How to chisel wood

Chiseling wood is a process that involves removing small pieces of material from a larger piece of wood with a sharp tool. This can be done for a variety of reasons, such as creating a desired shape or size, or to remove any imperfections in the wood. In order to chisel wood effectively, you need to have the proper tools and know how to use them correctly.
The first step is to select the right chisel for the job. There are many different sizes and types of chisels available, so it’s important to choose one that is appropriate for the task at hand. For example, if you’re working with a very hard piece of wood, you’ll need a chisel with a sharp, durable blade. If you’re working with a softer piece of wood, however, you can use a chisel with a less sharp blade.
Next, you need to prepare your work area. Chiseling wood can create a lot of dust, so it’s important to wear protective clothing and eye gear. You should also cover any nearby surfaces that you don’t want to get dirty or damaged.
Once you’re ready to start chiseling, it’s important to use the right technique. For best results, hold the chisel in your dominant hand and use your other hand to apply pressure to the top of the blade. Apply a steady, even pressure as you push the chisel into the wood. As you do so, angle the chisel slightly so that it’s cutting into the wood at a slight angle. This will help to prevent the blade from getting stuck.
Continue applying pressure and angling the chisel until you’ve cut through the entire piece of wood. When you’re finished, use a sandpaper to smooth out any rough edges. With practice, you’ll get better at using a chisel and will be able to create precise, professional-looking results.
Now that you know how to chisel wood, you can put your skills to use on a variety of projects. Chiseling can be used to create decorative details, remove imperfections, or simply to make a piece of wood the right size or shape for your needs. Experiment with different techniques and tools to find the ones that work best for you. With a little practice, you’ll be able to create beautiful, handmade pieces that are sure to impress.
Choose the right chisel for the job
Chisels are tools used for cutting and shaping wood. There are many different types of chisels, each designed for a specific purpose. In order to get the most out of your chisel, it is important to choose the right one for the job.
There are three main factors to consider when choosing a chisel: the type of wood you will be working with, the thickness of the wood, and the desired finish. Chisels come in a variety of shapes and sizes, so there is sure to be one that fits your needs.
In general, there are three types of chisels: carving, paring, and mortising. Carving chisels are best for soft woods like pine or cedar. They have a curved blade that is ideal for removing large amounts of material quickly. Paring chisels are best for hardwoods like oak or maple. They have a straight blade that is perfect for precision work. Mortising chisels are designed specifically for mortises – holes cut into the edge of a piece of wood to accept another piece – and should only be used with a mallet or hammer.
The thickness of the wood will also dictate the type of chisel you use. For thinner pieces of wood, a thinner chisel is better. Thicker pieces of wood require a thicker chisel. The desired finish is also important to consider. If you want a smooth finish, look for a chisel with a sharp blade. For a rougher finish, go for a chisel with a blunt blade.
No matter what project you are working on, there is a chisel that is perfect for the job. By taking the time to choose the right one, you can ensure that your project turns out exactly as you envisioned it.
Find the correct striking tool
When it comes to chiseling wood, the type of tool you use is key. Different tools are designed for different purposes, and using the wrong one can lead to frustration and poor results.
The most common striking tool for chiseling wood is a hammer. However, there are several other types of hammers that can be used depending on the job at hand. For instance, a ball-peen hammer has a round head that is good for shaping metal, while a claw hammer has two flat ends and is perfect for pulling nails out of wood.
Another option is a mallet, which is made from rubber or leather and has a smooth head. Mallets are often used in carpentry when you need more precision than you can get with a hammer. They’re also great for driving screws into hard surfaces like concrete.
If you’re working with very delicate material, you may need to use a chisel and punch set. This tool has a long, thin shaft with a small head that is perfect for creating detailed designs.
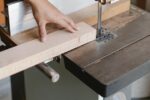
Apply pressure to the chisel with your hand
Woodworking is a popular hobby, and for good reason. It’s a great way to relax and get some creative satisfaction from making something with your own hands. But it can also be challenging, especially if you’re new to the hobby. One of the most important things to learn is how to use a chisel effectively. In this post, we’ll show you how to do that.
First, it’s important to understand the different parts of a chisel. The blade is the sharp part that does the cutting, and the handle is what you hold on to. The ferrule is the metal part that joins the blade and handle together.
There are two main ways to hold a chisel: with your fingers wrapped around the handle, or with your hand resting on top of the blade. For most people, the latter is more comfortable and gives you more control.
Now that you know how to hold a chisel, let’s talk about how to use it. When you’re starting out, it’s best to practice on some scrap wood before tackling a project. That way, you can get a feel for how much pressure to apply.
If you’re right-handed, start by holding the chisel in your right hand and resting your left hand on the wood. Apply pressure to the chisel with your right hand, and use your left hand to guide it along the wood. Remember to keep the blade at a 90-degree angle to the surface of the wood.
If you’re left-handed, hold the chisel in your left hand and rest your right hand on the wood. Again, apply pressure with your left hand and use your right hand to guide the chisel.
As you get more comfortable using a chisel, you’ll be able to apply more pressure. Just be careful not to apply too much pressure, or you could end up breaking the blade.
With practice, you’ll be able to use a chisel to create all sorts of woodworking projects. So get out there and start practicing!
Use a mallet to strike the chisel (optional)
When it comes to woodworking, there are a few basic tools that you need in order to get started. Chief among these is the chisel. Chisels come in a variety of shapes and sizes, but all do essentially the same job: they allow you to cut away small pieces of wood in a controlled manner. In this post, we’ll show you how to use a chisel safely and effectively.
First, you’ll need to gather a few supplies. In addition to the chisel itself, you’ll need a sharpening stone, a honing guide, and some sort of lubricant ( either water or oil will do). You’ll also need a piece of wood to practice on – we recommend using a scrap piece of 2×4.
When you’re ready to get started, begin by sharpening your chisel on the sharpening stone. Use long, even strokes, and be sure to keep the chisel at a consistent angle. Next, attach the honing guide to the stone according to the manufacturer’s instructions. This will help you keep the chisel at the correct angle as you sharpen it.
Once your chisel is sharp, it’s time to start using it. Begin by finding a piece of wood that you want to practice on. If you’re working with a larger piece of lumber, it’s a good idea to mark out the area that you want to remove with a pencil first. This will help you stay on track and avoid accidentally removing too much wood.
Next, position the chisel at the edge of the piece of wood, with the beveled edge facing inwards. Apply gentle pressure to the chisel as you begin to cut into the wood. As you get deeper into the cut, you can increase the amount of pressure that you’re applying.
Once you’ve cut away the piece of wood that you wanted to remove, you can use the chisel to smooth out the edges of the cut. To do this, simply turn the chisel over so that the beveled edge is facing outwards. then, lightly run the chisel along the edges of the cut, using gentle pressure.
Cut along the desired line
When you’re trying to chisel wood, it’s important to remember the basic rules. In order to get the best results, you need to make sure that you’re cutting along the desired line. If you’re not careful, you might end up with a botched job and a lot of wasted wood. By following these simple tips, however, you can make sure that your chiseling goes as smoothly as possible.
Sand down rough edges
Woodworking is a great hobby for people who love to be creative and use their hands. It can also be a very therapeutic experience, as it allows you to focus on the task at hand and clear your mind of all distractions. In this blog post, we will discuss how to chisel wood.
<= The first step in chiseling wood is to sand down any rough edges. This will help ensure that your cuts are smooth and accurate. You can use a variety of sanding tools, depending on the size and shape of the piece of wood you are working with.
<= The next step is to identify the area you want to cut. You should always cut away from your body, so make sure you have plenty of space behind the piece of wood you are working on. Once you have identified the desired cutting area, hold the chisel firmly in place with one hand and use your other hand to strike it with a hammer. Be sure to apply equal pressure on both sides of the chisel so that it cuts evenly into the wood.
<= Continue striking the chisel until it breaks through the surface of the wood. Then, twist it slightly in order to remove the chip of wood from the surface.
<= Repeat these steps until you have achieved the desired results. Remember to take your time and be careful, as chiseling wood can be dangerous if done improperly. With a little practice, you will be able to create beautiful works of art using this simple technique. Thanks for reading!
Sanding down rough edges is the first step in chiseling wood. This will help ensure that your cuts are smooth and accurate. You can use a variety of sanding tools, depending on the size and shape of the piece of wood you are working with.<=
How to chisel wood
Woodworking can be a fun and satisfying hobby, but it takes practice to learn the proper techniques. In this article, we’ve shown you how to chisel wood using three simple steps. With a little bit of patience and practice, you should be able to start creating beautiful pieces of furniture or other wooden objects in no time!