How to cure wood

It’s a familiar scenario: you’ve just finished building a new piece of furniture, or maybe you’re restoring an old one. You sand it down, apply the finish, and…it doesn’t quite look right. The wood seems too shiny, or not shiny enough, or the color is off. What went wrong?
The answer may be that you didn’t cure the wood properly before applying the finish. Curing wood is a process that helps it to absorb and retain finishes better, which in turn results in a more attractive and durable piece of furniture. In this article, we’ll show you how to cure wood properly so that your projects look great and last for years.
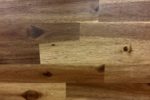
The first step in curing wood is to choose the right type of wood for your project. If you’re building something that will be exposed to moisture, like a bathroom vanity, then you’ll want to use a harder wood like oak or maple. Softer woods like pine are more susceptible to damage from water and humidity.
Once you’ve selected the right type of wood, the next step is to prepare it for finishing. This means sanding it down smooth so that the finish can be applied evenly. You’ll also want to remove any dust or debris from the surface of the wood before proceeding.
After the sanding is complete, it’s time to apply the finish. This can be done with a brush, a sprayer, or a cloth. If you’re using a brush, be sure to use long, even strokes in the same direction. Once the finish is applied, allow it to dry completely before moving on to the next step.
The final step in curing wood is to apply a topcoat. This will protect the finish from scratches and everyday wear and tear. It also adds an extra layer of shine, which can make your furniture look even more beautiful. Apply the topcoat with a brush or a sprayer, and let it dry completely before using your newly finished piece of furniture.
With these simple steps, you can cure wood properly so that your projects looks great and last for years. So get out there and start building!
What is wood curing and why is it important?
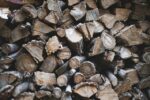
Wood curing is the process of drying and hardening lumber before it is used in construction. This process is important because it helps to prevent the lumber from warping, shrinking, or otherwise becoming misshapen once it has been put into use. There are several different methods of wood curing, each with its own advantages and disadvantages.
The different methods of wood curing.
There are several different methods of wood curing, each with its own advantages and disadvantages. The most common methods are kiln drying, air drying, and sun drying.
Kiln drying is the most common method of wood curing. This method involves placing the lumber in a large oven-like structure called a kiln and heating it to a temperature that is high enough to remove the moisture from the wood.
Air drying is a slower process than kiln drying, but it is less likely to cause damage to the lumber. This method involves stacking the lumber in a well-ventilated area and allowing it to dry naturally over a period of several weeks or months.
Sun drying is the quickest way to dry lumber, but it is also the most likely to cause damage to the wood. This method involves placing the lumber in direct sunlight for a period of time.
The benefits of wood curing.
The main benefit of wood curing is that it helps to prevent the lumber from warping, shrinking, or otherwise becoming misshapen once it has been put into use. This process is also important for preventing the growth of mold and mildew on the lumber.
How to cure wood using a kiln.
Kiln drying is the most common method of wood curing. This method involves placing the lumber in a large oven-like structure called a kiln and heating it to a temperature that is high enough to remove the moisture from the wood.
How to cure wood using a smoker.
Smoking lumber is another method of wood curing. This method involves placing the lumber in a large smoker and subjecting it to smoke for a period of time. This process helps to remove the moisture from the wood and also gives it a unique flavor.
How to cure wood using an oven.
Oven drying is another method of wood curing. This method involves placing the lumber in an oven and heating it to a temperature that is high enough to remove the moisture from the wood.
How to cure wood using a stove.
Stove drying is another method of wood curing. This method involves placing the lumber on a stove and heating it to a temperature that is high enough to remove the moisture from the wood.
How to cure wood using the sun.
Sun drying is the quickest way to dry lumber, but it is also the most likely to cause damage to the wood. This method involves placing the lumber in direct sunlight for a period of time.
How to store cured wood.
Once the lumber has been cured, it is important to store it in a cool, dry place. This will help to prevent the wood from warping or shrinking.
Troubleshooting tips for curing wood.
If the lumber is not drying properly, it is important to check the humidity levels in the kiln, smoker, oven, or other drying area. The ideal humidity level for drying lumber is between 20 and 30%.
It is also important to monitor the temperature of the drying area. The ideal temperature for drying lumber is between 120 and 140 degrees Fahrenheit.
If the humidity levels are too high or the temperature is too low, it will take longer for the lumber to dry properly.
How to cure wood
Wood needs to be cured properly before it is used in construction or other applications. The purpose of this article was to provide a guide on how to cure wood. We have outlined the steps necessary to ensure that the wood is properly treated and protected from the elements.
1. Cut the lumber into the desired size and shape.
2. Place the lumber in a kiln or an oven set to between 110-130 degrees Fahrenheit.
3. circulated air around the wood for four to six weeks, depending on the moisture content of the wood.
4. Remove the lumber from the kiln or oven and allow it to air dry for two weeks.
5. Store the lumber in a cool, dry place until it is ready to be used.