How To Cut A Straight Line With A Jigsaw

Ah, jigsaw puzzles, they’re an age-old passion. I’m sure all of you at home are just itching to get your hands on one. Well I’m here to tell you how to cut a straight line with a jigsaw, and can actually be quite fun!
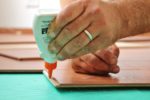
First things first, you’ll need a few supplies. Word to the wise, the better quality the supplies you have the better results you’ll have. You’ll need a jigsaw, a jigsaw blade, clamps and a straight edge. Optionally, you may wish to have some safety glasses, ear protection, and a dust mask, just to be safe.
Once you’ve got the supplies, it’s time to set up your jigsaw. Make sure that you install the blade according to the manufacturer’s instructions, and pay attention to the placement of the blade. Make sure that the teeth of the blade are pointed away from you and that it’s secure.
Next, place your material on a flat surface. Using a clamp is important here. It’ll help to keep the material steady and prevent it from moving mid-cut.
Once your material is secure, measure and draw your line. Use a straight edge to make sure the line is straight, and make sure it’s the width that you want it. Drawing is the most important part of the process, so take your time here, the result depends on it.
Once your line is drawn, it’s time to adjust the blade penetration. This can be done by adjusting the blade speed, the blade angle, or the blade length. Make sure to do this slowly, as this will determine how deep the blade will cut.
Knowing that your blade is ready, it’s time to guide your jigsaw along the line. Make sure to keep the saw steady, follow the line and keep tension on the blade. Press gently and maintain a steady pressure, this will make sure the line stays straight.
Once your line is almost finished, finish it off by slowing the jigsaw down to guide it to the end of the line. This will ensure a nice, natural finish.
Finally, here’s some safety tips for when your using your jigsaw: always make sure that the blade is securely installed, keep an eye on the blade at all times, and make sure to wear safety gear like goggles, ear protection and a dust mask.
If you run into any trouble, some troubleshooting advice is to make sure to have a sharp blade, adjust the blade penetration and carefully draw a straight line that follows your desired route.
And there you have it! Now you know how to cut a straight line with a jigsaw in just a few easy steps. Get ready to make beautiful jigsaw designs!
Supplies You’ll Need
OK, so you wanna know what supplies you’ll need for cutting a straight line with a jigsaw? Well first of all, you’ll obviously need a jigsaw! I mean, not to be too obvious, but it would be kinda hard to do it without the jigsaw, right? You’ll also want to make sure you have a regular saw blade. Not a fancy one, just a regular blade because those are what are best for straight cuts. Also don’t forget to grab something to measure with. It doesn’t need to be a fancy tape measure—a yardstick will do just fine.
Oh, and you may also want to get safety goggles because wood chips and sawdust can really fly when you’re using a jigsaw. Last but not least, you’ll need a straight edge to lay the jigsaw on top of. A level or a screwdriver set at a slight angle should work for this—anything that’ll help keep the jigsaw steady along the straight line you’re trying to cut.
And that’s it! Grab all these supplies and you’ll be good to go on your jigsaw cutting extravaganza. So get ready to make some straight cuts with your jigsaw and if you get stuck, don’t worry. I’ll be here to help!
Set Up Your Jigsaw
First things first – you have to set up your jigsaw. This is probably one of the most important steps. If you don’t do this right, you’re liable to end up with jigsaw pieces that are not quite straight. And that’s definitely not what you want.
So let’s start by putting your jigsaw on the table. Make sure that it’s firmly secured before you start using it. Next, make sure that you have the right blade for the job. Different blades will cut different things and it’s important to pick one that’s going to be able to cut through whatever material you’re working with.
Next, attach the blade to your jigsaw. This is actually pretty easy – all you have to do is line up the two pins, and then push the blade into place. Once it clicks, you know that it’s secure and ready to go.
Now it’s time to plug in your jigsaw. This is pretty self-explanatory, but make sure that the cord is firmly attached to both the jigsaw and the outlet before you start. The last thing you want is for it to come unplugged while you’re in the middle of cutting.
Finally, turn on your jigsaw. Most jigsaws have a power switch on the side, although some models may have a button on the top. Double check to make sure that the jigsaw is on and running before you move on to the next step.
Now that you have your setup complete, you’re ready to start cutting with your jigsaw. Just make sure that you’ve got all the right supplies and that your jigsaw is running the way it’s supposed to. After all, the last thing you want is to end up with a line that isn’t as straight as you’d like it to be!
Place Your Material
Alright folks, let’s talk about step two: placing your material. This is where the magic starts to happen, so listen up.
Start off by getting yourself a nice stable surface. You don’t want to have a wobbly surface or else you’ll have an even wobblier line. So, get a nice sturdy surface. A workbench should do just nicely.
Now it’s time to place your material. It really depends on what type of material you’re using if you want to use clamps or if you want to use a hold-down. Some materials may require both. Just make sure your material is secure and won’t move while you’re cutting.
Make sure you are a considerate cutter. Your material may be delicate and you don’t want it to break while cutting. Take your time and make sure you are being precise. If your material is thick, you may want to pre-cut it before you finish the straight line. That way it won’t break while you’re cutting.
Now you’re ready to move on to the next step. So, keep on listening for the next part!
Measure and Draw Your Line
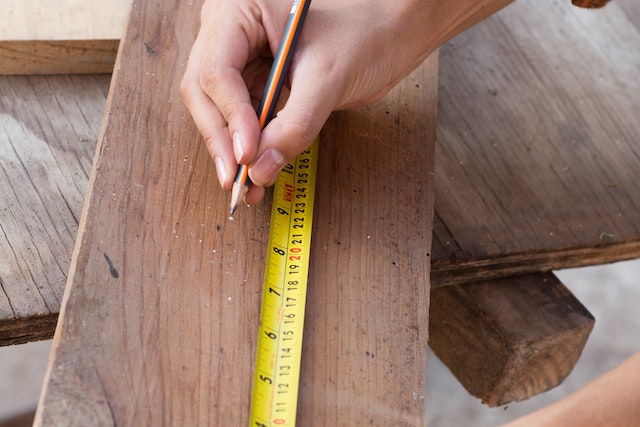
Good mornin’ everyone! It’s time to get our hands dirty, so let’s get to cutting. In Step 3 of our journey for the perfect cut, we measure and draw our line.
This step is important as it sets the foundation for the rest of the cut. It’s like Mark Twain said “Measure twice, cut once.” If you measure wrong, you’ll have to start over. Plus, it takes time, and you don’t want to cut into material that you’ve already cut! So let’s measure right.
Start by measuring the dimensions of the material you plan to cut and mark the appropriate points. If you’re cutting a square, make sure you get the angles right! You wanna make sure everything lines up in the end. When marking straight lines, use a ruler and sharp pencil to ensure accuracy. A basic ruler is just fine – no need to bring out the big guns yet!
Once that’s all marked, use a straight edge and fine-tip marker to draw your line. This is the actual line you’ll use for cutting. Make sure you draw this line nice and straight. To make sure everything lines up with the rest of your material, mark every intersection with a pencil.
And that’s it for this part. Now we move on to the more fun stuff – actually cutting the line! This will be the most challenging part of the cut, so make sure you pay attention to the next steps. See you soon!
Adjust the Blade Penetration
All right, so if you’ve followed the steps so far, you’re now ready to adjust the blade penetration of your jigsaw. Now, you want to make sure the blade penetrates the material in just the right way, because that’s what’ll ensure you get a nice, straight line out of it at the end.
Now, before you do anything else, let’s talk safety. Make sure your fingers (and toes, for that matter) have been removed from the area. Nothing good ever comes from leaving body parts near jigsaws. You never know when the blade might slip and send something flying. Keep your body parts at a safe distance.
Now, most jigsaws let you adjust the blade penetration before you start cutting. This is great; it means you don’t have to guess about how deep the blade will go. Just take your time and adjust the setting till it’s just right. Once it’s in place, you’ll get a nice, smooth cut from the jigsaw with minimal effort.
But if your jigsaw doesn’t have a depth control, don’t worry. You can still set the blade penetration using your hands. Simply hold the saw firmly and press it against the material in the right spot until it cuts through the material. Make sure to press down with just the right amount of pressure, not too much, but not too little either.
When done right, you’ll notice the blade will penetrate the material just the right amount. Don’t be afraid to test it out and make a few practice cuts. Once you’ve got the blade penetration set just the way you like it – that’s when you can start cutting your straight line.
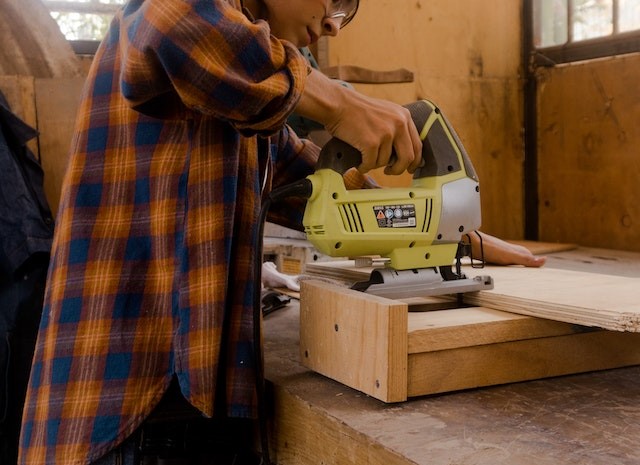
Guide Along the Line
Alrighty then, let’s move on to Step 5, the real nitty gritty of cutting the line. Getting your saw in the right spot is a crucial part of the process and I can’t emphasize it enough. If you don’t do this right, you’re gonna have a pretty wonky cut at the end. So, let’s not let that happen.
Firstly, take a look at your jigsaw. All jigsaws have a blade guard on them, trust me, you want to keep it on! Some jigsaws also have a dust blower, which is great for keeping the cut line clean and visible.
Now that you’ve got your set up just the way you want it, it’s time to start guiding the saw along the line. Before you start cutting, check the position of the blade relative to the line. You want to be sure you are cutting the line as precisely as possible.
Now here’s the important part: Guide the saw along the line, don’t push. If you push or try to force it past the line, you could cause the saw to jump out of the cut and ruin your line. Take it slow and steady, that’s the key.
Keep the saw moving along the line. It’s natural to try to go faster, but don’t do it until you get a feel for it. You don’t want to mess up the line. Don’t be afraid to stop and check the line periodically. It’s much better to take the time and make sure you’re on course than to rush and mess it up.
Finally, when you get to the end of the cut, guide the saw through the end of the line. Slow and steady wins the race, remember that. When you’re finished, make sure to turn off the saw and let it cool off before you put it away.
And there you have it – step 5 in cutting a straight line with a jigsaw. It’s a simple step but it’s critical to getting the perfect cut. Take your time and you’ll be sure to get the best results. Now go out there and show that line who’s boss!
Finish Cutting the Line
Alright everybody, we’re in the home stretch! Step 6 is all about finishing up the job and cutting the straight line. Now when you’re going forward and cutting this line, you want to make sure you’re taking your time. Don’t be rushin’ through it, so you don’t mess it up.
Take your time and go slow. Now here’s the deal, if you feel the jigsaw is pushing your material, don’t immediately adjust the blade penetration again. This might be natural depending on the material you’re cutting on — don’t be scared. All you gotta do is take it a bit slow and follow closely with the marked line. Eventually the blade will start to gain momentum and you won’t have to push it as much.
At this point it’s important to make sure your fingers are far away from the blade — I need y’all to be careful. While going forward, don’t press down too hard on the material, just let the jigsaw do the work. Too much pressure can cause inaccuracy and your straight line may start to waver.
Now, when you reach the end of the line, it’s time to turn off the jigsaw. Be sure to slow down as you approach the end so the blade isn’t whip-lashing around when you turn it off. Once you turn off the jigsaw start inspecting your line to make sure the straightness you’d envisioned came through. Make sure to check the material while the blade is still in place in case you did not cut straight. If it isn’t, no big deal, just try again paying extra attention to the blade penetration, pressure and grip.
Well there you have it folks. Step 6 of our How to Cut a Straight Line with a Jigsaw tutorial is complete. Now get out there and start making straight lines with a jigsaw!
Safety Tips
When it comes to using a jigsaw and cutting a straight line, safety is the top priority. While learning how to use a jigsaw may seem intimidating, following the safety guidelines will help avoid any major accidents or injury. Here are some safety tips that should be kept in mind while working with a jigsaw:
1. Always wear the right protective gear
No matter how experienced you are when it comes to using power tools, it is important to make sure you are wearing the right protective gear when handling a jigsaw. This includes wearing protective glasses, ear defenders, and dusk masks. This will protect you from any debris that may fly off while you’re cutting and help keep you safe.
2. Clamp down your material
When cutting with your jigsaw, make sure to secure the material with either clamps or a screw-down vice. This will help prevent your material from moving or shifting, which could otherwise lead to an unexpected failure.
3.Use the right blade for the job
It is important to use the correct blade for the job. A jigsaw requires a specialized type of blade designed for cutting curves and edges. Make sure to get the right blade for the job to ensure the best performance of your jigsaw.
4. Maintain your jigsaw
Another safety tip when using a jigsaw is to make sure you are performing regular maintenance on the tool. Make sure to check the tension in the blade, the power cord, and keep the blade clean. This will help ensure the jigsaw is working efficiently, free of any dust or debris. Performing regular maintenance will prevent any major issues and accidents while cutting.
5. Unplug the jigsaw while changing the blade
A major safety hazard while working with a jigsaw is accidentally pressing the power switch while changing the blade. To prevent this, make sure to unplug the jigsaw before changing the blade or make other adjustments.
No matter the project, following these safety tips will help keep you safe while using a jigsaw. As long as you follow the safety guidelines and use the right protective gear, cutting a straight line with a jigsaw should be a breeze.
Troubleshooting

Oh boy, troubleshooting. The moment when you finally realize your project isn’t going so well after all the hard work of cutting a straight line with a jigsaw! But don’t worry, there are plenty of easy and simple fixes if you’re finding yourself in a pickle.
If your jigsaw seems to be stalling while making long cuts, start by inspecting the blade. You may need to replace the blade if it has become dull or bent, as these issues can impede your progress. Another possible cause of stalling is the saw isn’t sinking enough into the material, which can be remedied by adjusting the blade penetration.
If the line you cut isn’t completely straight, don’t panic! The simplest solution to this problem is to try the same cuts again and make sure the saw is firmly in place before you start. You may also want to adjust the blade in relation to your line, so that it follows the line more carefully. Another option is to use a guide rail, which will help you keep your saw on the line and allow for more accurate cuts.
Sometimes the jigsaw can leave behind splinters or erratic woodgrain patterns. These issues can generally be remedied with some light sanding. Sanding and removing any leftover splinters will help create a smoother finish, while also eliminating any raised areas and sharp edges.
Finally, if your jigsaw seems to be vibrating under certain conditions, check to make sure there isn’t any debris built up around the blade. Loose pieces of sawdust and other debris can be troublesome and can cause excessive vibration. Cleaning the saw out should solve the issue, but if the problem persists, it may be time to take your saw in for servicing.
All in all, troubleshooting with a jigsaw is usually pretty straightforward and easy to do. Just keep calm and take the necessary steps to get your project back on track. With a bit of practice and some basic tips, you’ll be back to cutting straight lines in no time.