How To Make A Perfect Woodworking Jig For Your Project
A woodworking jig is a valuable tool that helps you to make precise and accurate cuts, drill holes, and shape wood pieces to the exact size and shape you need for your project. Whether you’re a beginner or an experienced woodworker, a well-made jig can save you time and frustration, and help you to achieve professional-looking results.
In this article, we’ll show you step-by-step how to make a perfect woodworking jig for your project. We’ll cover everything you need to know, from selecting the right materials, to designing and building a jig that suits your specific needs.
With our easy-to-follow instructions, you’ll be able to make a jig that will help you to achieve perfect cuts and shapes every time. So, let’s dive into the world of jigs and discover how to make a perfect woodworking jig for your next project!
Introduction to Woodworking Jigs
Hey guys, how you doing? I’m here today to tell you about the most exciting way to make your woodworking projects come to life – woodworking jigs!
We all know that woodworking requires precision and accuracy, but who has the time or money to buy all the expensive gear? Well, that’s where woodworking jigs come in. Whether you’re making furniture, cabinets, toys, or other woodworking projects, a jig can take your project to the next level and make it look like it was made by a pro.
So what exactly is a woodworking jig? A jig is a type of tool that helps guide your saw, router, or other power tools to ensure that you get a consistent and accurate cut. A common type of jig is the miter saw jig, which helps you get consistent, perfect miter cuts on boards and trim. Another popular jig is the tablesaw jig, which helps you make perfect crosscut and rip cuts on larger boards.
But maybe you don’t want to buy expensive jigs? That’s where the beauty of woodworking jigs really shines. Woodworking jigs are extremely versatile and easy to make, so that you can customize them to fit your project exactly. And, depending on the jig you’re making, you can use materials you already have or items can buy from the hardware store.
So why should you even bother with jigs? For starters, when you cut with a jig, the work is much easier, faster, and more accurate. Your project will look much nicer and hold together better than if you were to try and take measurements and make cuts with a ruler. With jigs, you can make even cuts with straight edges and perfectly rounded corners.
Plus, when you make your own jigs, they cost much less than pre-made ones. And plus, you can get more creative with the design and have the chance to customize it to fit the exact measurements of your project.
And that’s just the tip of the iceberg when it comes to woodworking jigs. So, stay tuned for the next installment, where I’ll be teaching you how to assemble your own jig from scrap materials! Until then, good luck with your woodworking projects and make sure to measure twice and cut once!
What is a Woodworking Jig
Welcome to the wonderful world of woodworking jigs! You’ve probably heard the old saying “If you want something done right, you have to do it yourself.” Well, many woodworkers take that to mean that when it comes to any project, using a jig is the way to go. But you might be asking yourself, “What exactly is an ‘woodworking jig’?”
Well, allow me to explain. A woodworking jig is a handy device that holds, supports and guides a piece of wood throughout the process of making a project. It can be as simple or complex as you make it. This can include locating dowels on a board or precisely cutting a pattern on a board or anything else you can imagine. The best thing about using a jig is that you can custom-design it for any specific task.
The world of woodworking jigs is immense. Every woodworker has their own style of jig and there is no one size fits all when it comes to these genius devices. Jigs can be made from just about any material, such as wood, metal, plastic, or even Styrofoam. You just need to find the material that works best for your project and then craft the jig accordingly.
To construct a jig, you will need to measure the material you are using as well as the cuts you will be making. Once you measure, mark, and cut the material you are ready to assemble the jig. This can involve straightforward tasks like simply joining two pieces of wood together with a few screws, or it can involve some creative problem solving.
That is just a basic overview of what woodworking jigs are and how they are used. For simple projects, a jig could be something simple as cutting a board in a certain way. For more complex projects, a jig could help you shape a winding shape, create a complicated joint, or even duplicate a complicated shape.
No matter what project you have, the use of a jig can help you save time, help you be more accurate, and generally do a better job. Jigs are incredibly useful and can really make a difference to your projects. In the next section, we’ll discuss how to assemble and use a woodworking jig for your next project.
Benefits of a Woodworking Jig
When it comes to woodworking projects, a jig can make all the difference between a job well done and a mess. A woodworking jig, if you don’t already know, is a device that helps secure and guide materials to help keep your cuts and measurements accurate.
The great thing about a jig, specifically a woodworking jig, is that it can make precise and repeatable cuts. That’s right, one jig can be used over and over again in multiple projects, as long as you can keep track of the specific measurements you need to make. That’s a great time-saver. Not having to redo cuts or measurements will save you a lot of time.
Another great benefit is that a woodworking jig helps you be more accurate in your cuts and measurements. This is great news. A jig allows you to make cuts and measurements that are straight, even, and precise. No more guessing at a cut or calculation.
Last but not least, a jig can help free your hands up for cutting and other tasks. That’s right, you don’t have to hold the material in place for hours at a time. With a jig, you just attach it to the board that you are working with and let it do the work. So not only can you have a perfectly precise cut or measurement, but you can also have your hands free to do other tasks.
So there you have it. A woodworking jig can help you save time, be accurate, and free your hands. With a jig, you’ll be able to craft those perfect projects in no time.
Assembling Your Woodworking Jig
If you’re like me, you find assembling stuff incredibly tedious. But, that’s okay, because I’m here to make assembling your woodworking jig a snap!
First, you need to gather your supplies. Of course, you’ll need wood. That’s a given. And, to make sure your jig comes out looking just the way you want, make sure to find the best wood you can. Next, grab the joints and other components for a nice, professional look. Now, you’re ready to design your jig.
Think about the purpose of your jig and how it should look. But, before you worry too much about the aesthetics, make sure your jig will do the job you need it to do. Your design should make your jig as solid and sturdy as possible. And, don’t forget to measure your cuts twice and actually measure the components of your jig to make sure everything fits correctly.
Once your design is done, you’re ready to let the sawdust fly! Cut your materials according to your plan, and make sure not to forget pieces here and there. This is the tedious part I mentioned earlier, but it’ll be worth it when your jig is complete! Now, it’s time to assemble your jig. This step requires patience and control, so take your time. Measure the joints, screw in the pieces, double check your measurements, and triple check if necessary. And, most importantly, make sure all the pieces line up correctly, so your jig is as solid as possible.
When you’re done, stand back and admire your work. You just built a woodworking jig! Now it’s time to move on to the next step.
Gather Your Supplies
If you think purchasing supplies to make your perfect jig is some sort of daunting task, think again! It’s easy-breezy and doesn’t even need you to leave your lounger. Depending on the measurements and size of the jig you’re creating, you’ll need to make sure you have the right materials to get the job done.
Hmm, let’s see. You need the basics like screws, nails and the like, but what else? Oh, of course, the wood. You can’t make a jig without it, right? Hardwoods are a great choice, especially oak. It’s not only durable, but also easy to find.
That’s not all: You’ll also need clamps to keep everything in place.Check how many holes you’ll be needing in your jig and make sure you have the exact number. These are important for the jig’s functionality.
While you’re gathering your supplies, make sure you’re not neglecting the tool side of things. A jig saw is an absolute must. You won’t be able to make clean accurate cuts otherwise. A drill and drill bits are also important, in order to make the necessary holes through your jiggie’s frame.
Wait, you thought that was all? Nuh-uh. You’re going to need a couple of sponges in order to sand off excess glue and any hard edges. Also, don’t forget to pick up a couple of wood screws to secure everything in place. And as a bonus, why not add a paintbrush to get that luxurious finish? Now that you’re ready with all the supplies, it’s time to get your woodworking game on! Ready? Go!
Design Your Jig
So you’ve decided to take on a woodworking project and you know you’ll need to create a jig to get the perfect results. As any experienced woodworker knows, the design of your jig will be the key to success when making cuts and shaping your pieces. Let’s dive into the nitty-gritty of designing your jig!
To begin, it’s important to understand exactly what kind of jig you’ll need. Will your jig be used to make one type of cut or many? How wide are the pieces you’ll be cutting? A little planning will go a long way in this step.
Once you’ve determined the purpose of your jig, it’s time to start designing. Start by sketching out a 2D drawing of your jig. You should include measurements and important details like the shape and size of your jig pieces and the type of jig hold-down you’ll use.
Don’t forget to go through your sketch a couple of times to find any flaws or inaccuracies. This can save you time and money in the long run. Once your jig is finally etched and cut, any little discrepancy can lead to a poorly made jig and a waste of material in the end.
Now it’s time to get creative! You might be tempted to go with a tried-and-true jig design, but why not challenge yourself to come up with something unique? This can be a great opportunity to practice beginner woodworking skills and hone that creative genius. Just remember to keep measurements accurate and jig parts strong and sturdy.
Once you’ve designed your jig, you can make a few modifications to improve it even further. You can apply a buddy system so that two or more pieces are attached together when using your jig. You can add extra supports or braces to increase the sturdiness of your jig. Or even optimize it with rubber feet that allow you to grip the surface below better and lessen vibrations.
Designing your jig is a very crucial step in your woodworking journey, and it’s one that should not be taken lightly. The more you plan and design, the better your results will be—so remember to take your time and get creative with it!
Cut Your Materials

Ayo! We’re gonna be learning how to cut the materials for your perfect little woodworkin’ jig project. First thing’s first: you gon’ need to get yourself some basics! Snatch up a good quality saw, some measuring supplies, protective gear and most importantly, a gumption to learn!
Once you got all your supplies gathered and the design blueprinted, you movin’ on to the first step in your woodworkin’ jig project: cuttin’ the materials. Now I know you might be feelin’ a bit overwhelmed about cuttin’ all those materials for the jig. With these kinda projects, accuracy is key, and if the measurements ain’t right, you’ll be wastin’ materials and your project’ll whip up on you.
When it comes to cuttin’ your materials, the trick is to measure twice and cut once. You gonna wanna measure the material’s exact length or width before cuttin’ ’em. Trust me, it’s worth it! If you never done this before, practice usin’ a measuring tape on scrap wood so you get the hang of it.
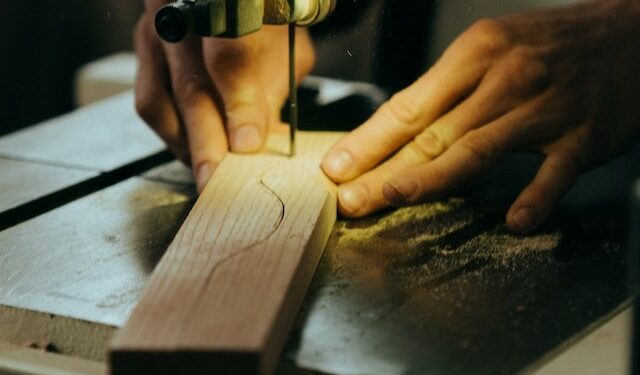
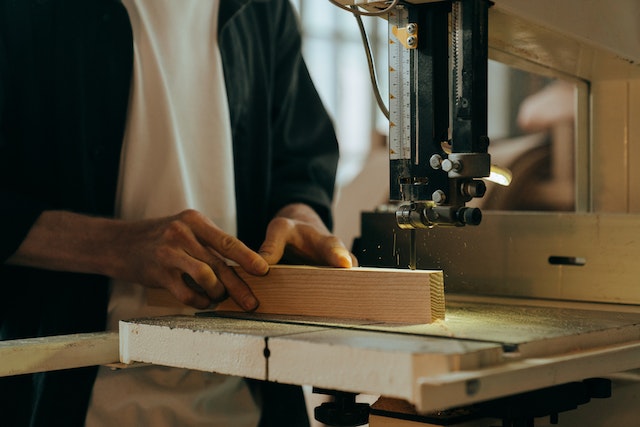
Once you got your measurements right, get choppin’! As far as tools, it’s best to stick to the basics like a standard saw, a band saw, or a jigsaw. But if you just wanna get the job done, a good ol’ coping saw can do the trick.
No matter what kinda saws you got, safety first is key! Make sure you workin’ in a large open space, wearin’ safety glasses and protective gear. Now, if you want to get real serious about it, you could pick up a table saw for more precise cuts. But if ya just new to the game, I recommend stickin’ with the regular saws!
And just like that, you on your way to gettin’ your materials cut for your woodworkin’ jig project. Now, onto finer details like shapin’ and sanding and finishin’ your jig – but we’ll get to that another time. Til’ then, good luck and have fun with your woodworkin’ projects!
Assemble Your Jig
Assembling a woodworking jig isn’t hard… if you’ve got yourself the right supplies and know a few tricks of the trade. That’s why I’m here! Now, if you want to get the job done like a pro, you gotta do it with the 3 Rs: Gather your supplies, design your jig, cut your materials. Then finally, it’s time to assemble your jig.
First things first – you’re going to need to gather the right tools for the job. Depending on your desired design, you may need a saw, hammer, drill, screws, nails, bolts, and various other bits and bobs. Once you’ve got all your supplies, it’s time to design your jig.
Figure out what your jig needs to do and draw up some diagrams to help you understand what you’re trying to build. Sketch out the size and shape of your jig, measure twice and cut once! Make sure you double-check all your measurements and numbers. You don’t want to cut a piece that’s too small or too big.
Now, it’s time to get hands on. Start cutting your materials to the sizes and shapes you’ve measured out. Depending on the tools you’ve got at your disposal, you may want to use a jigsaw, saw, circular saw, or combination square to cut your materials. Don’t be afraid to ask someone with more experience to guide you if you feel out of your depth.
Now that you’ve got everything cut, it’s time to assemble your jig. Here is where you can get creative. Get some bolts, screws, and nails to start attaching the pieces together. Don’t forget to pre-drill the holes if you’re going to be using wood screws, as that’ll make the job much easier. Slowly but surely your jig will start to take shape.
Once you’ve got it assembled, take some time to admire your handiwork. Congratulate yourself on a job well done and get ready for the next step on your journey. Don’t forget, measure twice and cut once! Now, it’s time to put the finishing touches to your jig.
Shaping Your Jig
Hey everyone! If you’re ready to take your woodworking project to the next level, the first thing you want to do is shape your woodworking jig. It’s one of the most important steps, and it’s one of the few steps that’s actually FUN!
Lucky for you, it’s not too complicated. The first rule of thumb when it comes to shaping your jig is ‘measure twice, cut once’. Don’t worry, you won’t have to pull out a ruler and start marking measurements like a mad scientist. Just take your time and make sure everything is to scale before you start cutting materials.
After you’re sure that your cuts will be the correct size and shape, it’s time to start sanding and finishing. This isn’t the most exciting part, but it’s a necessary one. Take your time here, use a fine grit sandpaper, and be sure to wear your safety goggles!
When it comes to the best practices, you’ll want to use a combination of guide blocks and clamps. This will ensure that your jig is level and secure. Make sure you take all of the necessary safety precautions and be sure to consult with your local Home Depot store for any additional tips or advice.
And there you have it! You’re now ready to start shaping your woodworking jig! With a little practice, you’ll be making jigs like a pro in no time. So sharpen those saws, tie your safety goggles, and let’s get started!
Measure Twice, Cut Once
When it comes to woodworking, the old saying of “measure twice, cut once” is something to seriously consider. After you’ve designed your woodworking jig and cut your materials, you’ll want to make sure that you take your time to obtain the best possible result. Taking the time to measure twice and make sure that you’re happy with your measurements will guarantee that your jig will fit perfectly and make your project successful.
When you measure twice, you’ll be able to ensure accuracy when cutting. A millimeter or two could make a huge difference in the finished product, which is why its so important to get those measurements right. With a jig saw or a circular saw, you’ll want to triple check your measurements before making your cut. And if you’re using a bandsaw, that measurement needs to be spot on, as these saws don’t make easy adjustments.
You may also want to consider marking your measurements twice. When cutting your materials, you’ll often rely on the markings to make sure that you’re confident in your cut. And as with measuring twice, making sure that you mark your measurements twice is key for accuracy. Drawing a few lines and arrows can help gain the necessary confidence to move forward with your project.
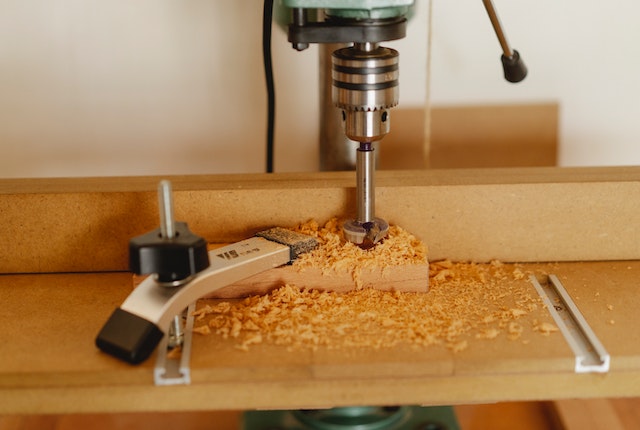
If you’re working with a drill press, it’s even more important to measure twice. As these presses use a vise to hold materials, the vise will eventually move, making the accuracy and precision of your jig unreliable. So make sure you check, double check, and triple check those measurements before drilling.
One last word of advice is to always keep safety in mind and wear proper safety gear. There have been too many instances of improper measuring and cutting leading to a disaster and dangerous accidents. So make sure you take the time to measure twice, cut once and always wear protective eyewear, gloves and a mask. You’ll be glad you did!
Sanding and Finishing
When your woodworking jig is cut and put together, the little nooks and crannies that remain need to be taken care of. You must get down to the sanding and finishing phase of the project.
Before diving in head-first, you must determine the type of finish you want on your jig. Do you want an easy to clean surface? That’s when a glossy finish comes into play. Are you after an antique look? Then you want to use a more matte finish.
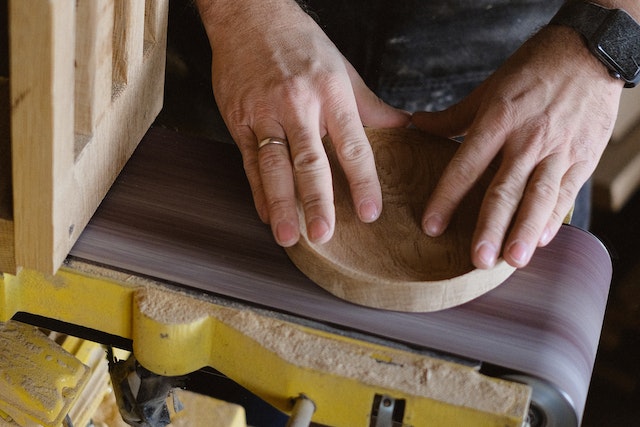
Once you determine which finish you want, it’s time to get to work. Start by using a medium-grit sandpaper to smooth out any rough spots. Work in small circles, focusing on the corners and edges of the jig. You want your cuts to be even and the finish to be ultra-smooth.
Once you’ve done your initial sanding, switch to a high-grit sandpaper for finer details. be steady and take your time, making sure you get every nook and cranny.
Be careful not to sand too far or you will risk taking off too much material and making your jig too uneven!
Another crucial step in the sanding and finishing process is to use a wood-finishing liquid. This step will make the surface of your woodwork pliable and resistant to dents and scratches. Apply the liquid with an old, soft cloth and make sure the liquid is evenly spread on the jig.
Once your jig is sanded and the finishing liquid is applied, you need to buff. Buffing will give your jig that extra bit of shine and make it look spick-and-span. To really make your jig standout, consider using a wax to give it an even glossier finish.
There you have it. Sanding and finishing your woodworking jig may seem intimidating at first but it’s an essential part of the process to ensure that your jig lasts for years to come. Take your time and enjoy every step of building your jig! Who knows, you may come up with amazing projects to use it on in the future!
Best Practices
Best Practices when it comes to making a perfect woodworking jig. I’ve got some tried-and-true tips that I’ve learned by making a few doozies myself.
First and foremost, always measure twice and cut once. Preferably, you want to start with the right size, so metal rulers and wooden rulers work best. Never try to eyeball or guess how much material you need.
Second, use a sharp saw blade. You don’t want to be messing around with a dull blade that’s gonna take forever to cut through your material. If we’re talking about electronic jigs, make sure you use a brand that’s reliable.
Third, sand and finish. Sanding smooths your wood and finish adds a protective layer that helps keep it from getting damaged over time. Don’t forget to use a dust mask and safety glasses.
Four, when it comes time to clamp your materials for cutting, make sure the clamps you use are heavy-duty and won’t break under pressure. Nobody wants to get clamps off the shelf and then find out they’re not up to the task.
Fifth, and last, but not least, always wear safety goggles and wear protective gloves or mitts when doing any cutting or shaping with your jig. You don’t want any debris and sawdust flying up into your eyes or hands. Trust me, I’ve been there.
If you take these precautions, the perfect jig will someday be in your future, I promise you. It’s never easy, but it’s definitely worth it! So don’t give up, and you’ll be able to make your perfect woodworking jig!
Using Your Jig
Do you know what time it is? It’s time to start using your woodworking jig! Now you’be done the hard part, and now it’s time to reap the rewards. Follow these steps and you’ll have your project done in no time.
First, you’ll need to clamp your materials. Having secure materials is absolutely essential for getting accurate cuts. Take the time to make sure the clamps are tight and the materials won’t move, and double check before you proceed.
Next, you can begin making your cuts. How you do this will depend on the type of jig you’ve made. A tenon jig will use a router, while a dado jig might use a saw. Regardless, take your time and use steady, even strokes. Remember to stay level and don’t rush.
Finally, you want to be sure to give your newly made pieces the perfect finishing touches. A light sanding to remove any splinters can do the job. You may also want to apply a protective finish or a sealant to keep your project looking great.
Now that’s it! Your jig is all ready to use and you’re ready to make some awesome woodworking projects. Just remember to clean up afterwards. Not only will it make it easier to work with the next time, but it’ll also help keep your workshop looking neat and tidy.
So keep these tips in mind and you’ll have no problem making perfect woodworking jigs for any project. Happy woodworking!
Clamping Your Materials
Yo so, you’re ready to start clamping in your jig and gettin’ to workin’. An important thing to remember is that clamps are your friend! Clamps can be used to ensure a tight fit when assemble a jig and will help keep your pieces in place while you’re cutting. A good jig will have enough clamps for all your pieces so that none are left out in the cold.
When clamping, try to keep an even pressure across all clamps. If you put too much pressure on one, it might cause your pieces to warp and mess up your job. You also want to avoid binding the pieces together so much that you can’t move ’em at all.
The best kind of clamps will have rubber or plastic pieces on them to cover the surface of the wood; this will help protect the wood from dents and scratches. And definitely avoid using metal clamps or nails for clamping; those can leave ugly marks on the wood.
Also, if you want to use your jig frequently, think about getting clamps that are adjustable. Adjustable clamps give you more control over how tightly they’re clamped and make it easier to keep the pressure even and avoid damaging your wood.
Now that you’re clamped in, inspection time! Make sure all your pieces are lined up and look good before you start cutting. It always pays to take an extra second to double check that your pieces are securely clamped and everything is where it’s supposed to be when it comes to woodworking. Don’t skimp on the details or you’ll pay for it in the long run.
That’s it! Now you’re ready to get cuttin’. So remember, clamps are your friend, adjust ’em for even pressure, inspect for accuracy, and you’ll be good to go. Good luck!
Making Your Cuts
Making your cuts is an integral part of any woodworking jig. Without it, you’ve spent your time and energy creating something that won’t be able to do what you need it to do. That said, I’m always reminded of my old woodworking teacher, who used to say: measure twice, cut once!
When making your cuts, it’s important to make sure you’re using the right saw for the job. If you’re cutting a straight line, a circular saw will do the job nicely. If you need to make a curved cut, a jigsaw will be more useful, but you may end up with jagged edges. Furthermore, if you need to make a truly curved cut, a scroll saw just may be your best choice.
Now, if you’re serious about making the perfect cuts, you should invest in a good-quality miter saw. This tool is great for making accurate cross-cuts and miter joints. And, if you’re willing to spend a little extra, you can get a compound miter saw that can be used to make angled cuts.
Regardless of what saw you use, don’t forget about safety. Always wear safety glasses and consider using a respirator and dust mask when working with wood. If you’re using a power saw, be sure to turn the power switch off before making a cut, and never operate a saw without a push stick to keep your hands away from the cutting blade.
Above all else, be sure to take your time and make sure all your cuts are accurate. After all, a jig is only as good as the cuts you make when constructing it! With that in mind, all that’s left to do is to make the cuts, assemble your jig, and enjoy the fruits of your labor. Good luck and have fun!
Final Touches
Ah, the final touch! You did it, you made the perfect woodworking jig. Now you have this amazing tool to use on your projects, the envy of your fellow woodworkers.
When it comes to the final touches, think of it this way: if this jig was at a party, what would make it stand out? You got the colour – check. You got the design – check. Now add a little style!
Start by adding some labels or decorations to your jig. Not only will you know where everything goes, but your coworkers will be impressed by your attention to detail. You could even paint it up in different colours for different uses – that way when you need it, you know exactly what colour to grab for.
An extra finishing touch you could do is to add a nameplate or etching of your name on the jig. This ensures that if you’ve loaned it to someone, they will know who it belongs to. Plus, it just looks super professional!
You could also use this time to make sure the jig is well oiled and lubricated. This will help it last for a long time, looking its best for your projects for years to come.
Finally, if you’re feeling particularly fancy, you could always invest in a nice case to store your jig in. Not only will this keep it clean and safe, but it’s a great way to express your personality and really show off your newly made jig.
And there you have it – you’ve made the perfect woodworking jig. With a little effort and attention to detail, you’ve just created a beautiful and useful tool to bring your projects to life! Now get out there and impress the masses!