How To Cut Metal With A Saw
Hey there everyone, I’m here to show you all how to cut metal with a saw. You might be wondering why metal? Well, metal is great for making different types of structures, art, or furniture. It’s really great for projects that require a lot of strength and durability.
Now I’m sure you’ve all heard about the usual ways to cut metal with a saw but in this article, I’m going to show you some different methods that use a saw, and some tips on how to get the job done safely and effectively.
For starters, you’ll need a few supplies before you get started. You’ll need safety goggles, gloves, and a face mask, just in case you get scraped or splashed with metal particles. You’ll also need the right saw for the job. There are many to choose from, like circular saws, jigsaw, and reciprocating saws, to name a few.
You’ll also need a work table, preferably one that can clamp onto whatever item you’re working on. This will help to keep the metal in place while you make the cut. As you can tell, there are many things to take into consideration before you begin, so read on and I will tell you exactly what you’ll need and how to do it.
In this article, I’m going to cover how to mark the cut line, set up the saw, and choose the correct blade; how to use magnets, circulars saws, jigsaws and other tools to make the cut; and finally how to finish the cut so it looks nice and professional.
Materials needed
You know what they say: with the right tools and the right instructions, you can do anything! Well, in this case, you don’t wanna mess around. You need the right materials to cut metal with a saw.
First, you need to make sure you have eye protection. While some people might think that looking through a pair of goggles at a saw spinning around isn’t glamorous, your precious eyes aren’t worth taking risks with. Also, you need to make sure your hands are safe. While you want to show off your cut and impress the ladies, you don’t want to give them cold hands. So wear work gloves and keep the sappiness away.
Now, of course you need the saw! You can get just a simple hand saw or a power saw, like a circular saw, jigsaw, or a reciprocating saw. Then you will also need to get the right blade for whatever saw you are using- different saws take different blades, make sure you grab the right one!
In addition to your saw and blades, you will also need to grab some type of smoother or cleaner- otherwise known as a file. This will help you finish the edges and make sure that your cut is perfect- we all like perfect edges, don’t we?
The last thing you will need is a clamping device. These can attach pieces of metal to the cutting surface and ensure that the metal is held in place for a clean, uniform cut. When all of your materials are gathered, you should be ready to cut! Don’t forget your safety goggles, gloves, and file!
Set-up

Once you’ve gathered the materials you need, it’s time for the fun part—setting up for your metal cut! It’s like the beginning of a great adventure – the beginning of your journey to learning how to cut metal with a saw.
Let’s start with the cut line. When cutting metal, it’s important to mark exactly where you want the cut to be with a marker. You can also use measurements and a ruler to make sure your line is straight. If you’re really serious about getting a straight line, use an angle plate or a T-square to draw the line.
Now, you’ve gotta protect your work space. Metal bits can be pretty dangerous, so be sure to cover any nearby surfaces with a protective tarp or cloth. This will help stop any metal chips from flying over and possibly damaging something you don’t want damaged.
Next, it’s time to set up the saw. This is the important part. Different saws will have different ways of being set up (thank goodness Eddie Murphy isn’t making this article, otherwise we’d be here for a long-ass time). For example, with a circular saw, you’ll need to make sure your blade depth is set correctly so the blade isn’t too deep.
Finally, but very importantly, is choosing the correct blade for the type of metal you’re cutting. Luckily, there are a lot of metal-cutting blades on the market. The most important thing when choosing your the blade is the type of metal you’ll be cutting (aluminum, stainless steel, etc.). Check the manufacturer’s recommendations and choose the right one for your metal cut.
There you have it – setting up for metal cutting in a nutshell. So gather your materials, mark your cut line, protect your work space, set up your saw and choose the correct blade. That’s all you need before you start cutting. Now let’s get cutting!
Mark the Cut Line
What’s up everyone, it’s me here with an article about cutting metal with a saw. Before you start cutting your metal, you must first identify and mark the cut line. Now, what exactly is a cut line? Well, it’s a line you draw on the metal where you plan to make the cut. Pretty simple, right?
So let’s get started. The first step is to measure your metal to determine the length and width of the cut you need to make. After that, take your permanent marker or sharpie and use it to draw the cut line onto the metal, making sure that you are not accidentally going past your desired measurements.
Now, if the metal you are going to be working with is relatively thin, you can use a metal ruler to help keep your cut line square by lightly etching the metal in order to create a guide. But if you’re dealing with particularly thick metal, then it is best to use a professional metal saw guide. This will ensure that your cuts are straight and that your metal is perfectly shaped when finished.
Finally, if you are working with an oddly shaped metal or a metal with quite a few curves or bends, then use a pencil or a fine-tipped marker to draw the edges of your metal. With this method, you can accurately mark the exact lines where you will be making the cuts.
And there you have it – that’s the secret to creating a good cut line for your metal. So go ahead and follow these steps and you should be able to cut your metal like a pro in no time. Until next time, thanks for reading, and happy sawing!
Protect your Work Space
Lemme tell you sumthin’, protecting yo’ work space when you cuttin’ metal is important, you betta believe it! Trust me, it’s one of them steps that you don’t wanna mess up on.
Now if yer gonna be cutting metal in your garage, vacuum it out real good, and you might even want to cover the walls with cardboard or heavy plastic to prevent flying metal shavings from sticking all over yo’ walls and furniture. Make sure to block off any windows so them shavings don’t fly through.
In order to protect yo’ tools, tape up any areas near the saw that couldn’t take any heat or vibration. You don’t want that saw to go scratching up yo’ nice table or bench.
Once you set up the saw, make sure that you put down some kind of mat or rug so that it doesn’t slip or slide. Be sure to anchor the saw so that it stays in one place and don’t move around.
When yo’ ready to start cutting, position yo’self so that you can’t be hurt when them pieces go flyin’. Use safety glasses or goggles to protect your eyes and dudes, pleaseee, wrap yo’ ears up in some ear protection. If you mess up and cuttin’ goes wrong, you don’t want to hear yo’ ears ringing for days.
If you have a large project that requires you to do a lot of cutting on the same piece of metal, it would be a good idea to put the cut pieces in a container that can handle hot metal chunks and also contain them shavings.
Take yo’ time and prepare yo’ workspace and all your materials properly so that you can avoid any undesirable accidents. Clean up yo’ workspace and make sure it’s nice and safe for the next time that you wanna cut some metal. And try not to make a big mess, okay? I’m sure yo’ mama won’t like that.
Set Up the Saw
Alright y’all, let’s get down to business and set up that saw. You’ll need a few supplies before you get started. Most saws require oil, so make sure you’ve got that ready to go. This is also a great time to double check that all the bolts and screws are tightened and the saw isn’t going anywhere. If you’re not sure, I’d recommend going over the instruction manual or contacting the manufacturer before getting started.
Next step is making sure your blade is sharp and ready to go. If you don’t have a sharpening kit handy, you can usually purchase one from a home improvement store. Otherwise, you can take it to a professional for sharpening, which isn’t too expensive. Once your blade is ready to go, you’ll need to attach it to the saw. This should be fairly simple, but you may need to refer to the instruction manual for proper installation.
Once your saw is set up and secure, you’ll need to adjust the speed setting. This varies from saw to saw, but in general you want to set your speed as low as possible while still allowing the blade to cut through the metal. This will reduce any potential friction and make sure your cuts are as clean and precise as possible.
Alright, you’re almost finished setting up your saw. Now it’s time to select the appropriate cutting surface. Generally speaking, you want a flat and stable surface that’s free of anything that can move or vibrate while you’re cutting. A wooden table or plastic cutting board can work great. You just want to make sure the surface can handle your saw and the metal you’re cutting.
And that’s about it for setting up your saw. It may seem like a lot of steps, but once you get the hang of it, you’ll be a pro in no time! Just make sure all your supplies are secured, your blade is sharp and your cuts are clean, and you’ll be ready to start slicing through metal like a pro.
Choose the Correct Blade
It’s not just about having the right saw, y’all. You also gotta have the right blade for the job. Now, I know that sounds a little confusing, but trust me. I’m just tryin’ to help. You gotta make sure the blade of your saw is the right size and type for the material you’ll be cutting.
Let’s say you need to cut through some mild steel. That’s when you wanna use a blade with carbon-alloyed steel teeth to get the job done. If you’re cutting something else like hardboard, choose a blade with small teeth. This makes it easier to saw through and limits chipping.
When you’re cutting any kind of hard material, like glass or tile, use a diamond blade. Now, these don’t come cheap, but if you want to make sure your cuts are nice and clean, you can’t go wrong with diamonds.
When you’re choosing a blade for a circular saw, make sure it’s wide enough to cover the saw’s motor. The wider the blade, the longer the cutting time and the more stable the saw becomes. For jigsaws and reciprocating saws, make sure you get the blade with the correct size and shape for your saw.
Also, you gotta pay attention to the type of tooth the blade has. Some blades have large teeth which are great for cutting quickly through softer materials. But if you’re dealing with something like aluminum, get a blade with small teeth which are designed for more precise, slower cuts.
So when you’re cutting metal, make sure you’re using the right blade. Do your research, get the right tool for the job and you’ll get the perfect cut every time.
Cutting

Ah cutting metal – not as daunting as it may sound! If done right it can be quite the goal scorer. In this section we’ll look at a few ways to get the job done, starting with magnets.
If you’re using thin metal, you can cut it using clamps and magnets. This is great for thinner metal like sheet metal and tin. Simply put, you’ll need one clamp to hold the metal in place, and the other one to move the line of the edge of the metal with a magnet. All the while you’ll be cutting up and down the edge. This can be relatively easy, but it usually requires some patience.
Next up is a circular saw. It’s great for larger cuts and are easy to manipulate. Just make sure you have the right blade lined up. You’ll want to place the saw on the line of cut and then move it forward. Keep the line of cut straight. This one is a bit harder to work with, as you need to be careful that you don’t wander off the line of cut.
Finally, a jigsaw is an excellent option for intricate cuts, but also for quick cuts. All you need to do is set the blade of the jigsaw with the line of cut, and then start the jigsaw. Make sure that the jigsaw is at an angle so that it’s following the line of cut. Again, it can be easy to be careless. So, be careful and keep your eye on the line of cut.
So yeah, the next time you have a metal cutting job on your hands, don’t let it scare you. These are some fairly easy methods to get the job done. Just make sure to go slow and steady! Good luck!
Magnets
Hey now, let’s talk about magnets! Magnets are a fantastic tool to use when cutting metal – provided the metal is magnetizable. Can you believe this? Well, you can bring a magnet close to the metal that you want to cut, hold it steady, then make your cut around it. That’s right.
Sometimes, to make the task even easier, you can even buy magnets that are shaped differently to fit in the desired area. This will help make sure that you don’t accidentally cut across an intended edge or line.
When using a magnet to hold your metal in place, you really must focus on the blade and make sure to cut as close to the edge of the magnet as possible. Otherwise, you may end up with irregular edges or uneven cuts in your finished piece. But if you can manage to do it well, it will save you time from having to use clamps or other materials to hold the metal in place.
One thing to watch out for when using magnets to help with cutting metal is the direction of the magnetic field. You must be familiar with where the north and south poles are so that the field does not disrupt the movement of the saw blade.
Now, you won’t be able to use magnets to cut all types of metal – stainless steel, for example, won’t be movable with a magnet. And, remember, while magnets can definitely help make the job easier, they’re also not always a necessary tool.
So there you have it, folks: magnets are a great tool to use when cutting metal – provided the metal is magnetizable. Just be sure to pay attention to the directions of the magnetic field, and make sure to cut as close to the edge of the magnet as possible.
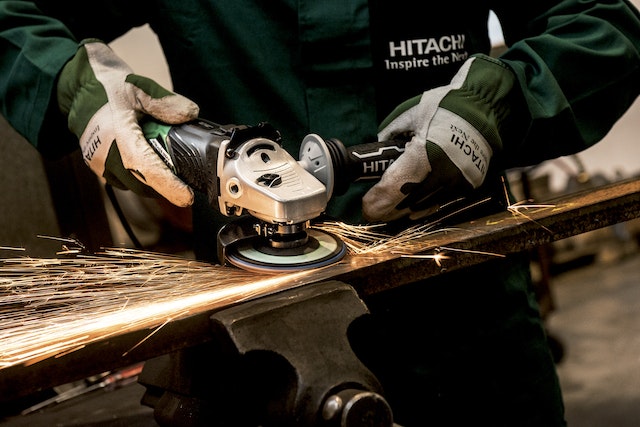
Circular Saws
Aw yeah gurl now its time to talk about circular saws. A circular saw is like a dreamy bae. It looks flashy and can do it all for you. It can even do fancy things that your jigsaw can’t.
Using a circular saw starts with choosing the blade type. Most of the time for metal cutting, you’ll want to go with a HSS blade. You can also opt for a diamond-tipped blade but keep in mind it will be more expensive.
The next step is to use some of that protective gear we went over earlier we don’t want an accident. Goggles, ear protection, and a face mask are essential. After gear up, set the blade depth to the thickness of the metal. Some saws even have a depth stop to make it easier. Once the blade depth is set, you will be ready to go.
If the metal you are cutting is large and extended and will require multiple cuts, make sure to always clamp it down. Don’t risk it moving while the saw is going. There is no need to keep the saw running while making adjustments. Also, if it does come in contact with the metal, always ensure that the blade is not spinning.
When you are ready to start cutting, you’ll need to double check that the blade is full of lubricant (kerosene). This will ensure a bloody-free clean cut. Depending on what type of metal you are cutting, you can adjust your cutting speed. A slower cutting speed might work better for harder metals, like stainless steel. Then, pull the trigger and if your cut is straight and perfect, put your hands together for a round of applause for yourself.
When you are done cutting the metal, always remember to unplug the saw before making any more adjustments and before cleanup. Then, you can clean up the cut and file smooth any jagged edges.
Now you know how to cut metal with a circular saw. Good luck and never turn your back on danger.
Jigsaws
To cut metal with a jigsaw, you gotta be as sharp and steady as a surgeon! First of all, we need to understand why jigsaws bring the heat when compared to other saws.
Jigsaws have a blade that quickly and efficiently cuts into metal with precision. This makes them the perfect tool for intricate designs and projects requiring exact cuts. Since the blades move from side to side, it allows for greater control and maneuverability, which comes in handy if you’re cutting intricate shapes or curves.
The key when using a jigsaw for cutting metal is to make sure the speed of the blade is slowed down. This is because metals require more force to break, so if you move the blade too quickly, it will create a lot of heat and damage the piece.
When you’re ready to get to work, make sure you’re wearing safety goggles and gloves. You don’t want anything happening to your peepers! Secure the piece of metal you’re cutting and make sure your hands are far away from the blade and your line of sight.
Now it’s time to take your blade to the metal! Create a shallow ledge in the metal, starting at the edge of your cut and in the direction of the blade. Release the trigger and move the blade to the edge of the cut, repeat the process back and forth until you create a deep enough groove for your blade.
Once your groove is wide enough, begin the cutting process. Make sure your movements are slow and methodical. Guide the blade along the cut line, releasing power every few strokes. Over time, the tool will do most of the work as you follow its lead. Just make sure to keep your fingers (literally!) crossed.
As an extra precaution, you can also use a clamp to secure the material and a piece of scrap wood underneath to provide additional support.
When you’ve finished your cut, you can clean and smooth the edges with a file. Voila! Perfect metal cuts with a jigsaw. It’s just like a dance, if your movement’s are fluid it’ll come out all groovy! So get that jigsaw, put your safety gear on, and start cutting some metal in style.
Finishing the Cut
Well, now you’ve gotten this far! You’ve learned how to choose the right materials, set-up your work space, and mark the cut line. Now it’s time to finish the cut. Just remember that safety comes first.
If you are using magnets, don’t forget to wear gloves. When putting them in place, do so gently and make sure they don’t move while the saw is cutting.
For those using circular saws, note the bevel adjustment if you are using an angle cuts. Double-check the cut line with a square before you start. As you cut with the saw, guide it steadily, go slow, and don’t force it.
And for those with jigsaws, start by drilling a hole to accommodate the blade. Then, go slow and steady when you start the saw. Make sure the blade is always in the guide hole, and don’t overheat the blade.
Once you’ve finished the cut, now it’s time for the finishing touches. To achieve the smoothest result, start with a 50-grit sandpaper and work your way up to a 220-grit or 320-grit. Make sure to clean up any burrs or rough spots and use a file to round off any sharp edges.
Now that you’ve finished all the steps, sit back and admire your work. You made it! Congratulations, you are now an expert metal cutter. From now on you can cut metals with ease and with confidence. Now you can show off your skills and make something really cool. Go forth and make something awesome!
Clean the Edge
Alright folks, once you’ve been through all that undiscipilined cutting and sawing and what have you, it’s time to clean the edge of your metal and get it looking super professional. Cleaning the edge means, in a nutshell, that you’re gonna need to get rid of any burr or burrs that may have gotten into the metal.
So, the first step? Grab your metal and that metal file, and give it a once over just to take care of any burrs that may have been created during the cutting process. Now, a metal file will help you get the edges looking smooth and pretty, but if you don’t have one, you can always just grab a clean piece of cloth or a rag and give it a few wipes over the edge.
But you wanna be careful when filing the edge. Make sure you’re gentle and not too rough with it, ya hear? If you’re too rough, you’re gonna end up leaving scratches or scrapes in the metal, which ain’t gonna look pretty, let me tell you.
Now that you’ve got the burrs and any other scrapes out of the metal, you might wanna think about sanding the edges down. Nothing too crazy, here. Sharp edges can cut you real good if you’re not careful, so make sure you smooth it out. Get yourself some fine-grit sandpaper, and take your time to smooth out those edges.
And lastly, if you’re really looking to give your edges a professional finish, you can always consider using a drill to polish the edges. This is gonna take a bit longer, but it’s gonna give them a real nice, clean finish. Plus, it’ll make them a lot safer to touch!
Now, if you’ve taken the time to complete all these steps, you should have yourself a nice, clean edge on the metal your sawing machine created. See? It wasn’t so hard, I told ya! Now, plug your tool back in, grab that cold one from the fridge, sit back in your chair, and admire your handy work!
File Smooth
Ah, finishing up the cut. Well, if you want it to look nice, you have to file smooth the edges. After you finish the cut and remove the excess metal (safety first, friends!), you can start cleaning up the edges by filing the metal smooth.
You’ll want a metal file for the job. These files range from single cut flat files to half-round or diagonal cut, depending on the shape of the metal. You’ll want to use a file that will fit the metal curve and shape. If you don’t have the right file, you may force the metal in a way you didn’t expect!
And be sure, if you’re dealing with a cast-iron material (which is super hard to work with!), that you use a file specifically made for cast-iron. Those are some of the toughest metals around and if you use a regular file, it’s gonna take much, much longer.
Now that you got your file, the best way to start filing is to grip it firmly and make one ever-so-slight motion at a time while applying even pressure. Work along the working edge of the file, keeping the same pressure and using a back-and-forth motion in a sweeping pattern that coincides with the metal’s shape.
Keep your finger lines up with your eye, that way you can keep an eye out for any sharp or uneven spots you may have missed. Don’t be in a rush when filing the metal, slow and steady wins the race.
And don’t forget to check the metal regularly! Use a Rag to wipe the metal and make sure it’s still true to form, that way you’re sure to have an even finish.
File your metal smooth, friends and you’re well on your way to having a perfect cut out of metal.
Conclusion
Well that’s all folks, you made it to the end of this article and now you know everything there is to know about cutting metal with a saw. Let’s go over the key highlights one more time:
First, you need to make sure you have the right materials before you start. You’ll need a saw, the correct blade for the job, a marking tool, and some kind of protective covering for your work space.
Next, you’ll want to start with marking your cut line. This is an important step because it allows you to have accurate cuts. Make sure to protect your work space from metal flakes before cutting. Set up the saw properly and choose the correct blade for the job.
The actual cutting part can involve magnet tools, circular saws, or jigsaws. Depending on the material you’re cutting and what kind of shape you’re aiming for, you’ll need to choose the correct saw.
Finally, after your cutting is done, you’ll want to clean the edge. Metal filings need to be removed before you can finish the cut. Once that is done, you’ll want to file the edge to make it smooth.
With all these steps complete, you are now all set to successfully cut metal with a saw. Start small and work your way up as you become more comfortable with the saw and the process. Safety first and good luck with your metal cutting endeavors.