How To Use A Band Saw To Make Intricate Cuts

Band saws are one of the most versatile tools in a woodworker’s arsenal. They can make precise and intricate cuts, and are capable of cutting through a wide variety of materials. However, learning how to use a band saw to make intricate cuts can be intimidating for beginners. In this article, we will discuss the basics of using a band saw to make intricate cuts in wood and other materials. Whether you are a seasoned woodworker or just starting out, this guide will help you get the most out of your band saw.
Preparing
Ah, the Band Saw. You’re probably here because you’re in need of making some intricate cuts and believe you need a Band Saw for that. Well, you’re not wrong. The Band Saw is a great tool for making intricate shapes and trim pieces from wood, metal and other materials. But there is more to it than just plugging it in and pushing a button. Before you can make your intricate cuts you will need to do a bit of prep work.
First and foremost, get familiar with the Band Saw. That may include watching some online tutorials, brushing up on Band Saw safety and operation protocols or talking to someone with experience. The more informed you are then the better and more streamlined the whole process.
Secondly, make sure you have the necessary supplies and materials. That includes the Band Saw, of course, but also wood and any other materials you will be using, as well as anything else you may need like a measuring tape, sand paper, a drill and the like. Gather these materials together and then you’ll be ready to move on to the next step.
Last, but not least, set up your Band Saw. Make sure you pay attention to safety protocols when setting it up. Follow the manufacturer’s instructions and double check it all. Also, check the adjustments and make sure that the blade and the table are perfectly square. If it’s off then your cuts won’t be neat or precise enough.
Now that you’ve done all that, you’re ready to start making your intricate cuts. Move on to section 2 and get started! Good luck!
Getting Familiar
When it comes to getting the most out of using a band saw, the first step is to get familiar with its capabilities and intricacies. Now I know that the first question most of you are thinking is: “Hey, Eddie, why should I even bother?” And I understand this question. After all, a band saw is just a machine, right? Well, my friends, a band saw is so much more.
It’s actually one of the most versatile tools you can use in your workshop. You can use it to make intricate cuts into a variety of materials, like wood, metal, plastic, and more. Not to mention, it can be a great way to save time and money.
So now that you know the why, let’s talk about the how. The first thing you need to do is familiarize yourself with the actual band saw. Read the manual, learn about the different types of blades, and make sure you understand what types of projects the saw can handle. And I know some of you out there are probably feeling a bit overwhelmed. Don’t let that stop you – there’s nothing to be afraid of.
Next, make sure you have the right accessories for the job. That means the right blade size and the right blade type for the material you are using. If you’re not sure, make sure you ask the experts at your local hardware store or on online forums. They may even be able to loan you a blade to try out on your projects. After all, you want to make sure you’re using the right tools for the right job – safer is definitely better.
Finally, make sure you have a good workbench and a comfortable place to stand while working with your band saw. It’s important that you’re comfortable while working – this will help you maintain control and focus on the project.
Now that you know everything there is to know about getting familar with a band saw, it’s time to get to work! Just remember to stay safe and have fun with your projects. That’s all for now, folks – I’ll see you again soon!
Gather Materials Needed
So, you wanna make some intricate cuts with a band saw, huh? Sounds interesting. One of the first steps is to make sure you have all the materials you need to get the job done.
When it comes to band saws, there’s an old saying that goes “you can’t saw what you don’t have”. So it’s important to make sure you’ve got your (metaphorical) ducks in a row before you start sawing.
Let’s start with the obvious: You’re going to need a saw. Fortunately, if you’re reading this, then you probably already have one! But if you don’t, don’t worry, you can get a good band saw pretty easily these days. Just make sure the saw you get is suitable for your needs. You’ll also need some kind of blade. There are many different types of blades for different types of projects, so make sure you pick the right one for the job.
Next, you’ll need to have some material to work with. Pick something that will work well with the type of cutting you’re doing. Try to use good quality materials if you can, as this will help ensure the best results.
Gloves, goggles and a dust mask are a must when using a band saw. Make sure you get the appropriate safety gear for the job. It may seem like a hassle, but it’s worth it. Trust me!
Finally, make sure you have a good workbench and a stable surface to work on. If you don’t already have one, make sure you get one that’s suitable for the type of cutting you’re doing.
So, ther you have it! That’s all the materials you need to get started. So go ahead and get it all ready and let’s go make some sweet, sweet wooden edifices with your newly sharpened band saw!
Set Up The Band Saw
Ah, there’s nothing like the smell of sawdust in the morning! This is especially true when setting up your band saw.
The first step in setting up your saw is to pick the right spot in your garage or workshop. You’ll need a flat surface that’s close to an electrical outlet. Once you’ve done that, it’s time to mount your saw. Preferably, you’ll use a sturdy workbench.
Now let’s talk about saw blades. It’s all about having the right blade for the job. Think of blades like tires; if you want a smooth ride (smooth cutting in this case) you’ll need the right size and design. For intricate cutting, you’ll need a blade with multiple teeth. Next, you’ll want to adjust the speed to account for the thickness and texture of the material you’re cutting.
When it comes to tension, you’ll want to make sure the blade is tight. If it’s not, it could cause the blade to warp and potentially break. To test the tension, tap the blade lightly with a screwdriver handle. If it doesn’t make a sound, it’s probably good to go.
Finally, you’ll want to use a blade guard to make sure you don’t accidentally thrust your hand into the moving blade. Also, it helps to move the material with your other hand while using the saw to make sure it’s secure.
Setting up your band saw is an important step if you want to make sure your cuts are clean and accurate. It’s important to take the time to make sure everything’s in the proper position and secured. This may take a bit of time, but trust me, it’s totally worth it. Happy cutting!
Making Cuts
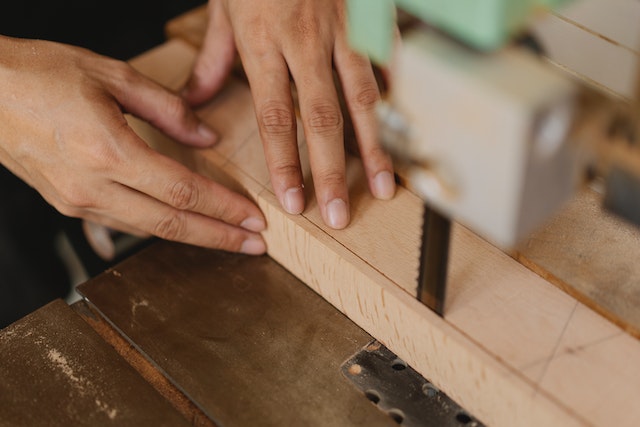
Ah, getting to thefun part. You know, the cutting. Making a sweet intricate cut can be quite a challenge. But don’t worry, we got you. First, you want to make sure you know where exactly you are going to be cutting on the material. This means marking the material so that you got yourself a nice guide. Sharpie is always a great way to go when it comes to marking. As much as I’d love to use a crayon like when I was five, it won’t stay on the material.
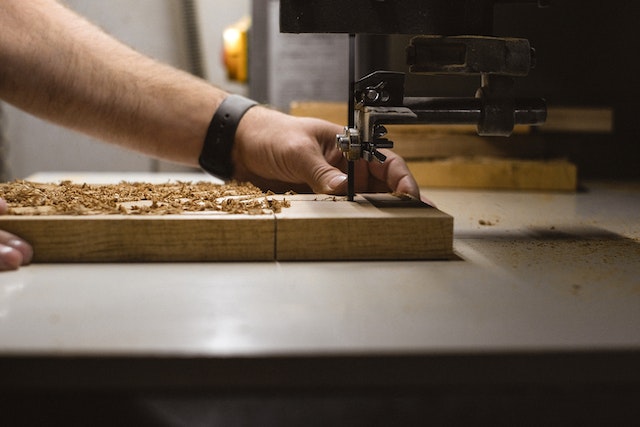
After you got your marking setup, it’s time to start cutting. You will want to keep in mind the angle of the cut that you want to make. This is where a steady hand comes in handy. You will also want to use a good quality blade in order to make a good cut. If a blade is too sharp it will give you a bad result as well. Safety is paramount so make sure you wear proper protection while cutting and make sure to keep your fingers away from the blade!
Once you are done cutting, it’s time to clean up. Make sure to clean any sawdust from the material and from the machine itself. If you have any sharp edges left, you will want to sand them off for better results. You can also use a file to further shape the edge that you created. This can give you a smoother result.
Finally, if you want to give the material a nice shine, you can use a polishing tool to give it a clean finish. You can also use a special wax or oil to make it look even better. Now you got yourself a nice looking intricate cut that looks like it was done by a pro! Stay safe, have fun and happy cutting!
Marking Out Materials
Ah ha, so you’ve made it to the fun part, marking out the materials. Now, one of the key points to remember is that you need to be precise with your markings. Put on your thinking cap and visualize the cuts you want to make. Now, take your tape measure and measure off the area that you want to cut. Make sure the measurements are exact so that you don’t end up with a jagged or mis-cut pattern later.
Once you’ve marked the area you want to cut, grab your trusty ruler. Use it to draw the intricate pattern or design you want to make. Be sure to lay down a straight line, or you’ll end up with something resembling a five-year-old’s art project. To make sure your line is hard and straight, use a grease pencil or industrial markers. Keep a steady hand to ensure accuracy.
If you’re feeling extra crafty, try using a template that you can place exactly where you want the pattern to go. That way, your friend won’t arrive at your house with a bag of presents only to find that their gift is made out of several oddly shaped pieces.
Once you’ve carefully marked out your pattern, double-check your measurements to make sure they are correct. And don’t forget your safety gear. Wearing a face mask and protective glasses is essential so you don’t injure yourself with misplaced sawdust. Now, go out and have a blast playing with your band saw.
Applying Cutting Angle
Well sure, ain’t nothin’ to it, just cuttin’ at an angle! Don’ worry you’re gonna cut yourself, I’m gonna take y’all through it nice an’ easy.
First, you wanna choose the angle you wanna cut at. Generally, the sharper the blade angle, the finer the cut. But you gotta use extreme caution when cuttin’ a sharp angle or else you gonna go messin’ up mah blade. So, be careful. I recommend starting out with a range of angles between 25 and 30 degrees
Once you’ve chosen da angle, it’s time ta go ahead n’ cut it up. For a band saw, you set up the blade, taking into consideration da angle dat you wanna use. Then, you adjust the blade n’ turn itta da appropriate angle. To get the angle jus’ right, use the marks on the machine to get the right angle.
Once the blade is in da right place, then you jus’ go ahead n’ start making da cut. Pay attention ta da amount a pressure you’re applying to the saw, too much or too little pressure can lead to a mess-up. The tension of the blade should be light enough to flex a little bit as it passes through the material.
And you don’t even have to worry about jigging as your saw handles da cutting angle. So, dat’s it, easy peasy!
Now go ahead n’ give it a go. An’ don’t forget to keep it smooth and clean, or else yer gonna spend more time cleanin’ upyerr mess than enjoyin’ da project. Have fun cuttin’ at an angle!
Cutting Tools Safety
Hey folks! This part of the journey is all about safe cutting so listen up.
It’s important to think about the tool being used in a safe way. With a band saw, the blade is always moving, so you want to be extra careful not to put any part of your body anywhere near it. That includes your hands and feet as well!
If you are using a clamped piece of material, make sure that it is held firmly and won’t move during cutting. It should also be securely held to a stable surface. There should be no gap between the material and the surface in which it is resting.
Always wear protective eyewear when cutting with a band saw. You don’t want to end up like me, with great eyesight but poor vision – it’s not a fun experience.
Always keep your fingers far away from the blade as it makes contact with the material. Debris may fly and you don’t want to get cut.
Finally, try to make shallow cuts first. This will ensure you are cutting in the right direction and get the job done right.
So, there you have it folks – a few safety tips to consider when using a band saw. As you can see, it’s not as hard as you think. Just take your time and you’ll be cutting intricate designs like a pro in no time!
Post-Cutting
Once you’ve gotten the hang of using a band saw to make intricate cuts, you can move onto the final steps of the process. After going through all the trouble of setting up the saw and practicing making cuts, you’re almost ready to show off your newly acquired skills. Before you can do that, you first have to finish up the benefits of using a band saw.
After completing the cutting phase, post-cutting comes next! This phase is meant to take your raw cuts and turn them into a finished piece of art. Let’s take a look at what post-cutting is all about!
So the first step of post-cutting is to clean up. We’ve all made our fair share of mistakes when experimenting, and it’s no different when working with a band saw. While making your intricate cuts, small pieces of scrap might be left behind and can potentially be dangerous. To make sure that no one falls victim to these little scraps, take a minute to inspect the area and clear any remaining materials.
After the area is free of scraps, the next step towards achieving a finished product is to sand and shape. Sanding and shaping your cuts adds the necessary touches to really make the pieces pop and look amazing! When approaching the sanding portion, use a piece of sandpaper that is the right grit for the job. If you’re not sure which type of grit to use, ask around and see what other experienced carpenters suggest.
Now that your cuts have been sanded and shaped, the last step of post-cutting is to finish your masterpiece by polishing. It’s almost time to show off your work and make your friends and family jealous. When polishing, use a non-abrasive cloth and apply the polish in a back and forth motion. Using this motion, instead of circular, ensure that you evenly distribute the polish across the entire surface.
And just like that, you’ve made it to the very end of post-cutting! Now you have the finished product you were looking for and can take all the praise from your friends and family. Who knows, you might even get requests for custom pieces! With a little practice, you can make intricate cuts with a band saw like a seasoned carpenter. Go show off your new skills and impress the world!
Clean Up
Oh hey kid, you need some help with that clean up? Well don’t worry, I’m gonna walk you through it.
First off, you want to make sure that you’re unplugging all of your machinery before you get started. Don’t wait until the blade has stopped, unplug that bad boy from the wall socket the second you finish with your cuts. Don’t forget about all the available power switches that your band saw comes with.
Once the power is off and all the moving parts have come to rest, pick up a brush and give all your working surfaces a good sweep. The idea here is to make sure that any sawdust or debris left over doesn’t interfere with your future projects. A good rule of thumb is to never let your sawdust pile up.
Make sure you’re also keeping up with the oils and cutting fluid that you need to run your band saw correctly. If it’s been a while since you’ve changed yours out and your saw is still producing good results, it might be time to change up the fluids. Remember, you want to maintain a healthy cutting environment, so always make sure you’re keeping up with your oil and coolant.
You can also use a rag and a solvent of your choice to get rid of any extra material collected on the saw bed and other components. Don’t underestimate the importance of cleaning your machine thoroughly – you don’t want any unwanted particles slowing down your sawing process in the future.
Finally, don’t forget about the inside of the saw. Take the time to clear off the saw’s chamber and make sure there aren’t any hidden saw chips or other unwanted particles that could be causing a jam. This is a great chance for you to double check if your blade is running true, so take advantage of it.
And there you have it kid, clean up done! Make sure to always follow these same steps whenever you are using a band saw – you don’t want your saw working improperly and ending up with a messy result. Now, go ahead and start working on that intricate cut!
Sanding and Shaping
So, you finally made your cuts, congrats! You made it to the second to last step closer to having what you wanted. Now you need to sand and shape your work and make it look exactly how you want it to. And this is where having an Eddie Murphy sassiness comes in handy!
Let’s start with the sanding part. Bear in mind, when sanding with a band saw, you don’t need to overdo it. Start with a large-grit sandpaper, then going down to finer grit depending on the level of smoothness you need. Be careful not to use too much force on the sandpaper, as it can make the saw’s blade vibrate and damage it. If done correctly, sanding with a band saw won’t take more than a few min.
Shaping is a bit trickier, so you must pay attention to what you’re doing. With a slow speed, and the right size, you can carefully cut through the material and shape it as you like. Just make sure to not put too much pressure on the blade and keep your hand away from the blade as it moves, and you should be good to go.
But, then again, the goal here is to make something nice lookin’– like a diamond studded, palm-leather, sequinned leopard. So if you find yourself in a tricky situation and in need of an extra sass or two, then just remember Eddie Murphy’s ‘I stayed up all night for 7 days straight’ line from ‘Party All The Time.’ You just need to let that sass fuel you and push through the shaping portion. With a lot of patience and some sweet Eddie Murphy moves, you’ll have that sleek design you had in mind in no time.
Before you know it, you’ll be done sanding and shaping and ready to move to the polishing portion, which is the final step of your masterpiece! Now that’s what I call a happy ending!
Finish by Polishing

When it comes to making intricate cuts and getting the highest level of precision, it is important to have a good and reliable finishing technique. Finishing is often the final and most overlooked step in a job well done. For cutting complex shapes with a band saw, the best way to finish is to polish the surface.
Polishing the surface will remove any burrs, rough edges, and any ridges that remain along the cut line. This will create a smooth finish, making the piece look professionally cut and allowing the operator to see exactly how the shape is forming. Polishing is easy to perform with a band saw and really helps to deliver the perfect end-result for any of those intricate cuts.
Before you start polishing, make sure the band saw blade is free from dirt, dust and other particles that can reduce the shine. Additionally, check the edges of the cuts for any residual burn that can spoil the end product. If you notice any of these issues, you will need to address them instantly, as polishing will be useless on uneven surfaces.
Once the band saw blade has been thoroughly cleaned and inspected for any flaws, you will start the polishing process. With a clean rag and some fine sandpaper, start rubbing the edges of the cut with a circular motion. You should notice that the surface quickly starts to take a beautiful shine, with any imperfections in the cut disappearing right before your eyes!
It is important to keep the sandpaper moving constantly with evenly distributed pressure – just enough to reduce the rough surface without compromising the general shape of the cut. During polishing, make sure to check that the blade is staying on track and isn’t snagging on any ridges or rough spots.
Once the surface is completely polished, finish up with a soft cloth to give it that final shine and you will be rewarded with a perfect cut every time. After that it is only a matter of inspecting the cut to ensure it has been completed to the highest possible standard. If you’re looking for that extra smooth and professional carve, polishing is a must for any intricate project.
So there you have it! A few easy steps to ensure that any intricate cuts made with a band saw will turn out perfectly polished and looking as professional as possible. And if you ever find yourself in a tight cut corner, just remember that polishing it up can be the answer to achieving the best finished product.