How to age wood grey
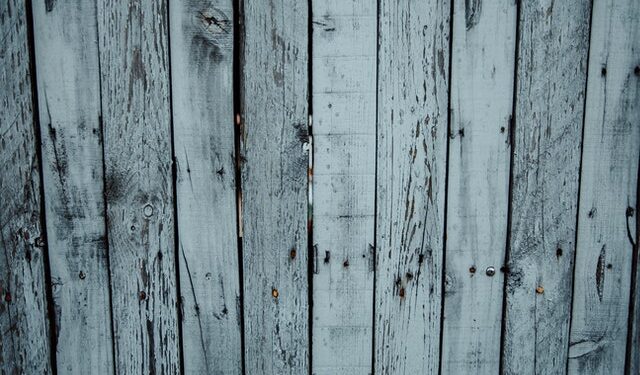
Aged wood has a certain charm to it – a rustic feel that can add character and warmth to any space. While there are many ways to age wood, one of the most popular methods is to use grey paint. In this article, we’ll show you how to age wood grey using two simple techniques.
The first technique is to use a light grey paint. To do this, simply paint your wood with a light grey paint. You can either use a brush or a sprayer to apply the paint. Once the paint is dry, you can then sand the wood to create a distressed look.
The second technique is to use a dark grey paint. To do this, you’ll need to apply a dark grey paint to your wood. Again, you can use a brush or sprayer to apply the paint. Once the paint is dry, you can then sand the wood to create a distressed look.
Both of these techniques are easy to do and will give your wood a unique aged look. So, if you’re looking to add some character to your space, consider using one of these two methods to age your wood grey.
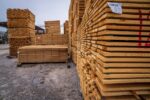
What type of wood should you use to age grey
Aging wood to make it look grey can be a fun, creative project. But what type of wood should you use for the best results?
There are a few different types of wood that can be used for this project, but some work better than others. We recommend using either cedar or pine, as they both take well to the aging process. You can also use oak or poplar, but these woods may not give you the same weathered look that you’re going for.
Cedar and pine are both softwoods, which means they’re easy to work with and take stain well. This is important when you’re trying to achieve a certain look with your project. Oak and poplar, on the other hand, are hardwoods. Hardwoods are more difficult to work with and don’t always take stain as evenly. This can make it harder to achieve a consistent look.
If you’re looking for the best type of wood to use for your project, we recommend cedar or pine. These woods are easy to work with and take stain evenly, giving you the best chance of achieving the weathered look you’re going for.
How do you prepare the wood for aging
Once you’ve selected your wood, the next step is to prep it for aging. This means sanding it down to remove any roughness or imperfections. Once it’s smooth, you can begin applying the aging solution.
There are a few different ways to do this, but one of the simplest is to mix equal parts vinegar and water in a spray bottle. You can also add a few drops of liquid smoke or tea to the mixture for extra color.
Spray the solution onto the wood, and then let it sit for at least an hour. The longer it sits, the darker the wood will become. Once you’re happy with the color, wipe off any excess solution and allow the wood to dry completely.
And that’s it! With just a little bit of prep work, you can easily create beautiful aged wood for your home.
What are the steps to age the wood grey
Aging wood can give it a beautiful, antique look. But it’s not easy to do – unless you follow these simple steps.
1. Start with clean wood. If your wood is dirty or has a lot of old finishes on it, use a stripper to remove them. Be sure to follow the instructions on the can and wear gloves and protective eyewear.
2. Once the stripper has done its job, sand the wood until it’s smooth. You can use an electric sander for this, but it’s not necessary – a good old-fashioned sandpaper will do the trick.
3. Now it’s time to apply the stain. For grey wood, we recommend using a dark walnut or ebony stain. Apply it evenly with a brush, making sure to get into all the nooks and crannies.
4. Once the stain is dry, you can either leave the wood as-is or apply a clear topcoat to protect it from scratches and wear. If you do decide to topcoat, be sure to let the stain dry completely first.
Following these steps will ensure that your wood has a beautiful, antique-looking finish that will last for years to come.
How long does it take to age the wood grey
It depends on the method you use and the results you’re hoping to achieve. For example, if you’re using a chemical aging solution, it could take as little as 24 hours. But if you’re using a natural weathering method like sun exposure or rainwater, it could take several weeks or even months.
What are the best ways to age wood grey?
There are several methods you can use to age wood grey, including:
– Using a chemical aging solution: This is one of the quickest methods, and it can produce very consistent results. You’ll need to purchase a commercially available aging solution, which you can then apply to your wood using a paintbrush or sprayer.
– Sun exposure: This is a slower method, but it’s free and easy to do. Simply place your wood in an area that gets lots of sunlight, and let nature take its course. The UV rays from the sun will bleach the wood and eventually turn it grey.
– Rainwater: Similar to sun exposure, this method involves exposing your wood to the elements. Place your wood outside in an area where it will be exposed to rainfall, and let the rainwater do its work. After a few weeks or months, you should start to see the wood turn grey.
– Smoking: This method requires a bit more effort, but it can produce some really stunning results. To smoke your wood, you’ll need to build a small fire in a metal container, and then place your wood on top of the container so that it’s exposed to the smoke. The longer you let the wood sit in the smoke, the darker it will become.
– Burning: This is another method that requires a bit of effort, but it can create some beautiful aged wood. Simply use a torch or other heat source to char the surface of the wood. The longer you char the wood, the darker it will become.
These are just a few of the most popular methods for aging wood grey. Experiment with different techniques to see which one works best for you and produces the results you’re looking for.
One important thing to keep in mind is that grey wood will continue to darken over time, so it’s best to err on the side of caution when first starting out. It’s always easier to add more age later on than it is to remove it!
What are some tips for ageing wood grey
Wooden boards and furniture can be given a beautiful aged grey finish using some simple techniques. In this blog post, we will show you how to do it. Follow these easy steps and you will be able to achieve the perfect aged grey wood look in no time!
1. Start by sanding your wood down using a medium-grit sandpaper. This will help to create a smooth surface for the paint to adhere to.
2. Once you have sanded the wood, wipe it down with a damp cloth to remove any dust.
3. Next, apply a layer of primer to the wood. This will help the paint to stick better and provide a more even finish.
4. Once the primer is dry, start painting the wood with a light grey paint. Use long strokes in the same direction to avoid leaving streaks.
5. Allow the first coat of paint to dry completely before applying a second coat. You may need to apply additional coats until you achieve the desired coverage.
6. Finally, once the paint is dry, sand the surface lightly with a fine-grit sandpaper. This will create a distressed look and help to give the wood an aged appearance.
Following these simple steps will help you to achieve a beautiful aged grey finish on your wood. For best results, be sure to use high-quality paint and primer, and take your time with the project. With a little patience, you’ll be able to create a stunning piece that will add character to any space.
Can you seal or varnish the wood after ageing it grey
One popular way to age wood is by using a vinegar and steel wool solution. This will give the wood a grey, weathered look in just a few hours. To do this, you’ll need to soak some steel wool in vinegar for a few hours (or even overnight). Once it’s soaked, simply brush it onto the wood surface. The longer you leave it on, the greyer the wood will become.
Once you’re happy with the colour, you can seal the wood with a clear sealant to protect it from moisture and wear. This is especially important if you’re going to be using the aged wood outdoors. You can also choose to varnish the wood for extra protection and durability. However, keep in mind that varnish can yellow over time, so it’s best to use a clear sealant if you’re aiming for a true grey colour.
Aging wood is a great way to add character and charm to any project. With the right finishing touches, it can also be made to last for years to come.
How do you troubleshoot problems with ageing wood grey
One common problem with grey wood is that the colour can be blotchy or uneven. This can happen for a number of reasons, but one of the most common is simply that the wood wasn’t properly prepared before it was stained or sealed. If you’re having this problem, the best thing to do is to strip the wood back to its natural state and start again from scratch. This time, make sure to sand the wood thoroughly and apply a primer before staining or sealing.
Another common issue with grey wood is that it can start to look dull over time. This is usually because the top coat of sealer or varnish has worn away, revealing the bare wood beneath. To fix this, simply sand away the dull top layer and reapply a fresh coat of sealer or varnish.
If your grey wood is looking patchy, it’s likely that the stain or sealer has been applied unevenly. This can happen if you’re using a spray-on product, so it’s important to make sure that you evenly coverage the entire surface of the wood. If you’re having trouble with this, try using a brush or roller instead of a sprayer.
Finally, if your grey wood is simply too light or dark for your liking, you can always try bleaching or dying it to achieve the perfect shade. Just be sure to test any products on a small area of the wood first, as they can sometimes have unexpected results.
With these tips, you should be able to troubleshoot any problems you’re having with ageing wood grey. If you need any further help or advice, please don’t hesitate to contact a professional. Grey wood can be a beautiful addition to your home, but it’s important to make sure that it looks its best. With a little bit of care and attention, you can keep your grey wood looking great for years to come.
How to age wood grey
Achieving that aged wood look doesn’t have to be difficult. In this article, we’ll show you how to age wood grey using three different methods: staining, weathering, and distressing. With a little bit of practice, you’ll be able to create beautiful pieces of furniture that look like they’ve been around for years.
Staining is the most common way to achieve a grey finish on wood. You can use any type of stain, but we recommend using a water-based stain for best results. Simply apply the stain to your piece of wood and allow it to dry. You can then proceed to weathering or distressing, if desired.
Weathering is a great way to add character to your furniture. It’s also relatively easy to do. All you need is some sandpaper and a little bit of time. Start by sanding down the edges of your piece of wood. Then, working in small sections, sand the surface of the wood until you’ve achieved the desired look.
Distressing is another popular way to age wood. It’s perfect for those who want to create a rustic look. To distress your wood, you’ll need to start by sanding it down. Once you’ve sanded away the top layer of wood, you can then proceed to beat it with a hammer or other blunt object. This will create indentations and give the wood a worn look.
All of these methods are great for achieving a grey finish on wood. Experiment with each one until you find the technique that works best for you. And don’t be afraid to get creative! There are endless possibilities when it comes to aging wood.
There are a few different ways that you can go about grey washing wood and each one will create a slightly different final look.
The most common method is to stain the wood with a water-based stain. This is going to be the quickest way to achieve a grey finish on your wood. Simply apply the stain evenly across the surface of your wood and then allow it to dry completely.
If you want to add more character and depth to the final look, you can try weathering the wood instead. This process is going to take a bit more time but it will be worth it in the end. Start by sanding down the edges of your wood and then working in small sections, sand the entire surface until you have achieved the look that you are going for.
And finally, if you want to create a really rustic look, you can try distressing the wood. This technique is similar to weathering but it will give the wood a more worn look. To distress your wood, start by sanding it down and then proceed to beat it with a hammer or other blunt object. This will create indentations and make the wood look aged.
Experiment with each technique until you find the one that works best for you and your project. And don’t be afraid to get creative! There are endless possibilities when it comes to grey washing wood.