How To Create A Beautiful Wood Carving For A Custom Sign

Ah, the joy of creating a great piece of art from simple materials. There is nothing quite like it! If you are looking for a fun and creative outlet, then why not try your hand at creating a beautiful wood carving for a custom sign. With the right materials and some practice, you can create a work of art that you can be proud of for years to come! So let’s start discussing how to create a beautiful wood carving for a custom sign.
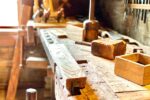
To start, it is important that you gather all your materials. You will need a selection of carving tools, some wood, a few pieces of sandpaper, and a protective coating to finish it off. Make sure to choose a wood that is strong enough and of good quality, as this will make a difference in the final product.
Once you have selected your wood, the next step is to mark your design. This can be done with a pencil, felt-tip marker, or any other marking tool of your choice. You can choose an image or text of your own liking, it could be a name or logo, or something as simple as a heart, star or flower. Just be sure to create a design that is simple enough that you can easily cut it out.
When you are all set, it’s time to start carving the wood. Begin by making small, shallow cuts and gradually work your way to deeper cuts as needed. Be precise and careful so that the project does not become too complicated. Don’t forget to take frequent breaks and make sure to use safety equipment such as goggles to protect your eye from dust and splinters.
After completing the main cutting, take some time to sand and clean the wood to give it a smoother, more attractive finish. Sandpaper comes in various grades and can be used to refine any rough edges left behind.
Once the carving is finished, you can now add the desired details such as fine carvings and etchings using your carving tools. These details can really set your piece apart and make it even more special.
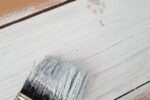
To finish your custom creation, you should apply a protective coating. A good choice is a wood wax sealer, which can help protect and preserve your sign, while also giving it a beautiful sheen. Apply the wax with a brush and leave to dry.
And there you have it. Hang up your sign and admire your beautiful piece of art that you created with your own hands. Congratulations! You are now ready to show off your new masterpiece to the world. Who knows, maybe your custom sign will be admired by people from all over!
Gather Your Materials

Y’all ready to get started on your beautiful wood carving for your custom sign? That’s awesome! The first step is to gather all the materials you are going to need. You might think that you can start wood carving with just wood, but you’re gonna need a lot of other stuff if you want it to look good.
I always like to first get my safety gear. You don’t want to be running into any accidents carving wood pieces, right? That’s why it’s a good idea to slip on some safety goggles and a dust mask. Trust me, sawdust can get everywhere and you don’t want to be breathing it in while carving.
Next, you’ll need to get your tools. The type of tool you need is going to depend on what type of carving you plan on doing. A knife might be good for small, detailed areas, but if you plan on cutting in larger, more intricate pieces, you’ll need something like a saw, chisel, or router piece. And don’t forget about finishing materials like sandpaper, which you can use to make the wood smooth.
And finally, you’ll need the wood for carving! The nice thing about this is that you can find it at a lot of different local stores, so you don’t have to splurge on some crazy expensive rare wood. It’s important to pick out a wood that’s going to be able to hold up to the carving and sanding that you have planned.
Now, you’ve got all the materials you need! You’re ready to start dreaming up your custom sign! Let the wood carving begin!
Choose Your Wood
When it comes to choosing the material for your custom sign, you have a few options, depending on what look you’re trying to achieve. Do you want it to look rustic and classic, or do you want it to have a more contemporary feel? The type of wood you choose can really set the tone for your project.
If you’re looking for a more classic, rustic look, then a harder wood is the way to go. A few common hardwoods you may want to consider include oak, walnut, and mahogany. These woods are tough, durable, and will produce a nice deep finish. They may be more challenging to work with, though, so if you’re a beginner carver it might be best to start with a softer wood.
Pine is a great choice for novice wood carvers since it’s actually quite light and easy to manipulate. Another great beginner wood is basswood, which is lightweight and has a smooth texture. Cedar is also popular amongst carvers because it has a natural resistance to insects.
When choosing your wood, it’s important to remember that it can affect the texture and finishing touches of your carving. You don’t want to finish it up only to discover that it’s too fragile for your needs. Additionally, you should consider any potential allergies to the type of wood you choose.
One thing that always helps is to see the wood in person before you purchase it. Go to the store and inspect it for any potential defects. If needed, find a friend who is a woodworking aficionado and get their opinion. Ultimately, you want to select a type of wood that is both aesthetically pleasing and easy to work with.
When all is said and done, your wood should reflect the look and feel of your beautiful custom sign. With a little bit of research and some careful consideration, you can ensure that you find the right wood for the job. Now that you’ve chosen your wood, you can move on the fun part: creating your custom design.
Mark Your Design

When it comes to beginning a wood carving project, there’s no better starting point than marking your design. This is where you’ll finally get to test your artistic chops and see if you have what it takes to be a real wood carver!
Now, there are numerous ways to mark your desired design. You can use a pencil and draw directly on the wood, or you can use a template of some kind to accurately trace the shape onto the wood. I favor the latter approach, because it’s easier to make small corrections instead of taking a step back and trying to redraw the design on the wood itself.
When I’m marking out my designs, I like to use a combination of techniques. First, I print out the desired design onto paper and then trace it onto the wood using carbon paper. This allows me to make sure that my shape is accurate and will fit perfectly on the wood. Then, I use an X-Acto knife to cut out any sections that I want to remove and mark any lines I want to be sure to keep.
Once I’m happy with my design, I use a marking pen or pencil to highlight any sections I want to keep and draw any details that I want to stand out in the wood. While it might seem tedious, this process is incredibly important to ensure that you don’t make any mistakes while carving the wood.
And with that, your design is ready to be transferred onto the wood and cut out. So get ready to test your skills and get carving!
Start Cutting
Are you ready to start cutting your design on your wood? It’s time to break out the saws! You’ve got a few options to choose from here. Power saws like a jigsaw are probably the easiest, but if you really want to get crafty, you can go for a more traditional approach with a coping saw. Personally, I’d opt for the power saw, as it will make cutting through the wood far easier. Whichever one you choose, make sure you have the proper protective gear to make sure you don’t hurt yourself in the process.
Once you have the saw ready and you have your protective gear on, you should have the board in a vice to ensure everything is stable and secure. Make sure it’s tight enough so that the board won’t move around as you cut, but not so tight that it gets bent or damaged.
Now that you’re all prepped, it’s time to start cutting! Before you begin, make sure you’re following the design you made previously. If you’re still feeling unsure, you can mark the lines you need to follow with a pencil or piece of chalk. Take your time here and go slowly–power saws are powerful tools, so you don’t want to cut into any extra material where you don’t need to!
Once you’ve got your saw running, be sure to keep safety as your top priority. If you’re feeling overwhelmed, you can use a guide in your wood so that the saw will automatically stay within the parameters of your design. But if you’re confident and comfortable, then feel free to go at it without the guide. Remember to be careful and always keep your fingers away from the saw.
If you are using a power saw and running into difficulties, do not force it. If the saw is stuck, you may have to adjust the way you grip the wood, the blade, or the saw itself. And if that doesn’t help, take a break and review your design.
Once you’re done with cutting, put away the saw and inspect the pieces. If your cutting wasn’t off, then you should have perfectly cut pieces that match your design! Take a notebook and use it to write down all the mistakes or any unexpected occurrences during the process. That way, you can learn from them when you approach your next wood carving project.
Congratulations! You’ve successfully started the process of creating your beautiful wood carving. You should be proud of yourself. Now all you have to do is work on the finer details!
Sand and Clean

When it comes to making a beautiful wood carving for your custom sign, the sanding and cleaning process may seem daunting, but it’s necessary to ensure the highest quality results. First, you’ll want to put on a pair of sanding gloves—you don’t want to be getting sawdust all over your nice clothes! Next, find your course-grit sandpaper and start sanding down your wood carving. You want to make sure you get rid of any bumps or splinters that may have appeared during the cutting process.
Once you’ve finished sanding, it’s time to break out the vacuum cleaner and get rid of all that pesky sawdust. This will make sure that no specks of sawdust ruin your final design. After you’ve vacuumed everything up, you’ll want to give the wood another once-over with a damp cloth, wiping off any remaining sawdust and getting rid of dirt.
Finally, you can give the wood a final cleaning before you start the finishing touches. I like to use a t-shirt, because the material is soft enough that it won’t scratch the wood but can still get rid of any excess sawdust. Keep buffing and polishing the wood until you get that nice, smooth finish you’ve been wanting!
By the end of the sanding and cleaning process, you should have a beautiful piece of wood that you can start using to create your custom sign. As long as you take the time to do everything right, you’re sure to have a high-quality wood carving that looks amazing! Now you can affix it to your wall, stand back, and admire the beauty of your work. Now wasn’t that Eddie Murphy-liscious?
Finish Details
Once your basic carving is complete, it’s time to go back over your carving and add any finishing details. Details are what will make your carving stand out, take it from professional Eddie Murphy you don’t rush finishing touches. First, you’ll want to go over all your lines and edges with the chisel and a mallet to sharpen them. This is the time to get creative! Depending on your design, you can lightly tap any whittled weave or shapes you want to create. This can be in the form of letters, symbols, or deeper routed corners.
Once you have the desired effect, you can use some 220-grit sandpaper to take off any imperfections and clean up any hard-to-reach areas. This is where you can go back over any lines and make them as deep or skinny as you want. After you are happy with the outcome, you can go ahead and use some steel wool to fine-tune all of your work. You can use the finer steel wool for the finishing details, and if necessary use a heavier grade to smooth out any uneven spots.
When you are satisfied with the outcome, you can go ahead and give your wood sign one final touch of creativity by staining it! This will bring out the detail and can provide a nice finish. After this step is complete, you are ready to move on. But be sure you are satisfied with the outcome because you don’t want to have to make any major changes at this stage. And there you have it wooden carvers, you have just completed the finishing details of your custom sign. Now all that’s left is to proudly hang up your masterpiece and take it all in!
Apply a Protective Coating
Alright, now it’s time to apply some protection to your masterpiece! Depending on what type of wood you used and what kind of sign you carved, you may have different options for protective coating. If you used soft wood like pine, you could use an oil-based protective coating, or a wax-based protective coating. As for hardwood, you may want to consider using shellacs or varnishes.
If you plan on using an oil-based wood preservative, the application should be easy enough. In most cases, all you need to do is apply the oil with a rag and spread it on the surface. Make sure you get an even coat, and if you want, repeat the process in order to achieve a more glossy finish.
As for wax-based protective coatings, you may want to apply a thin layer at first and then buff it. This method will create a nice shiny finish that really stands out.
On the other hand, if you decided to stick with a shellac or varnish, make sure to use a brush in order to achieve an even coat. It’s also important to use a thin layer at first and build up multiple coats. That way, you’ll be sure to achieve a solid finish.
Whichever method you choose, make sure to let your sign dry before handling or hanging it. That way, you can avoid any potential smudging or ruining of your lovely carving.
At the end of the day, creating a beautiful wood carving is a rewarding experience and by following these simple steps you can be sure to have something you can be proud of for years to come. Have fun and enjoy the process! “
Hang Up your Sign and Admire

Ah, finally the moment you’ve been waiting for – it’s time to hang up that beautiful custom sign you’ve created with your own two hands! As you slowly pull out the nail and hammer, you can already feel a sense of pride bubbling up within you. With one well-placed swing, the nail is secured and the sign is up and ready to be admired!
Now let’s pause for a moment to appreciate the beauty of your work before you. The curves of the wood, the solidity of the carving, and the great protective coat you carefully applied have come together to create an amazing piece of craftsmanship. This will surely add a great accent to any room, am I right?
Once you’ve taken a moment to appreciate your handy-work, now it’s time to move on to the next project! Maybe you can start thinking about making a memento box next? The possibilities are endless when it comes to woodworking and you can always come up with something new and interesting. After all, practice makes perfect!
There you go, you now know how to make a beautiful custom sign just like Eddie Murphy! From preparing the materials to the finishing details, you’ll be able to create amazing pieces of art you’ll be proud to show off at home or in a shop. Now, it’s time to go show off your creations and let everyone know how talented you truly are!