How To Make A Perfect Bridle Joint For Your Woodworking Project
Ahoy fellow woodworkers! If you’re here looking for advice on how to make a perfect bridle joint for your woodworking project, you came to the right place!
Before we dive into the step by step details, let me help you gather the materials you will need for this project: wood, glue, drill, saw, clamps. Now you’re ready to go!
Let’s begin by measuring and marking. This is a crucial step for any project that has two pieces of wood that need to join together. Use your ruler to measure the wood and then mark the cut lines where you plan to cut.
When you have your cut lines marked out, it’s time to use that saw. Make sure you have a firm grip as you slowly lower the saw along the marked lines. Depending on the saw blade you might need to do more than one pass to get the desired cut.
After you have both pieces of wood cut out, you’ll want to drill holes on either side of the cut lines. This is important for adding stability to your joint. Again, the size of the bit will depend on how thick or thin your wood is.
It’s time to break out the glue and make sure both of your wood pieces have an adequate layer of glue on them. This is key to ensure a strong bond between the two pieces of wood.
Now that your wood is prepped, you are ready to put it together. Make sure you align the two pieces of wood and if need be, add some clamps to hold them in place. Once the glue is dry, your joint will be stronger than ever!
As with any woodworking project, make sure you check and double-check your joint for any alignment errors and ensure that no glue is left exposed. This will help the rigidity of your woodworking project and it will be easier to take apart and reassemble if need be.
This is how to make a perfect bridle joint for your woodworking project. Remember, practice makes perfect. With a bit of patience and some elbow grease, you’ll knocking out beautiful joints like a pro in no time!
Materials
Okay, so you’re ready to make your bridle joint and you’re wondering, what materials do I need?Well, that’s a great question, and I’m here to help.You’ll need Wood, Glue, Drill, Saw, and Clamps.Now, don’t let this list intimidate you, you can use any kind of wood you want!The same goes for your glue, so choose whatever brand you feel most comfortable with.It’s just important that the type of glue you choose is strong enough to hold the joint together.
Your drill should be the right size for your wood, and make sure the bit is sharp enough that it won’t tear through the wood.Your saw should also be the right size for your wood, and even if you don’t have a big saw don’t worry, a smaller saw will do!Finally, you’ll need some clamps.These aren’t just for show, the clamps are actually the most important part of making sure the joint doesn’t come apart, so make sure you get good ones!
Now that you have all your materials, let’s move on to the next step!
Wood
What do ya think ya need for a successful bridle joint? Wood! Duh. The kind of wood you use is key. Depending on the project, you may want hardwood, softwood, another type of composite wood material.
I’m no forest ranger, but each type of wood has its own characteristics. Hardwood will be more dense and a bit heavier than softwood. Softwood tends to be lighter but not as strong on its own.
This is why it’s important to check out the project you’re working on and determine what type of wood is best for it.
And if you decide to go with a wood composite material, make sure you read up on it first. It’s important to know what you’re dealing with to ensure your project turns out great.
Now that we’ve got that out of the way, let’s move on and get started on the bridle joint! Let’s do this!”
Glue

Now if you’ve been selected to do this project, you’re gonna need glue. That’s right: conventional wisdom is incorrect and you don’t just hold it together with an unbreakable bond of love. This is woodworking, baby, and it ain’t playin’.
For this project, you’re gonna need a gallon of your best super glue. No, I’m just kiddin’. You don’t need that much. Just enough for the bridle joint you’ll be making. In addition to the glue, you’ll also need some rags, cotton swabs, a little bit of water, and beer…because why not?
No seriously, applying a proper glue is easy but you want to remember a few important things. A bridle joint isn’t just held together by pretty words and warm wishes; you want to make sure it’s good and tight! So it’s important to use enough glue but not too much. I recommend spreading a thin layer of glue over each mating surface and then testing it with a bit of friction. If it¹s too loose, add more glue or let it sit for another minute. If it’s too tight, add a bit of water to help the pieces slide nicely together.
Let’s not forget the importance of cleaning up any messes of glue you make. Glues like super glue or epoxy can be dangerous and annoying if they get on you or your materials. Make sure to have those rags and cotton swabs handy to wipe away any excess glue. Not to mention it’ll look better when your project is done.
Now don’t forget to grab a cold one for that hard work you put in too. After all, what’s woodworking without a beer? Hey, if the joint was done well, why not two? It’s your call. Now get to gluin’!
Drill
Ahhh, drilling. We’re at the most critical part of the operation here, folks. Trust me when I tell you, if you don’t get this part right, then your bridle joint might just be a pile of wood. Let’s make sure you impress your buddies in the woodshop and make this joint look like it was welded together.
First thing to consider is the size of the holes you’ll be drilling. You’ll want to make sure you have a bit that’s the size of, or slightly smaller than, the amount of material you’ll be drilling through. Looks like the size is marked on the drill bit, so take care not to mix up all those shinny things you have laying around, or else you’ll end up drilling nice, clean holes right through your project.
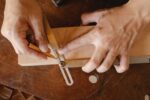
Once you’ve selected a bit, it’s time to get to drilling. For the bridle joint, you’ll need to drill a couple holes, both at the angle opposite to the angle on the end of the board and also in-line with the end grain. In this way, you’ll get a cross-grain overlap between the two pieces of wood.
To get the holes drilled straight, it takes a little bit of finesse. First up, make sure you clamp the piece of wood you’ll be drilling into onto a workbench. Then, drill slowly, just like granny taught you, and be sure that the angle is correct. You’ll need to hold the drill firmly and keep it from bouncing around. With this combination of precision and patience, you’re sure to make a nice, clean hole for your dowel.
Finally, once you’ve got the hole drilled in one piece of wood, repeat the process for the other piece of wood. Make sure the holes are exactly matched up, and that you have a nice clean overlap between the two pieces.
And that’s it! You’re now a drilling pro and can make a perfect bridle joint! OK, maybe not quite, but you’re on your way. So grab your drill, get to work, and don’t forget: go slow, keep it straight, and your project will surely make granny proud.
Saw
When it comes to saws, woodworking folks have a lot of choices. The saw you use to make the bridle joint is going to depend on the type of wood you’re working with and the complexity of the joint you plan to create. If you’re just wanting to make a basic bridle joint, I’d suggest starting with a classic hand saw.
Now, it’s important to make sure you get the right one for the job. You don’t want you’re dad’s old hand saw that wouldn’t cut butter in a power outage. But you don’t have to break the bank either. There are a number of affordable saws that will do the job nicely.
Now if you’re looking to do something a bit more complicated or to just get the job done a helluva lot faster, then you’re gonna wanna take a look at using a circular saw. These bad boys can really crank out some nice cuts with ease and accuracy. Just keep in mind though, these will take a bit more skill and caution to wield. So if you’re a beginner, stick with the hand saw.
Depending on the wood you use and the overall quality of the joint you plan to create, you may want to break out the jigsaw. But I wouldn’t suggest doing that for a beginner. They are a bit more finicky and require a steady hand.
No matter which saw you choose, remember to always make sure you’re wearing safety eyewear and practice general caution. Your digits are important and a saw will do an excellent job of ruining them in no time. So, saws are great for the job, just be sure to treat them with respect.
Clamps

No woodworking project is complete without clamps! When making a bridle joint, clamps play a key role in keeping the pieces of wood aligned and secure. Clamps help by evenly distributing the pressure over the surface of the wood so that the wood won’t slip or move while the glue dries. So, in order to make a perfect bridle joint, you’re gonna need to have the right clamps.
Let’s go over a few things to consider when picking out the right clamps for the job. First, you’ll want to make sure that the clamps are big enough to fit over the thickness of both pieces of wood. Second, ensure that the clamps can reach the width of both pieces of wood that you’ve cut. Third, make sure that the clamps have enough pressure to clamp the wood together without slipping or slipping while the glue dries.
Now, there are lots of different types of clamps you could opt to use. You could use bar clamps, F-clamps, pipe clamps, or even C-clamps. If you’re not sure which ones to use, you could always ask a woodworking expert for their advice. Alternatively, you can just go to your local woodworking store and pick up some clamps that you think are appropriate.
Once you have the right size of clamps, you’re ready to get started on your bridle joint project. Now, proceed with clamping the two pieces of wood together for about 10 seconds and make sure that the two pieces of wood stay aligned. Once you’re done, you should be good to go.
Now, that wasn’t so hard, was it? With the right clamps and a little patience, you can easily make a perfect bridle joint for your woodworking project. So, go on. Get out there and start clamping!
Measure and Mark
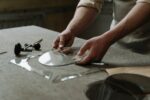
In Step 1 of making a perfect Bridle Joint for your woodworking project, the first thing you have to do is measure and mark the wood. Now let me tell you, this isn’t any easy task, so the more accurate you are the better your results will be! To get the best results, you’ll need a measuring tape and a pencil. Once you have those handy, you can start.
To measure the wood, start by positioning one end of the measuring tape against the end of the wood. Remember that that you don’t need to account for the thickness of the saw blade when you’re measuring, so make sure you take the width of the saw into consideration. Once you’ve marked the end of the wood you can move on to the other end. Make sure that the wood is aligned so that both ends are the same length. Once you’re happy with the measurement, you can use a pencil to mark the cut lines. Make sure that you mark a line on either side of the wood so that you can easily keep track of your cuts!
Once you’ve marked the lines on both pieces of wood, you can start cutting. You might want to draw a third line on each piece of wood to help you keep track of how deeply you are cutting. Then, using the saw, make sure to cut along the lines you marked, being careful not to go too deep. When making the first few cuts, go slow and steady. That way you can make the most precise cut possible.
Now that you’ve finished measuring and marking your wood, your ready for the next step: Cutting! Make sure to measure and mark the wood accurately and precisely so that construction of the joint can breeze along. So be sure to keep your eye on the ruler and put that pencil to work!
Measure the Wood
Hey there wood loving folks, in this next step, we gonna measure the wood accordingly to the size ya need to make ya bridle joint so listen up!
We gonna need use a ruler or measuring tape ta measure the wood with maximum accuracy. Y’all don’t want no unnecessary adjustments once the sawing begins.
If the wood is currently in two pieces, measure the length of both pieces, if it ain’t then measure both the inside and outside based on your measured cut lines. Make sure each measurement is as accurate as possible, as a quote says, ‘measure twice and cut once’, so make sure to measure correctly!
It’s likely that your project will require several cuts to fit exactly. Measure the length of each one before you cut and make sure they’re the same or similar length. Pay attention ta the marks you made, because as ya well aware, a small difference in measurements can result in a poorly fitting joint!
Alright now! Keep your chin up, check the measurements and make sure everything fits perfectly. We almost at the sawing phase folks! So once ya done with the measurements, it’s time to move to step three!
Thanks for stickin’ with me and I’ll see ya in the next step!
Mark the Cut Lines
If you thought marking your cut lines is just as simple as haphazardly jotting something down on your piece, you’ve got no right to be here, baby. Eh, this woodworking project better be worth it.
When making a bridle joint, it’s important to take it slow and ensure that your cut lines are as accurate as possible, or else everything else is going to suffer. So, that means no eyeballing or guessing. It’s gotta be precise. Now, I recommend getting a square and making sure your markings are totally square. Doing so will eliminate unnecessary hassle when it comes time to put the pieces together.
Once you have your square, draw a line along the face of the board. This will be the first cut line, so absolutely make sure that it is straight. After that, go ahead and draw the opposing cut line. To make sure it perfectly aligns with the first line, measure the distance between the edge of the board and the cut line. Then, use that exact distance when you make the opposing line. With any luck, the two cut lines should be the same distance from the edge of the board.
If you follow those steps and measure twice, you’ll be way ahead of the game. Now, if you want to get real fancy, you can draw a perpendicular cut line in between the two along the end of the board. That way, you’ll have a crisp joint.
Once you’ve marked up that wood, you’re ready for the next part of the process. Go ahead and take a break and pat yourself on the back for remembering my words of wisdom. Good job, pal.
Cut
Ah ha! We got our materials and marked our cuts, now it’s time to actually do the cutting! So, grab that trusty saw of yours and hang on to your hat! I mean gloves.
The first thing you have to do is square up your saw. This is a really important step. I mean, you’d be really embarrassed if you didn’t square your saw and ended up with wobbly edges when you finished, right?
Now, make sure you’re cutting in the right direction. You want to start at one end of the line with one side of the saw, and the other end of the line with the other side. It’s like fish sticks, you got to have both ends.
Okay, now that you have your saw lined up, it’s time to get to cutting! Depending on the type of saw you’re using, you can take a few practice strokes on some scrap wood to make sure you know what you’re doing. I know it can get a little intimidating when you’re about to cut into a nice piece of wood, you want to make sure you do it right.
Once you’re comfortable, feel free to start on the marked lines you’ve made. Don’t bunch your strokes together, you want to keep them neat and smooth. With each stroke, the saw should go all the way through your wood. Don’t forget, apply pressure gradually and evenly.
Now once you’re done, inspect the cut. As long as the lines are straight and neat, you can proceed to the next step. There you have it, cutting a perfect bridle joint! Pretty easy, huh? Now let’s move on to the next step and make sure this joint looks good!
Use the Saw to Cut Along Your Marked Lines
Getting the saw out! Is anyone ready? Let’s get sawing shall we? For those of you who haven’t used a saw yet, it usually looks a little intimidating but trust me when I say it’s not as scary as it looks.
Ok, now that the saw is out, take your marked piece of wood and place it flat on the surface with the marked line facing up. No matter if you’re using a handsaw or a power saw, as you start to saw make sure to keep your stroke even and straight along the marked line. You’ll need to apply some pressure as you saw and keep up a steady motion all the way till the end.
Once you’ve finished sawing, take the saw away and inspect your cut. If the cut wasn’t deep enough or you didn’t follow the marked line accurately, don’t worry. You can make any adjustments as needed with a file or a wood chisel or whatever else you have lying around. But, just in case you need to saw the same piece of wood again, it’s best to have a spare so you don’t ruin the original!
And that’s it folks! After everything is in place, you can move onto the next step – drilling. That’s going to be way more fun! Until then, happy sawing!”
Drill
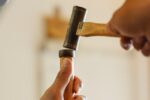
Let’s get ready to drill! Now comes the fun part, putting the tools to work. First, you’ll need a drill to create holes in between the cuts that you’ve made in the wood previously. Remember to not drill too deeply, as otherwise you’ll make it harder to create the perfect bridle joint.
When drilling, it’s important to think about the type of drill bit you want to use. You’ll most likely need something a bit sharp and not too wide otherwise the holes will be too large and it won’t sit properly in the joint. The specialists recommend starting with a drill bit that is slightly smaller than the tenon. When you have it lined up and ready to start, be sure to securely fasten the wood in place so that it won’t move during the drilling.
Now that the wood is secured and the bit is ready, let’s get drilling! Pay close attention as you press the trigger and make sure that you drill the holes in the wood strategically. You want to make sure that the drill bit is correctly lined up each time so that you get a perfect Bridle joint in the end.
When you’re finished drilling, remember to inspect the holes so that make sure that they are in the right place and leave enough space to connect each board perfectly. If all looks good, then you’re ready to move on to the next step! It’s time to get gluing!
Drill Holes Between the Cuts
Hey, friends! It’s your old pal here, back again. Now I know none of you asked for a woodworking expert, but I’m here to help you out anyway. In this section, we will learn how to make perfect bridle joints for your woodworking project, and this step is probably the most intimidating part of the process. Don’t worry, though, by the time I’m done, you’ll feel like a pro!
Now, once you’ve marked and cut both pieces of wood, it’s time to do some drilling. You will need to drill holes between the cuts you made, and for this I recommend using a drill with a bit that is slightly smaller than the width of the joint or gap you are creating. The reason for this is that you want to ensure a tight fit, and if your bit is too big it won’t cut all the way through the wood.
When drilling, make sure to hold the drill at a 90 degree angle perpendicular to the wood. Keep the drill pointed straight and steady, and keep the bit moving – don’t just let it sit in one spot for too long. This will help ensure the holes are even and form a perfect joint. Depending on the type of wood you’re using, you may need to use a lubricant to help with drill speed.
Also, be sure to stop once you go all the way through the second piece of wood. If you keep going, you run the risk of ruining the joint by creating too big a gap.
When you have finished drilling, you’re almost there – just one more step to go! Keep sanding and cleaning up the area to make sure the pieces fit flush together. This is an essential part of making a perfect bridle joint. Okay, now you’re ready to move onto the next step – gluing. Get ready to whip out your glue!
So, friends, that’s it. Now you know what it takes to drill holes between cuts to make the perfect bridle joint. Just keep at it, and before you know it you’ll have the perfect joint. All right, well I think that’s enough woodworking advice from me. Until next time, be sure to stay safe, keep working, and enjoy your woodworking project!
Glue
Alright, so now that you have your hole drilled and your cut is complete, it’s time to grab the glue and start sticking things together. We don’t have the luxury of sutures and anesthetic, so let’s get to sticking this joint together.
We’re lookin’ for a tight and secure fit. So make sure you get it right the first time. To begin, grab some wood glue, and apply it generously over both sides of the joint. Now, I don’t want you getting carried away here. Keep it to just enough glue that it stays stuck, no more, no less.
Position your two pieces of wood together. The first thing to look for is that everything is in the right alignment. You don’t want anything stuck out of alignment – it’s like taking a picture with your shirt tucked in on one side, and hanging out at the other.
Grab some clamps, and secure the joint firmly. Then, whatever you do, don’t move it! Let it sit and do its thing for a couple of hours until it’s dry.
And there you have it. You have successfully made a Bridle joint for your woodworking project. I’m here to tell ya, the feeling of this joint drying and holding together tight is like a mother’s embrace. As Forrest Gump said, “that’s all I got to say about that.” Congratulations, you’ve built yourself a sturdy, secure joint, friend. Time to move on to the next step.
Apply Glue to Both Pieces of Wood

Ey, ey, ey! You just about ready for the fun part, partner? Time to apply the glue! Now, when it comes to the glue you should use, you want to make sure that it can stand up to your project. That means if you’re gonna be varnishing, staining, or painting, you want to find something like a polyurethane glue.
Now, when it comes to applying the glue it’s important that you cover both pieces of wood evenly. Don’t be shy, get in there and really let the glue seep into all the cracks! Make sure you do it enough so that the wood stays together firmly but don’t go too wild.
If you’ve never wielded a glue bottle before and you’re unsure of yourself, try practicing on some practice pieces before you put it in the project. Make yourself familiar with the glue before you start because once all that stickiness gets on the wood, it ain’t never coming off!
After you’ve given the wood a proper gluing, it’s time to put it together. But first, it’s a good idea to wipe up any excess glue with a damp cloth. Nothing ruins work like a bunch of dried glue all over the place.
Alright, partner, one last thing to say about the glue. Storing it! Find a safe place to keep it, make sure it’s out of reach of any kids or untrained professionals, and keep it away from any heat sources or chemicals. You don’t wanna find yourself needing glue for a project and finding out that it’s all dried up from months of sitting in a hot storage room!
Alright, that wraps it up! Let’s move onto assembling our bridle joint!
Put it Together
Ah, we’ve reached Step 5 of this bridle jointing business – putting it all together. By now you should have your two pieces of wood all cut and drilled to the exact specifications of your project. Now all that’s left to do is assemble them and let the glue set.
First, align the two pieces of wood together as precisely as you can. This will require a fair bit of precision as even the slightest misalignment in the placement of the wood will make for an imperfect joint. If you can, use an alignment tool to make sure you’ve got the positioning just right.
Finally, bring out your clamps. Now bear in mind, you don’t just want to randomly clamp down and call it a day – you want to apply just the right amount of pressure to ensure a good fit. Let the glue dry for however long the instructions tell you to and then remove the clamp.
And there you have it – you’ve created a perfect bridle joint! Grab yourself a cold one to celebrate, take a look at your handywork and bask in the glory of a job well done. Sit back and admire your work – you deserve it.
Align Both Pieces of Wood
Ahoy all of my woodworking buddies! Ya’ll know you can’t make a perfect bridle joint for your woodworking project until you get both pieces of wood in alignment!
Now, this can be tricky, so you’ll want to be sure you’ve got the right measurements. Pull out your measuring tape and double check that it’s exact because the pieces need to fit together like a glove and a hand, ya’ll!
Once ya’ll got it all measured, you can take a look at where the cut ends on both pieces of wood. Make sure that your markings align perfectly so that when you put the joint together, you’ll have a perfect fit! Once it’s measured and marked, you’ll be ready to put it together.
When you get to this part of the project, you’ll want to make sure that you’re holding both pieces of wood firmly in your hands. Then carefully insert the cut ends into each other and feel the fit. It should be snug, but not overly tight – if the pieces don’t fit, something probably went wrong in the measuring and cutting-off stages.
While you hold both pieces together, take a look and see if there’s any misalignment. If so, you might need to go back to the measurement stage and check it again. If everything looks good though, you’re ready to secure the joint with a few clamps and get ready for the next step.
Good luck to all of you woodworking journeyers, and I hope this helps you create the perfect bridle joint for your project!
Secure with Clamps
Oh boy! Now the time has come for the most satisfying part of this whole bridle joint building process, the clamping! Now I know clamping may seem like a mundane task, but trust me, it’s an important part of making sure that your bridle joint is secure and doesn’t come apart over time.
So let’s get started. First you’ll want to grab a couple of clamps and make sure that the ends of the pieces of wood are lined up the way you want them before you start clamping. Once you’ve got them how you want them, go ahead and attach your clamps. Now when you clamp, make sure you don’t over tighten them. There’s no need to overdo it here otherwise you can cause the wood to split. Just make it tight enough that the wood can’t move but loose enough that you can still take the clamps off without too much trouble.
Now that you’ve clamped the two pieces of wood, go ahead and give them a good once over and make sure everything is how you want it and that the two pieces of wood are in the exact spot you’d like for them to be. If everything looks good, great! You’re done with the clamps. Oh and don’t forget to give yourself a pat on the back for a job well done.
And that is what it takes to secure a bridle joint with clamps. Now that you know how to make sure your bridle joint is secure with clamps you should be all set to move onto the evaluation step where we’ll make sure that everything looks good and is properly aligned. But until then, have fun creating something beautiful and functional.
Evaluation
Ah, so we have our bridle joint all ready. Time to evaluate it, to make sure everything has been done properly. Now, first of all, check that the pieces have been aligned well and they fit together properly. Make sure it’s perfectly even. If it’s not, don’t worry too much. Just those two even if not perfectly equal, it should work out fine. Next step is to check if there are any signs of glue being left behind. If there is, carefully remove it. You don’t want that extra glue leaking out and ruining the looks of your piece.
Now that that is done, take a step back and appreciate your hard work. Building a perfect bridle joint is no child’s play after all. All that measuring, sawing, drilling, and gluing are quite the task, and one should be proud of the work they have accomplished.
So, all in all, measuring and marking the wood, cutting along the lines, drilling the holes, applying glue, putting it together then inspecting for errors is the way to go if you want to make a perfect bridle joint. It’s not easy, but with a bit of patience and skill, you can get it done! In the end, the result is worth it.
Inspect for Alignment Errors

Ahh, the dreaded alignment errors. If there’s one thing I can’t stand when it comes to woodworking projects, that’s it.
When it comes to making a perfect bridle joint, there’s nothing worse than having a joint that just isn’t aligned properly. It’s enough to make you want to take a sledgehammer to everything and start over.
But before you do that, you should take the time to inspect for alignment errors. Spending a few minutes to check that all the pieces fit together properly can save you hours of frustration and heartache.
Start by making sure that both pieces of wood are aligned properly with each other. You should not have any gaps between the pieces of wood when you look at them side by side.
Next, check to make sure the joint is flush. If there are any gaps between the pieces, you’ll need to adjust the clamps so that they are properly tightened up against each other. If the joint is not flush, you’ll need to check the cuts since that could be indicative of an alignment issue.
Finally, take a look at the drill holes you made. Make sure they line up correctly and that they are the correct size. If they are off, then it’s likely that you’ll need to redrill and start again.
By performing a final inspection for alignment errors, you can ensure that your bridle joints are perfect for your woodworking project! Despite the fact that it’s a bit time consuming and can cause some added stress, it’s worth it in the end to have a joint that looks great and will last for years to come.
Ensure No Glue is Left Exposed
Ah, yes. Once the wood is glued together and the clamps are in place, one might think the bridle joint is complete. But you’d be wrong, because there’s one more very important step to ensure a perfect bridle joint: ensuring no glue is left exposed!
You see, if any glue is left exposed on the bridle joint, it is possible that the joint will eventually become weak and start to separate. That’s why it’s crucial to give the bridle joint a once-over to make sure there’s no visible glue anywhere.
The best way to do this is to carefully inspect the bridle joint with a bright lamp while lightly touching it. This will help you spot any bits of glue that may have been missed during the gluing process. If you find any, use a damp cloth to wipe it away.
However, if you’re in a pinch and don’t have time for this thorough inspection, you can use a wood chisel to carefully scrape away any glue that might have seeped out from the joint. Be sure not to gouge the wood, though!
No matter which method you use, it is incredibly important to take the time and make sure there’s no glue left exposed on the bridle joint. After all, it’s better to be safe than sorry. A perfectly crafted bridle joint will last for many years, but a so-so joint or one with exposed glue will quickly weaken and come apart. So, make sure to give the joint one last once-over before you consider it done!