How to Make a Perfect Mortise-and-Groove Joint for Your Woodworking Project
Alright all you woodshops! Have any of y’all ever heard of the Mortise-and-Groove joint? The name sounds like some kind of exotic dance routine, but I promise it isn’t, not even close. It’s actually a type of joint that is used in woodworking projects. I know what you’re asking. You wanna know how to make a perfect mortise-and-groove joint for your woodworking project, right? Well you’ve come to the right place, ‘cause I’m here to show you.
Let’s start with the basics. Why should you know how to make this joint? This joint is designed to connect two pieces of wood together without the use of glue or fasteners. It’s a strong and lasting joint, perfect for projects that will be used for a long time. It’s also perfect for projects that will be subject to a lot of wear and tear.
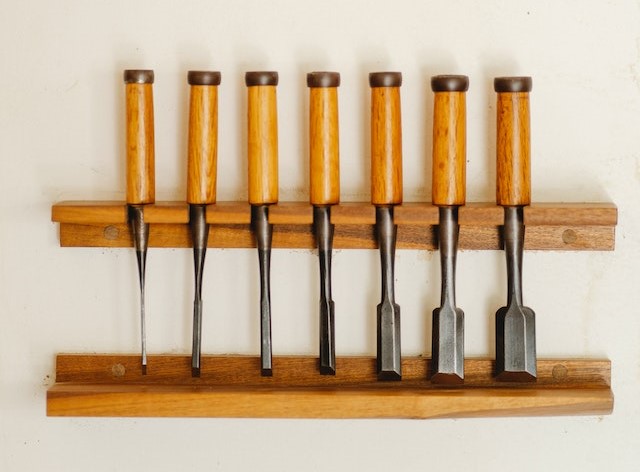
So, now that you know why you might need this joint, let’s get the materials. You’ll need a drill and an assortment of bits, hammers, chisels, saws, and other tools that you’ll learn about as we go.
Now you’re ready to start on the project. The first step is to mark the mortise; you’re going to use this mark as a template to guide your work. Use a ruler to draw a line across the wood, then use a marking gauge to mark both the depth and width of the mortise. Once this is done, you’re ready to drill.
Use the right size bit to drill the mortise, making sure that you’re going deep enough and with enough precision to create the perfect fit. Keep in mind that you may need to drill more gradually at some locations to ensure that it’s exactly right.
Now it’s time to chisel. Use the chisel to remove any rough edges and make sure that the joint fits together perfectly. It may take some trial and error but you’ll get it.
Next, you’ll need to make the groove. Use the same methods that you used for the mortise—a saw, drill bits, and hammer—to create the groove in the other piece of wood. Pay close attention to the angles and make sure that the pieces fit together.
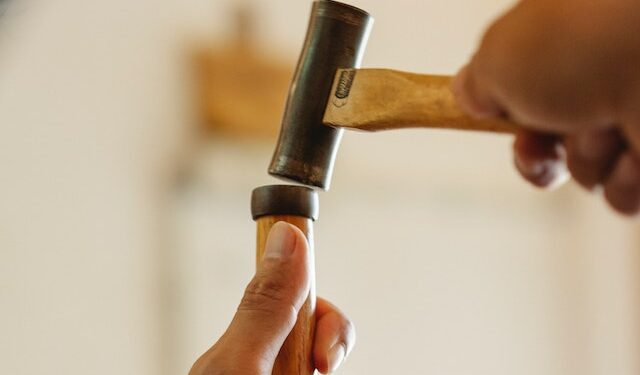
Now it’s time to join the mortise and groove. Use a mallet to tap the pieces together. Once everything is lined up and secure, you can use glue or clamps to hold them together.
Finally, for the finishing touches, you can bevel the edges of the joint. This will make everything look nice and professional.
And there you have it! Now you know how to make a perfect mortise-and-groove joint. So, clean up your work area, admire all your hard work, and get ready to use your finished project!
Whoa! Why Am I Making This Joint?
Whoa, why am I making this joint? Because mortise and groove joints are super strong and you can pass the test of time even more so than something like… let’s say a cake. Making a mortise and groove joint is like making a fine-grade cake.
It takes a little bit of skill and a little bit of finesse to make a joint that lasts for a lifetime. You don’t want one of those joints that falls apart when you look at it wrong, do you? Of course not!
So why am I making a mortise and groove joint? Well, it’s a bit more complex than a simple butt joint or a dado. A mortise and groove joint is created when you cut a mortise into one piece of wood and a groove into the other. The mortise and groove each fit into one another and make for a much stronger joint than most other woodworking techniques.
A mortise and groove joint can be used in a variety of projects such as doghouses, playhouses, furniture and much more. With mortise and groove joints, you don’t have to worry about having to use nails or screws. It’s a very strong joint and once it’s in place, it will stay secure and not budge.
The trick with making a mortise and groove joint is that it takes time to do it right. It’s an art form of sorts, as you’ll need a steady hand, good eyesight, and a sharp chisel in order to get a neat and snug fit.
So in summary, the reason why I’m making this joint is because it will provide extra strength and stability for my project. When it’s done, I’ll have a joint that will last for years and years.
Gathering the Materials
Hey everyone! It’s your ol’ buddy here, talking about how to make the perfect mortise-and-groove joint for your woodworking projects. In order to get the job done properly, you’re going to need to gather the right supplies.
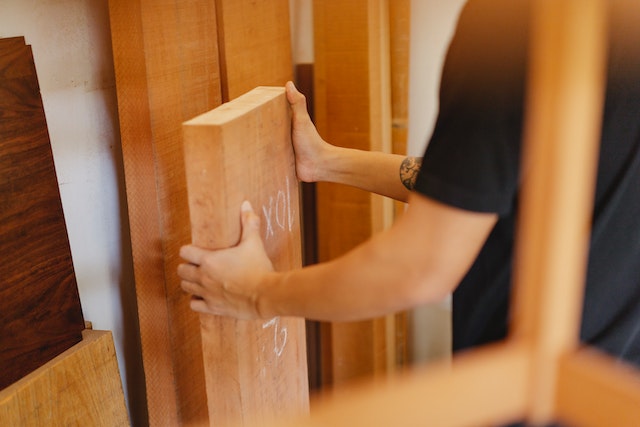
The first thing you’ll need is the wood of your choice to make the joint out of. You can use whatever wood you want, depending on the project you’re working on. The type of wood you use will determine the kind of tools you’ll need to use.
You’re also going to need a saw or some kind of cutting tool to make the mortise and its corresponding groove. If you don’t have one of these, you can borrow one from a friend or buy a cheap one at your local hardware store.
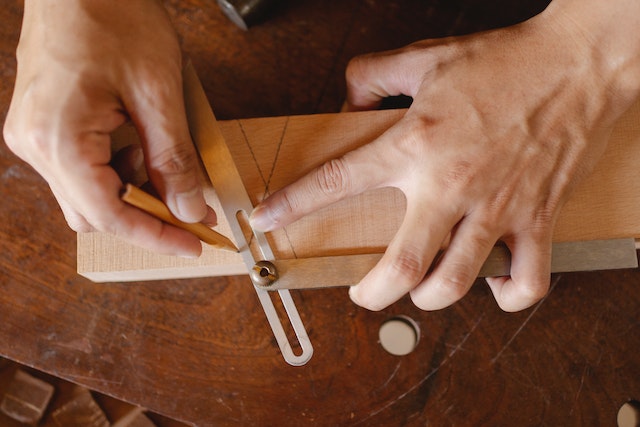
Next, you’re going to need a marking tool. This can be a pencil, marker, or even just a straight edge. This will help make sure the mortise and groove line up properly.
You’re also going to need some kind of chisel or router. This will be used to carve out the joint. Again, if you don’t have one of these, you can easily find one at your local hardware store.
Finally, you’re going to need a drill bit. This will allow you to make the holes for the screws that will join the mortise and the groove. Make sure to get the right size for your project!
That’s all you need to get started with the mortise-and-groove joint. Now that you’ve got your tools, it’s time to get down to work. Good luck!
Marking the Mortise
You know what they say: measure twice and cut once. But before measuring and cutting, you have to mark! Marking the mortise is probably my favorite part of the process because it’s satisfying to join the dots and be able to visualize where all the lines are going to be cut, drilled, and chiseled.
To get started, take your durable material like maple, mahogany, or oak and lay it out on the table flat. Take a pen, pencil, or marker – I prefer using a marker so I don’t have to erase too much later – and draw out where the mortise needs to be located. Make sure the lines you draw are straight and even, or else it will throw off your entire project.
For this step, you don’t have to be too complicated. Just draw a simple rectangular box that’s the same size and shape as what the mortise needs to be, with the dimensions of the joint you’re creating. Try to keep the marks uniform, clean, and neat throughout the length of your material.
Once you’ve marked the shape of the mortise and have made sure it’s correct, you can start creating measurements to determine the depth. Using a ruler or some sort of depth finder and a pencil, mark out the depth that needs to be drilled and chiseled. That way you know how deep you need to drill and chisel without damaging the material.
And that’s it for the marking stage! This part of the process isn’t very complicated or difficult – just be sure to take your time and make sure everything is done correctly. That way, the rest of the project will go much smoother. Make sure to measure twice and cut once, and when you’re done with this stage, you can check it off your list and move on to the drilling.
Drilling the Mortise
Alright, now that you’ve got the mark, let’s get into drilling the mortise. This is definitely the part I look forward to the most. All of your hard work and accuracy will pay off now and you get to ring in the fun with a drill! Haven’t you ever just wanted to press a button, hear some whirring noise, and see something come out? That never gets old; it’s the best.
Anyways, get yourself a drill that’s suitable for drilling in wood (won’t get into any specifics here; you know the drill). Put your workpiece onto the bench, measure once more, and start drilling. Make sure you’re drilling straight and vertical. You’ve been taking measurements and marking everything out so you should be fine, but if you start to deviate, stop and make sure the drill bit is still centered. No use continuing the work if you have a crooked mortise – what do you think the folks would say about that?
Another thing to make sure of is that you drill the appropriate length. Measure your mortise and divide that by the width of the drill bit. That should end up as a decimal – say, two and two-thirds inches. The numbers to the right of the decimal point are the number of passes you need to make. So, in this case, make two and two-thirds passes with your drill bit.
Now, the fun is done and the mortise is drilled. Take the drill out and start cleaning up the hole. You can use a chisel to make it more perfect, but that’s only if you want to be a perfectionist. Hey, I won’t judge. If you’re happy with the way it looks and seems like it would do the job, you’re good to go! You can move on to the next step, which is chiseling for a perfect fit. “
Chiseling for a Perfect Fit
Boy, I can’t believe I’m doing this! Chiseling, who would’ve thought I’d be chiseling a mortise-and-groove joint! This is some serious woodworking!
Well, let’s move on, I guess. I should have a mallet and a chisel at the ready. Now, I need to mark out my mortise and groove accurately – go over it a few times to make sure it’s right. Once I’m confident in my measurements and lines, it’s time to start chiseling.
It’s best to start with the chisel taken out of the mortise at anangle. Make sure I have a firm grip on the chisel. Make sure I’m securely held in place. I don’t want to lose my grip! Now it’s time for the mallet! Start light, I don’t want to go too deep into my wood yet. I want to create a nice gap that fits my mortise and groove but is still long enough for the wood I’m using.
Hitting with a mallet too hard can make the fit too narrow and it won’t match the groove. And why would I be doing Grove and Mortise if I didn’t want a perfect joint?
My mallet should be hitting the chisel every couple of chiseling motions. Don’t forget to keep my hands away from the striking end of the chisel – this baby can be dangerous!
I’ll need to measure the gap in the mortise a few times. Keep the fit as tight as possible while still allowing the joint to move freely. Try some test fitting with the groove piece before I make it permanent.
Ohh yeah, almost done with this chiseling. Now, I can’t forget to get my edges clean and bevelled. Just a few more minutes of work and this mortise-and-groove joint will be perfect. All that’s left to do then is join them together and enjoy my handiwork.
Making the Groove

Ahoy woodworkers or wanna-be woodworkers! Are ya feelin’ overwhelmed by the difficulty of your next woodworking project? Well let me tell you, all ya gotta do is take a deep breath and keep facin’ forward. I’m here to take ya through the steps for making the perfect Mortise-and-Groove joint for your next big project.
So today we’re gonna tackle step 5 – Making the Groove! Now don’t let this step intimidate ya – plenty of other woodworkers have done it before and so can you! First things first, you’re gonna want to make sure you got the right router bit and router table to get the job done. Measure your bit length and take that into account when settin’ up the table. With the depth of cut and fence position set, ya can feel pretty dang confident!
Next up, position your wood so it’s durable and easy to work with – maybe on a dedicated clamping table. Don’t forget to turn on the router and make sure the bit is spinning before you place it on the wood. Grab onto the wood with both hands – one on the router itself, and one at the wood’s end – to evenly distribute the pressure. That’s the key to making a groove! Make sure to move smoothly, starting and stopping at the same pace. And don’t forget to carefully guide the router along the surface of your wood – you don’t want it diggin’ in to mess up your groove.
Once you’ve gone along the entire surface of the wood, what’s next? Well, turn off the router and do a little clean up! I’m talkin’ about using a chisel and wooden mallet to clean up the corners and fix any visible imperfections. Ah yeah, that’s the good stuff. Last but not least, finish off the surface with a little bit of sandpaper. That way, yo carefully crafted groove will be ready to receive the tenon from the mating piece of wood.
Whatever project you’re tryin’ to tackle – from simple shelves to complicated frames – I’m sure you’ve got this Mortise-and-Groove joint ready to go in no time. All you have to do is keep calm and chisel on…you got this!
Joining the Mortise and Groove
Once you have the groove and mortise perfectly mated together, you’re ready for the best part, putting ‘em together! Before you start though, I should mention something to maximize your mortise-and-groove success. You will have better luck if you put the material with the groove on top while joining them. This might seem like common sense, but trust me, you don’t want to find out the hard way.
Now then, begin by placing the mortise and groove together by lining up the ends. You want this joint to be airtight, so make sure there is no gap between the two components. Now, applies glue in the joint and make sure to get it into both parts of the joint.
Once your glue is in place and your pieces are squared off, it’s time to start hammering. That’s right – you gotta whack the living heck out of this joint! Get yourself a sturdy mallet, and with a couple of sharp taps you’ll be shooting nails in no time. Make sure to set the mallet in the recess at the edge of the joint and to adjust your angle on each subsequent tap until the joint is tight.
Correct positioning is absolute key here so make sure to check your progress as you beat that baby until it’s level.
Finally, once you’re satisfied with the fit of your joint, add another bit of glue. That’s right, don’t be stingy either, go ahead and spread that glue around. This second layer of glue helps ensure that those two pieces stay together through the years and anything else you try to put there.
Congratulations! You just built a perfect mortise-and-groove joint! Now go flex your woodworking muscles to your friends and family and bask in the glory of your craftsmanship!
Finishing Touches – Beveling
Hey, now that you’ve made it this far, it’s almost time to wrap up your mortise and groove joint. But, we still need to give it the perfect finish.
Let’s touch up the edges and get the perfect bevel.
We’re all about the details, so grab a pack of sandpaper, grab your beveled chisel and get to ‘chisin’.
You’ll want to hold the bevel in such a way that the flat side is facing down, and create bevels on the sides of your mortise. And don’t just focus on the sides, do the same to the mortise itself as well as the groove.
Make sure to angle your chisels slightly downward so that the surface slopes inward to funnel out the excess wood. Keep the chisel angle close to the angle you marked on the wood earlier to ensure a perfect cut.
After you’re done chiseling, you’re going to want to sand down your joint so it’s perfect! You’ll want to start with a fairly coarse grain to make sure you get a smooth, even surface.
Work your way through the coarser grits and then move to a finer grit for a really good finish. Once you’re done that, you can then apply a small amount of wood glue to join the mortise to the groove. Glue the joints and once it dries, you’re all done with the beveling.
You can now proudly stand back and admire your work! Your joint looks beautiful, smooth, and perfect. And you did it, by yourself. You’re a woodworking warrior, a carpenter extraordinaire, and a mortise and groove master.
All Wrapped Up – Cleaning Up and Enjoying Your Handiwork
Woohoo! You’ve made it to the last part of this mortise-and-groove joint masterpiece you’ve been working on. I know it’s been a lot of work, but all the preparation and effort has paid off and you should be feeling proud. Now all that’s left to do is wrap things up, give your joint a little TLC, and get to enjoy the fruits of your labor.
First things first – clean up your workspace. You should have good lighting and enough room to move around so you can easily access your tools. Sweep the floor to get rid of your sawdust and wood chips, and make sure everything is neat and organized so you don’t misplace those small tools.
Now that you have a clean space, look over your mortise-and-groove joint and give it a final check. Make sure there are no remaining gaps between the pieces, and that the fit is snug. If there’s any small space here and there, fill it in with some sawdust and wood glue to fill the space. Let the glue dry and sand it down if needed.
Finally, take a go-over of the surface with a fine-grit sandpaper. This will smooth out any uneven or rough spots and make your wood look amazing. If you want an extra smooth finish, you can apply some wood wax or a sealer. Once the wax or sealer has dried, you can admire your work and show it off.
So enjoy your beautiful mortise-and-groove joint – you’ve clearly worked hard to make it! Take pictures of it to show your friends, and don’t forget to document your masterpiece on social media to share with the world. Now it’s time to move on to the next woodworking project – good luck!