The Ultimate Guide to Woodworking Safety: How to Protect Yourself in the Workshop

Hey there, woodworkers! Listen up, cuz this is the only safety course you’ll need. I’m here to talk to you about how to keep yourself safe in the workshop and discuss “The Ultimate Guide to Woodworking Safety How to Protect Yourself in the Workshop”.
Now, nothing kills the buzz in your work more than an injury, so we’re gonna make sure you don’t hurt yourself here. First thing’s first — dust. It’s everywhere and quite frankly, it ain’t something to mess with. Inhaling too much of it can mess you up real bad. So here’s what you do— get yourself a respirator. Now, there’s plenty of different ones, so make sure you get one that best suits your needs.
Since you’re gonna be working with all kinds of tools and machines, it’s essential to outfit the workshop for safety. Get yourself some safety glasses, ear protection, and wear clothes that provide as much coverage as possible. Nothing like a few missing fingers to ruin your work. Also, think about getting yourself a first aid kit and a fire extinguisher. It’s always good to be prepared.
Now let’s talk about using the table saw. Now, this is one tool you don’t ever want to mess with. To make sure you stay safe while using it, the most important thing to do is to learn the basics. Make sure you know all the safety features your saw has and use them. Then, make sure you adjust the blade height, take extra care when cutting, and always stand in a stable posture.
You also need to be aware of the power tools you’re using and make sure you understand their basic safety features. The last thing you want is for your saw to kickback, so keep that in mind when you’re operating the machine. Don’t forget about rulers and guides either—they can help you make sure your cuts are exact.
And when it comes to handling sharp tools, always make sure you have a plan for your cutting route. You want to make sure you minimize nicks and snags in your work. Finally, don’t forget to wear a dust mask when you’re finishing up your project.
So there you have it, woodworkers—the ultimate guide to woodworking safety and how to protect yourself in the workshop. Whether you’re an experienced woodworker or a beginner, following these guidelines will help ensure you stay safe in your workshop.
Dust Protection
Heyyy, do I have some tips for you on woodworking safety! It’s important to take the necessary precautions when working with tools – so pay close attention to my guide.
Let’s get started with some dust protection. If you don’t take the necessary steps to minimize dust, you’ll end up with a serious case of dust inhalation – dust can be pretty nasty, and it’s real easy to inhale a bit of it. The best way to protect against dust inhalation is to wear a respirator.
When looking for a respirator, search for one that can block 95% of airborne particles. A heated filter is also a helpful component since it will help you avoid breathing in fumes, particles, and more. Not all respirators can protect against these elements, so read the label on the respirator to make sure it’s actually made for woodworking safety.
Don’t settle for a cheap respirator either. Invest in a quality respirator, even if it might cost a bit more – it will be worth it in the long run. It’s also best to purchase a respirator that fits properly – if it doesn’t fit well, you won’t have as much protection from dust as you would with a proper fitting respirator.
Not only that, but you should also make sure to outfit your workshop with safety glasses and ear protection. Eyewear should be certified to meet safety standards, and you should look for ear protection that can block at least 95% of noise.
When it comes to your clothing, it’s important to make sure you don’t wear anything that can get caught in the tools you’re using. That means no necklaces, watches, or anything that could get entangled. Additionally, it’s wise to keep long hair secured in a net or a ponytail. If your hair gets stuck in the tools while you’re working, it could easily cause an injury.
Finally, always make sure to have a good pair of gloves and some first aid supplies nearby in case of an emergency – and that’s it for dust protection. See ya next time and stay safe in the workshop!”
Choosing the Right Respirator
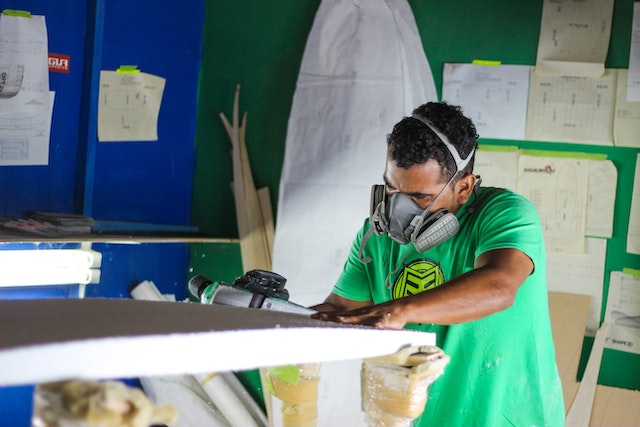
I think it’s pretty obvious by now—if you want to stay safe in the woodshop, you need to take some special precautions. One of the most important pieces of protective equipment any woodworker can have is a respirator—it’s designed to keep any dust or other particles from getting into your lungs!
If you’re going to invest in a respirator, you need to make sure you’re getting one that’s suitable for a woodworking environment. In general, you should make sure you’re choosing a respiratory system that’s rated for at least 95 percent filtration efficiency. The higher the efficiency, the better your protection.
Choosing the right respirator can be a bit tricky. Different respirators are designed for different types of tasks. Some are rated by the level of smoke they can filter out and others are rated by the number of particles they can stop. It’s important to understand what type of air filtration you need for your tasks and then make sure you’re getting the right type of respirator.
You should also look at the fit of the respirator, since a poor fit can lead to leakage and ultimately reduce the effectiveness of the mask. Most respirators come with adjustable straps that allow you to make sure the fit is snug and comfortable, so it’s important to make sure you’re taking the time to get the fit just right.
Finally, you should make sure the respirator you choose is suitable for any chemical or organic vapor exposures you might encounter in the woodshop. Some respirators come with organic vapor filters and these will help protect you from certain volatile organic compounds found in some woodworking glues and finishes.
The bottom line is that if you want to stay safe in the woodshop, you need the right respirator. Invest the time and energy into making sure you’re getting the right type of respirator, fitted properly and with the right level of protection and you’ll be able to breathe easy knowing you’re doing all you can to keep yourself safe.
Outfitting the Workshop
When it comes to ensuring safety in your workshop, the best place to start is establishing a safe environment from the ground up. After all, working safely starts before you ever pick up a tool. Outfitting your workshop for safety is the first step!
First, think about the basics. Do you have enough lighting? If it’s too dark, you won’t be able to see the dangers of your tools and workspace. Make sure to install proper lighting, both natural and artificial. I like to keep a couple’a flashlight handy in case the power goes out. Also, check your work surfaces and tools regularly to make sure they are in good condition. Damaged or outdated tools are more likely to cause harm.
Next, think about the equipment you’ll need. Even novice woodworkers know to have safety glasses, a respirator, and ear protection on hand. But don’t forget smaller items like gloves, visors, and dust masks. Glove are a must-have for working with sharp tools or when applying finishes to protect from skin or fumes. You may want to invest in a free-standing dust collector or shop vac to keep the dust down in your workshop.
Finally, think about the layout of your shop. Make sure you have space to move around freely, with plenty of clearance for your tools. If a tool is in the way and you keep going over it, you can quickly trip or stumble. Make sure your table saw is securely mounted on a stable platform, or you might end up with a nasty injury.
That’s it for outfitting your workshop for safety. Getting the basics right goes a long way toward making the woodworking experience safe and enjoyable. Now you can feel confident that your shop is ready for tackling those projects you’ve been eyeing. Happy woodworking!
Safety Glasses
Ahhh woodworking – the smell of sawdust in the morning is enough to make any man happy! But it’s important to stay safe when doing such a craft. In this article, I’m gonna give you the scoop on the ultimate guide to woodworking safety and how to protect yourself in the workshop.
First things first – safety glasses! Every woodworker should invest in a good pair of safety glasses. Eye injuries are a real danger in the workshop and you need to be prepared! Look for glasses that fit nice and snug on your head and don’t forget to make sure they meet ANSI safety standards. Make sure your lenses read “Z87.1” – this is the safety standard tested and certified by the American National Standards Institute.
Now that you’ve got your safety glasses sorted, there’s no excuse not to wear them all the time you’re woodworking! I won’t even get into what can happen if you don’t protect your vision – trust me, you don’t want to go there. You’ll need a good pair of safety glasses if you’re gonna be routing or sawing any pieces; sawdust and small pieces of wood flying around can be dangerous!
Along with the safety glasses, make sure you’ve got some sort of hand protection too. I recommend getting industrial-strength work gloves, to protect your hands from splinters and the like. And don’t forget to keep a pair of needle-nose pliers handy, in case you need them.
When it comes to woodworking safety, no piece of equipment should be overlooked! Make sure you’ve got your glasses on at all times, and don’t be afraid to invest in quality safety gear; it’ll last you a lot longer than the cheap stuff. Good luck in the workshop and happy woodworking!
Ear Protection

If you’ve ever been sanding away in the workshop and then in walks Eddie Murphy? You guessed it – there’s a good chance you’ll hear me shouting “Hey! What’s that racket?!”
Now listen, woodworking can be LOUD! You need to protect your ears from noisy power tools and accidents like dropping something heavy – all of which can cause permanent hearing loss. That’s why I’m here to talk to you about protecting your hearing when you’re working with wood.
The first step to minimizing the loud noises you produce in the workshop is making sure that the room is soundproofed. Check for gaps around doors and windows, and use high-pile rugs that you can lay down on the floor to help absorb the noise.
If it’s still too loud in there, then you’re going to want to get yourself some ear protection. It’s as simple as getting some earmuffs or earplugs. Even if you’re working in a relatively quiet room, earmuffs or earplugs can still be a worthwhile investment – because the noise that your power tools produce but also the bits of sawdust you send up into the air can impact your hearing.
My suggestion is to wear earmuffs while you’re working with power tools, and then switch over to earplugs if you’re using hand tools. That way, you won’t be as likely to miss important noises that come from the tools themselves, like when a blade starts to dull or when something has gone wrong.
Now, when working with ear protection, you need to be extra careful about removing them. It’s Always best to remove both earmuffs and earplugs before you take them off, because if you leave one in you can actually startle yourself when you hear a sound that you weren’t expecting – like the sound of Eddie Murphy cantering in out of nowhere!
So why not follow my lead and make ear protection part of your regular routine everytime you get on to the workshop? Believe me, it’ll be worth it in spades when you still have your hearing intact after a long day of woodworking!
Clothing
When it comes to woodworking safety, the right clothing makes a huge difference. While there is a lot of debate over what kind of clothing is best, one fact remains – it is important to be aware of the clothing you are wearing while in the workshop.
The key is to pick clothing that is comfortable and will not get in the way of the task at hand. Stay away from baggy clothes, dangly jewelry, and scarves as they can easily become entangled with machinery. Instead, choose softer fabrics like cotton and denim, wear sensible shoes, and make sure to tuck in any long hair.
Another important thing to consider is your choice of footwear. Flip-flops, sandals, and open-toe shoes are a no-go in the woodworking studio as sawdust, wood chips, and other debris can easily get wedged between your toes. Stick with either steel-toed work boots or sneakers with a low heel and a rounded toe.
Some workers also prefer to wear gloves while working, particularly when handling sharp tools or pieces of wood. Specialty gloves are available for woodworking and other tasks, but you can also make do with regular cotton or leather gardening gloves. If you do choose to wear gloves, make sure you take them off when using power tools or saws and other hazardous equipment.
Finally, safety glasses are a must whenever you’re working in the workshop. You can find a variety of designs at your local hardware store, or you can opt for a pair of Impact-resistant goggles or a full-face shield. These will provide the best protection from flying debris and dust.
No matter what you choose to wear in the workshop, the main thing is to stay safe. Make sure your clothes fit correctly, stay aware of any potential hazards, and be sure to take the necessary precautions when handling sharp tools and operating any power tools. In the end, you’ll be glad you put in the time and effort to safeguard yourself.
Other Essential Equipment
Welcome to the next part of the ultimate guide to woodworking safety: how to protect yourself in the workshop. Here we’ll be learning about the “essential equipment” that we need in order to stay safe while working.
First of all, let me tell ya that you need some serious protection when it comes to woodworking. You wouldn’t want to end up going to the hospital or worse, the morgue, if a saw blade accidentally cuts off one of your hands! Yikes!
Let’s start by taking a look at the essential equipment that you must have in your woodworking workshop. Safety gloves are a must-have. They protect your hands and fingers from abrasions, splinters, and shocks caused by power tools. They also provide a better grip on the wood, so you can control your workpiece and work with accuracy.
Other essential pieces of equipment you should have in your workshop are work boots, knee pads, and face protection. The work boots provide a good grip on the floor, so you don’t slip and fall. Knee pads provide protection for your knees when you’re working on the floor. And face protection, in the form of a face shield, is necessary to keep sawdust out of your eyes.
Another important piece of equipment is a first aid kit. Accidents can happen, no matter how careful you are, and you want to be prepared for them. So make sure you have a well-stocked first aid kit in your workshop.
Once you’ve got all the essential equipment, the next step is to make sure you always use them. It might seem like a small thing, but it can make a BIG difference in your safety. So don’t be a slacker—always wear your safety gear!
That’s it for essential equipment. But hey, don’t get too comfortable. There’s still a lot more to learn if you want to stay safe in the woodworking workshop. So let’s move on to the next section.
Table Saw Safety
It’s no secret that nothing comes close to the feeling of playing with a tablesaw. It’s the unmistakable sound of a machine that truly turns raw material into something remarkable. But before you get down to some serious cutting, it’s important to understand how to use the table saw safely. It’s not just to avoid ruining the piece you’re working on – it’s also to protect yourself from any potential injuries.
Let’s start by discussing the table saw itself. There’s typically a circular blade at the center of the table saw, which spins at high speeds. The spinning blade of the table saw can dish out quite the punch, and this is why it has to be handled with extreme care. In order to ensure everyone’s safety, it’s really important to turn off the power to the saw before adjusting the blade or making any changes to the table saw.
Next, let’s chat about learning the basics of the table saw. Before using it, it’s crucial that you read the instruction manual in order to get familiar with any safety features the saw may have. Most table saws are equipped with anti-kickback mechanisms and guards, which protect against any dangerous kickbacks. Familiarizing yourself with the machine and its safety features is important as this knowledge can help to protect you from injury.
When you’re ready to start using the saw, it’s recommended to keep both hands on the workpiece at all times. This way, you’re in control and you know exactly what’s happening when you apply pressure to the wood. If your hands slip from the workpiece, the saw can easily kickback and cause serious injury.
It’s also essential to always use sharp blades. Dull blades can cause kickback just as easily as if your hands were to slip. By keeping a close eye on the blades and replacing them when necessary, you can ensure that the saw won’t unexpectedly kickback.
Finally, there’s always the possibility of getting a blade caught in the wood. This is why it’s important to plan your cutting route. This way, you know exactly what you’re cutting and where you’re cutting it. It also helps to use a featherboard, a tool that holds the board in place while the saw is running.
Taking the time to understand the basics of table saw safety is incredibly important. Not only will it help you make the best use of your saw, but it’s also important for everyone’s safety. So, make sure to read up on what you need to know about table saw safety and get to work on creating something amazing.
Learning the Basics
Ahhh, woodworking…the most pleasant of all crafts. Not only do you get to make beautiful things with your own two hands, but you also get to show off to all your friends. But before you do any of that, you better make sure you have a firm understanding of the basics of woodworking safety. Because safety isn’t just important…it’s essential.
Now this isn’t rocket science, but you still need to pay attention. The most important part is to make sure that you have all the necessary safety equipment BEFORE you get into your workshop. You should always wear safety goggles to protect your eyes; wear a dust mask, and make sure your clothes don’t have too many loose pieces that might get caught in machinery. And don’t forget to invest in some ear protection. Even if you don’t blast music in the workshop, the tools can still be loud.
Once you’re geared up, now it’s time to learn the basics. First, you should never operate a power tool without reading the instructions. It’s tempting to just plug in the tool and get to work, but you want to make sure you understand how to use it properly. Take the time to learn its features and what each of them do. It’s also a good idea to be familiar with some basic woodworking principles, like understanding why it’s important to use the right types of wood for different projects.
When it comes to table saws, there are additional safety measures you should take. Don’t forget to use the saw’s safety features, like the splinter guard, the dust ports, the riving knife, and the anti-kickback pawl. Always make sure the cutting area is clear and uncluttered. And make sure you never try to cut a piece of wood that is too long or too short.
Just take your time, understand the basics of woodworking safety, make sure you’re geared up and follow all the safety directions. That’s all there is to it. Now get out there and make some beautiful things. And don’t forget to show off to all your friends!
Using the Safety Features of Your Saw
Today we’re talking about using the safety features of a table saw. Now you might be thinking, easiest way to use a table saw is to just turn it on and let ‘er rip. But I’m here to tell you that’s a surefire way to get hurt.
So let’s start by learning about the safety features of your table saw. Most saws today come with a blade guard, which covers the blade when the saw is not in use or when you’re adjusting the blade height or tilt. This guard helps keep the blade from injuring you or other people in the workshop. Your saw should also have an emergency stop button of some kind. This is there to shut the saw off in case of emergency and should be readily accessible.
Another feature of your table saw is the safety switch. This prevents the saw from starting when the blade guard is in the down position, so you don’t end up starting it while your fingers are in the way. Make sure to double-check your switch before you turn it on.
Finally, your saw should have an anti-kickback device. This device helps in case the saw starts to kickback and throw your project back towards you. It stops the saw from cutting and helps keep you safe.
Now that we know all about the safety features of your table saw, I suggest taking the time to familiarize yourself with the operation of each one. Even if you’re an experienced woodworker, it’s important to get to know the features of your specific saw. Do some practice runs to make sure you understand how each feature works. Your best bet is to operate the saw slowly and deliberately the first few times and become comfortable with the features.
Once you’ve familiarized yourself with the safety features of your saw, you can tackle bigger projects with more confidence.
That’s all I had to say about using the safety features of your table saw. Until next time, stay safe out there.
Preventing Injuries
Ah, injuries. I’m sure you’ve heard of them. Nobody wants that, right? Preventing injuries while working on your projects should be at the top of your list at all times. So, to keep things safe, here are a few tips I can share with you.
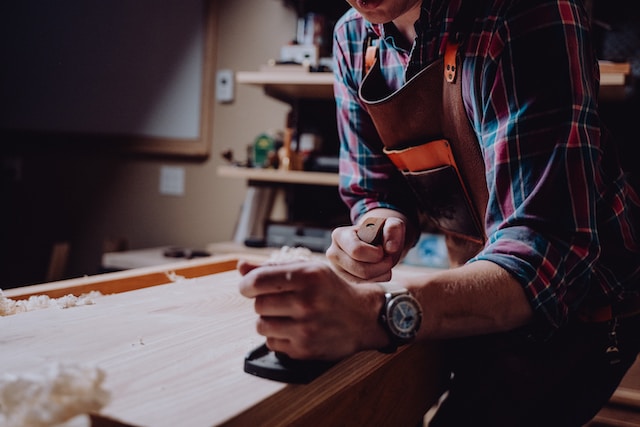
First and foremost, avoid unstable postures while working. It can be easy to forget you need to move around a bit, and that’s OK. Just make sure you’re always trying to find a comfortable and stable posture that puts you in a position to work safely. You don’t want to put your body in any unnatural positions that could lead to pulling a muscle or other painful injuries.
You also want to make sure you’re controlling the workpiece in your hands. Using your hands to move it into position for sawing or sanding is essential, but you want to make sure it’s not slipping or overrunning the marks and lines you’ve worked to make. A handheld guide can come in handy in situations like these.
Finally, use the moment to remember the basics before you jump into any project. Check your tools, examine the workpieces and make sure your workspace is where you need it to be. Never rush through a task, take time to plan out your route and read through any directions or instructions that come with the project, especially if power tools are involved. Taking the time to make sure you’re safe is always a good idea.
So, that’s it. A few basic tips to help you remember that safety is always important. Always keep this in mind and never take risks when it comes to your safety. Good luck and have fun creating all your masterpieces!
Avoid Unstable Posture
When it comes to woodworking safety nothing is more important than avoiding an unstable posture. This can mean the difference between a project that’s finished, and a trip to the hospital. To learn how to avoid an unstable posture, follow these tips from your friendly neighborhood woodworking enthusiast!
First, make sure your stool or chair is of the right height and is stable. This will ensure that you can reach the place where you need to and that there won’t be any risks of falls or accidents. Another simple trick is placing a box, form or some type of structure that gives you extra support while working on your projects – it really helps you in being comfortable and secure while working.
When you are working with a tool, it pays to make sure you are standing on firm ground. If you’re standing on something unstable, such as a wobbly or tilted surface, then you could very easily trip and injure yourself. Always take the extra time to make sure you have a firm, level spot to stand and work on.
To make sure you don’t overwork any one muscle group, it is a good practice to shake out any tightness and stretch out once in a while. Working repetitively on the same project or with the same tool can get you stiff, so a good stretch will help you ease those tensions, improve your posture and prevent any injuries.
Your posture is extremely important while you are working on your projects. You want to make sure you can be in a relaxed state and to keep your back straight. Otherwise, you will be at risk of muscle strain and possible injury. It is a good idea to use your knees and legs for support instead of your back.
Finally, when it comes to woodworking safety don’t forget to use any safety equipment available to you. Make sure to wear safety glasses, dust masks, ear protection, and any other gear that is recommended for that woodworking project you are working on.
By following these simple tips, you’ll be able to enjoy the art of woodworking in a safe way and make sure those projects come to fruition with a smile. Working with wood is an amazing activity, just be mindful of your postures, surroundings, and use the right safety gear. Have fun and be safe!
Controlling Your Workpiece
Woodworking may seem like an easy workaround. You get your tools, their instructions, and you’re off to the races! Well, sorry to burst your bubble, my friend, but it’s not that easy. Safety comes first, and if you don’t prepare, you can pay a high price.
One of the most important safety measures to consider when considering woodworking safety is controlling your workpiece. This can be done in several ways.
One way is to clamp down your workpiece. There are several types of clamps and types of wood that need different clamping styles. You want to make sure you choose the right style and size based on your wood type. It’s best to consult your saw instructions manual or a local woodworking guru before clamping down your workpiece. Alternatively, you can use the hold-down clums they keep the entire piece in place while you work, rather than just one section.
It may also be necessary to feed your workpiece through the saw very carefully. This can be a tricky process, as you need to make sure you don’t cut your fingers and that you keep the saw blade at its optimal speed. It can be helpful to practice this technique on scrap pieces of wood before attempting it on your workpiece if you don’t feel confident.
You may also need to use a featherboard to control the wood as it moves through the saw. The featherboards help to keep the wood in place and can help you to do tricky cuts or make fine adjustments. You will need to experiment with different sizes and shapes of the featherboard to determine what works best for your workpiece.
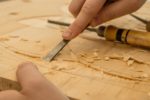
Finally, always be aware of any sharp tools you are using, like a chisel or an adze. It’s very easy for cuts or chips to fly off when you are working with a sharp tool, so always be sure to wear safety glasses when working with these tools. I recommend keeping your gloves handy.
So, my friends, that’s a brief overview of what it takes to control your workpiece and keep your woodworking safe. Clamping, feeding, and using the right featherboards and tools all work together to create the perfect safety package. Just always keep in mind that there are no shortcuts in woodworking, and safety comes first. Always handle your workpiece with care! Oh, and if you feel any level of doubt, always go ask Eddie—I’m always here to offer my help and advice!
Power Tools
Of course, the power tools in your workshop are the real stars of the show. Not only do power tools allow you to get your carpentry and woodworking projects done faster, but they also bring with them the potential for injury if used carelessly. That’s why, if you’re going to be using any power tools in your workshop, you need to make sure you understand the basics of safe operation.
For starters, you’ll want to make sure you’re wearing all the right safety equipment. That means goggles and a dust mask, protective gloves, hearing protections, and steel-toed shoes. It also helps to have a plan in place before you fire up any saws, routers, or drills. Have your lumber pieces marked off and the right equipment set up before you start working to avoid accidents.
When you are actually using any of your power tools, it’s important to be aware of kickback risks. Make sure your wood pieces are firmly clamped to the table and use the proper guide ruler when you make a cut. For using a saw, use the fence and guard to keep the blade out of reach.
Routers also require a bit of special attention. Whenever you’re using a router, make sure you secure the wood piece to the worktable firmly. Your hands should always be a safe distance from the spinning bit itself. Failing that, protective gloves can help.
It’s also helpful to get familiar with the features of your specific tools. In particular, you’ll want to adjust the speed of your drill and router according to the task at hand. Higher speeds are great for softwoods, while lower speeds are better when you’re working on hardwoods.
Finally, it’s always a good idea to clear your workshop of any clutter that might obstruct your work. Poor planning, not paying sufficient attention to detail, and having a haphazard workshop environment can all contribute to a greater chance of injury.
As you can see, understanding the basics of power tool safety and taking the right precautions can help you protect yourself and your workshop. Just remember to keep your safety equipment on and practice proper technique so you can enjoy the fruits of your labor without risk of injury.
Learning the Basics of Safe Operation
Safety is no joking matter, so when it comes to working with power tools, you need to be up to speed on the basics of safe operation.
Learning the basics of safe and effective power tool use is an important step in protecting yourself while woodworking. First and foremost, you want to make sure that every power tool in your shop has the appropriate safety labels and symbols. These symbols are usually accompanied by a brief explanation of the tool’s intended use or specific safety requirements.
Secondly, you should always inspect your tool for any potential hazards before you use it. Before plugging it in, check for frayed cables or other potential problems. Ensure that your workspace is free from obstructions that could lead to a hazardous situation.
Once you’ve inspected the tool and cleared the workspace, it’s time to set up your safety gear. While working with a power tool, it’s essential that you protect your eyes and ears with safety glasses and hearing protection. Wear the appropriate protective clothing and make sure that you’re never wearing loose or baggy clothing or jewelry.
Before using the tool itself, always perform a dry run to make sure that it operates properly and that you’re comfortable with the way it works. Have a firm grip on the tool, keep your fingers away from the bit or blade, and position your body so that you can properly manipulate the material in a safe and effective manner.
Finally, always read and follow the instructions and warnings included in the tool’s manual. They should cover everything from startup procedures to shutdown protocols, and should serve as a guide for safe and effective operation.
By following these simple steps, you’ll be able to use power tools with confidence in your woodworking shop. The most important factor to remember is safety first—so take the time to learn the basics of safe power tool operation and you’ll have a safe and enjoyable woodworking experience.
Minimizing Kickback Risk
Heya safety-lovers! Here we are again, discussing kickbacks and all the wacky risks every woodworker should be aware of. So, first things first- what are kickbacks? Well, kickbacks are basically when the workpiece (the piece of wood you’re working with) gets caught up in the blade and comes at ya like a rogue rocket! As Steven Wright says, ‘You can’t have everything…where would you put it?’ That’s why it’s super duper important to minimize the chance of kickbacks in the shop.
Let me clue ya in on how to avoid ’em.
Always use a proper push stick when you’re guiding a workpiece around the blade, especially when you’re cutting small pieces. And whatever you do, don’t ever pick up a piece while it’s still in the blade! That’s way too shady.
Taking a few extra moments to think through your cut route before you start the saw is worth its weight in wood sawdust. Planning and paying attention to each step will help prevent snags that could cause a kickback. And always keep your hands away from the blade!
Checking the blade for deformation and wear, especially before use and after sharpening, is also important. Blades that are warped can cause a workpiece to jam and lead to a potentially dangerous situation. And, always make sure all safety guards are working properly and aligned, as they can help prevent kickbacks.
Be mindful that smaller saw blades tend to cause more kickbacks, since they can easily become cluttered and clogged. So, if you are working with smaller pieces, it’s a smart move to up the blade size.
Right now you may be thinking- can anything good come out of kickbacks? Well, yes! There is a plus side.
The good news is that all that bouncing around can help ya keep ya on ya toes and have ya all the more vigilant in the shop.
So, in a nutshell, follow the tips I just outlined and you can reduce the risk of kickbacks and escape unscathed. And remember, safety comes first!”
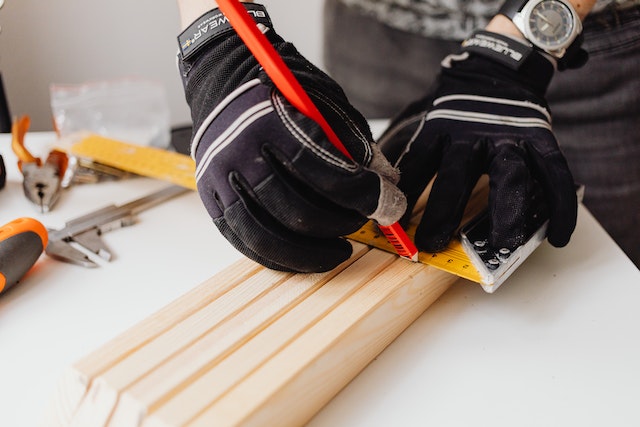
Understanding Rulers and Guides
Ahhh, rulers. The tool that separates the men from the boys! Sure, you may have mastered the basics of your power tools, but do you REALLY know what you’re doing in the workshop if you don’t know your way around a ruler?
Answering that question, in a word: no. No, you don’t know what you’re doing in the workshop without an understanding of rulers and guides. But it’s okay, because I’m here to help you.
To start, let’s talk about what kind of rulers and guides you’ll want to use. Well, it all comes down to finding the right one for the job. If you’re doing any kind of measuring or marking, you’ll need to make sure you’re using the ruler that’s best suited for your task.
Analog rulers are great for small measurements and cutting, but digital rulers are the way to go for more precise and complex cutting jobs. Then there are specialty rulers, like those with built-in angles and curves to help you tackle just about any project.
It’s also important to recognize the dangers of improper use of rulers and guides in the workshop. Whether you’re measuring a piece before cutting, or marking for joinery, you need to ensure that the ruler and guide are firmly attached to the piece. An improperly secured ruler is likely to slip, leading to a dangerous, and potentially more expensive, mistake.
When it comes to marking, make sure that the ruler is snugly pressed against the wood so that the line stays straight. I prefer to use a square, triangle, or T-square to make sure I get accurate lines, which are especially important when cutting small dovetail joints.
Finally, make sure to inspect the rulers and guides you’re using. It’s important to check them regularly to keep them accurate and safe to use. A damaged ruler or guide could fail and cause injury in the workshop.
So, at the end of the day, do you really need to understand rulers and guides in the workshop? I think the answer is a resounding yes! Taking the time to familiarize yourself with the best tools for the job and properly inspecting them regularly will go a long way in keeping you safe and your projects looking great. Now you’re ready to be a pro in the workshop!
Handling Sharp Tools
Ah, we come to one of my favorite sections of any woodworking safety guide: handling sharp tools! You know, I recently saw one of those motivational wall posters that said something like “Sharp tools turn raw materials into works of art.” I thought it was cheesy, but it rings true, doesn’t it?
In any case, handling those tools safely is important, and there are a few tips that have helped me in my years of woodworking. First and foremost, you want to plan out your cutting route before you start. It’s easy to get carried away and start sawing without a plan, but that’s a surefire way to get an unexpected nick or snag in your project. I’ve seen it happen to other woodworkers, and believe me, it’s never a pleasant surprise!
Having an idea of what you’re going to cut helps you get things done more efficiently, too. Another pro tip is to start on the outside of your project and work your way in. Check the grain of the wood so that you know how it’s going to behave, and make sure you know how to use the tool. If you want to make a particular cut, practice on some scrap first so that you know how the tool should feel when it’s working properly.
Finally, when you’re done, it’s important to take safety precautions. Never leave an exposed blade in a place where it could be touched by unsuspecting hands. Always make sure that the blade you used is completely secure before you put the tool away. It’s also smart to leave the area around where you’re cutting clear of any obstacles before you begin.
So, that’s it for handling sharp tools. I know that those sounds like simple pieces of advice, but if you follow them then you won’t have any problems in the workshop. Remember, sharp tools can turn raw materials into works of art, but if you’re not careful then you could end up with a one-of-a-kind medical artifact instead!
Planning a Cutting Route
Hey, y’all! Now, let’s talk about the most important part of woodworking – planning a careful cutting route. Now, I’m sure you know that it takes skill and experience to get the best results. And regardless of your skill level, it’s important to start your project by planning a route for cutting. This is the only way to ensure a safe, successful outcome.
First and foremost, always double-check measurements before making any cuts. Marking the cut lines accurately is essential. Then, you should determine the best direction for cutting. Go with the grain of the wood whenever possible, because it will result in a smooth and accurate cut. This is especially important if you’re cutting intricate shapes, as going against the grain can cause unexpected twists and curves.
Next, figure out the appropriate order for cutting pieces. For example, you should always cut along the longest edge first, so that you have less chance of wasting wood. Whenever possible, try to make each cut serve two or more functions. For instance, if you need to cut a bunch of pieces to the same length, cut them all at once.
Finally, be sure that your cutting tool is sharp and properly maintained. Dull blades will cause extra stress on the piece you’re cutting, increasing the likelihood of a mess-up. Plus, blades that are too dull can even be hazardous – you don’t want any kickbacks or slips!
See? Woodworking planning isn’t all that bad! As long as you pay attention, there’s no need to worry. That’s why I always say double-check, check, and recheck all your measurements. That’ll help keep you safe in the workshop. Now get out there and start woodworking!
Avoiding Nicks and Snags
Let me tell you, I get the chills thinking about avoiding them nicks and snags. In the woodworking world, nothing is worse than having a perfectly smooth piece of wood that gets all ruined with a nick or a snag.
No one wants that, so this subsection of the ultimate guide to woodworking safety is gonna come in real handy when you’re working in the shop.
First off, don’t forget the basics like always be aware of your surroundings in the shop, sweep up sawdust and debris regularly and wear the right safety gear!
Second, anytime you are cutting, plan out your path and don’t forget to follow that map you made. That way you can avoid those pesky nicks and snags that could totally ruin your woodworking project.
To help you avoid nicks and snags, use rulers and guides when you’re sanding. These are super important when it comes to having perfect, smooth cuts. A ruler helps keep your sanding in straight lines and a guide stops your saw from ‘chopping’ into the wood in all the wrong places.
Third, use extra caution when cutting through a hardwood. Hardwoods are much harder to cut through compared to softwoods. When cutting through a hardwood, it’s important to double-check the blade and tool to see if they need sharpening or repair to avoid causing nicks and snags.
Next, if you’re using a sawmake sure to adjust the elevation so that your blade is slightly above the top of the stock you’re cutting. This will help avoid the nicks and snags that could really mess up your woodworking project.
Finally, have patience and take your time when making cuts. This will help you control the saw and keep the blade in line with the wood. Even if you have a great saw with all of the right features, you still need good old fashioned practice to avoid making any nicks or snags.
That about wraps up this section of the ultimate guide to woodworking safety. I’m so glad we’ve taken the time to talk about avoiding nicks and snags and how to do that in a safe, careful way.
Finishing Projects Safely
It’s critical when it comes to ensuring your health and well-being in the workshop.
So let’s talk about sanders. Sanders are the tools of choice when it comes to polishing woodwork. But even with their awesome abilities, they can still be very dangerous.
That’s why it’s important to always practice good safety when you’re using a sander. Make sure to wear protective equipment like safety glasses, earplugs, and a dust mask when sanding. You should also avoid working in any awkward positions that could lead to an injury or an accident.
As for the sandpaper that you’re using, you want to make sure that it’s the right one for the job. As with any tool, different sandpapers require different speeds and strokes to get the job done correctly.
And once you’re finished sanding your project, give it the once-over with a dust mask. Even small particles of dust can cause medical problems if inhaled. So never forget to wear your dust mask when you’re finishing up a project.
Finally, it’s always a good idea to remember the basics of woodworking safety. Make sure that you’re using the correct tools and that they are in good working order. And of course, practice proper shop etiquette to minimize the risk of accidents and injuries.
So that’s it! With these simple tips, you should be able to finish any woodworking project safely and without worry. Have fun, stay safe, and happy woodworking!
Sander Safety
Ah sahnders, yes sahnders. What can I say about the good ol’ sanders? Sanders are great for finishing off a project, but you need to be careful and employ the right safety precautions to ensure you don’t sand off more than you wanted to.
The first thing you have to be sure of is that you have the right sander for the job. The size and style will depend a lot on the size of the project and the material that you’re dealing with. For instance, if you’re working with a large piece of wood then you’re going to want a larger disc sander. Or if you’ve got a piece of hardwood then you’re going to want to get yourself an orbital sander.
The next thing to be aware of is the various dust protections that need to be utilized. Whenever you’re sanding wood, you are creating dust. This dust can be hazardous to your health, so you need to make sure that you’ve got the right face mask, eye protection (goggles), and some kind of dust collector to help with the clean up. You also want to make sure that all of the sanders guards and guards are secured in place so there are no loose parts.
Finally, when it comes to employing the right safety practices while sanding, you need to focus on maintaining a strong grip on the sander without excess pressure, keeping a firm footing and never reaching over the surface, and being aware of all potential kickback points. If you’re continuously mindful of these safety steps, then you should be able to sand away without any problems.
With all that being said, sanders really are a great way to finish your project with the right kind of finesse. Just remember to take the time to get familiar with the sander itself and to always stay safe while you’re operating it.
Finishing Up with a Dust Mask
Ah, the dust mask. It’s the bane of any woodworker’s existence. Whether you’re a beginner or a seasoned pro, the wood shavings and other particles released while finishing a project can pose a health risk, so it’s important to protect yourself with the right gear.
When picking out the right mask, make sure you have one with the right fitting. It should cover both your nose and mouth and fit snugly against your face, without any gaps that would let any particles escape. It’s also important to get a mask that has the appropriate rating when it comes to blocking out dust particles.
Also, remember to double-check your mask before you start working on your projects. Make sure that the straps are secure, that there aren’t any tears or holes, and that the filter is in good shape. A ratty old mask won’t do the trick.
Once you have your mask on, it’s important to remember a few safety basics. Make sure you’re working in a well-ventilated area, as dust particles can linger in the air and still be inhaled- and that’s just not good. And although it’s hard to resist the urge, avoid inhaling while you’re working. It’s just not worth it to take the risk.
Oh, and don’t forget the most important tip: change your mask regularly! With all those particles flying around, your filter can get clogged up pretty quickly. The general rule of thumb is to change it every eight hours or when you can’t smell any aroma through it. As well, remember to discard the filters properly.
All in all, the dust mask is an essential piece of protective equipment for any woodworker- so take the time to get the right one and wear it properly. That way, you can ensure your workshop is a safe and healthy place to work- now that’s a win in anyone’s book.
Remembering the Basics
OK, now let’s bring it all on home and make sure you’ve got your safety tips all locked down.
When it comes to woodworking safety, there ain’t no substitute for common sense. Like, pay attention to what you and do, keep those sharp tools away from your melon, and don’t forget to put on all that protective gear like the respirator and safety glasses, right?
But all that stuff that you get at the hardware store, when you don’t know what it’s for, just take something, you’re gonna be safe, right? Uh-huh, not so fast.
This is ironic if you think about it, but safety gear is only effective if it fits properly, ya know? So make sure you know what’s what, and get what you need so it can actually do what it’s made to do. If a respirator doesn’t fit your face correctly, or you can’t see a darn thing through the safety glasses, then you’re just playing Russian Roulette with your eyeballs and lungs, know what I mean?
Dust can be really hazardous to your health, even if it all looks clean and harmless, so if you haven’t already, get yourself a dust collector system that can suck all those nasty dust particles out before they get in your lungs, that’ll help keep you safe, too.
Have you heard about Rulers and Guides? Well, this is something that a lot of people have a hard time understanding, so I’ll try to break it down for you. See, rulers and guides are like imaginary straight lines that you have to draw in the air when cutting, to keep the material straight, so you can get your measurements right. It’s like having a ruler in your head, or a guide that shows you the direction you need to go, ya feel me?
Finally, always make sure to keep those tools sharp! Dull tools are dangerous, you know, because they can slip more easily and cause more damage, so it’s important to keep those baby’s sharp, with a file or a whetstone.
So that’s what it’s all about, word up. Remember woodworking safety–don’t do anything crazy, keep your gear and tools in check, and always use your common sense. You can make some beautiful wooden masterpieces without ever having to worry about getting hurt. Now, go make some sawdust!