How to Make a Perfect Miter Joint for Your Woodworking Project
If you’re looking to create clean and seamless corners for your woodworking project, then a miter joint is the way to go. Miter joints are commonly used for picture frames, molding, and even furniture.
However, achieving a perfect miter joint can be tricky, especially for beginners. In this article, we’ll walk you through the steps on how to make a perfect miter joint for your woodworking project.
Gather Your Materials
Now don’t worry we’re gonna make that perfect miter joint for your woodworking project today. First things first you got to gather the materials. Now, you not gonna need the kitchen sink, but you do need some stuff.
First, you gonna need the materials. The most important thing you gonna need is the wood you’ll be cutting the joint with. Measure out the piece you want cut, then grab it while you still got the tape measure out. It’ll save you from having to measure it again later.
Next, you gonna need some tools. Whether you’re using a handsaw or a miter saw, you gonna need blades for the saw. Make sure you have the right size of blade for your cutting job, and don’t forget the spares in case you need them.
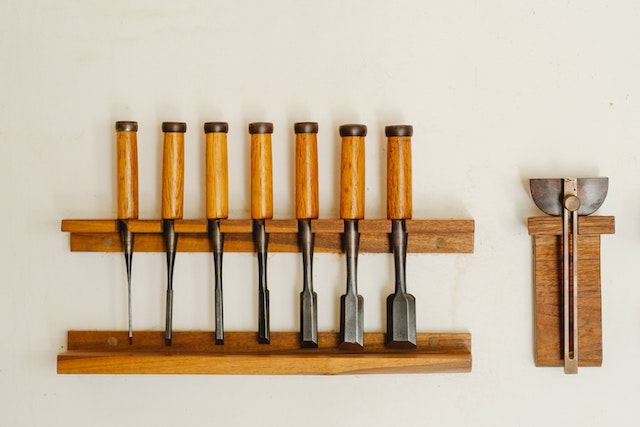
You might also need a few additional supplies depending on the project, such as chisels, sandpaper and glue. However, these are optional and not necessary for every project. Make sure you have a good workspace setup with plenty of room to work.
Finally, you should make sure to have safety gear. A pair of gloves and safety glasses will do the job nicely. It might seem like an hassle, but trust me, you don’t want to get wood chips in your eyes.
And there you have it. Those are the materials and tools you need to gather for your upcoming woodworking project. Now that you’ve got everything you need, let’s move on and make that perfect miter joint.
Materials Needed
Are you ready to make a perfect miter joint for your woodworking project? Let me tell you, it’s a tedious yet satisfying task, my friend. First and foremost, you need to gather the necessary materials before you get started. Here’s what you need to collect:
– Tools: A miter saw is a must-have tool here, and you may need to use a coping saw as well. If you don’t have a miter saw, you can do this with a handsaw, but it won’t come out as neat. Also, make sure to find a good quality clamp for better accuracy.
– Hardwood and Lumber: The material you use for your project will determine the overall strength of the miter joint. Select something that is easy to work with, and make sure it has a consistent grain pattern. Also, make sure the pieces are straight, and the edges are cut accurately.
– Wood Glue: Even if you want your project to be as strong and sturdy as possible, you need the right kind of glue. Stick with a good quality wood glue so that it can last.
Now that you have the materials, you can start getting everything ready. Make sure all the pieces you need are close by, and everything is in its right place. Don’t forget to use safety equipment to protect yourself while you work.
Remember, the key to making a perfect miter joint is to take your time. Work through each step carefully, and your project will look professional when you’re done. Good luck!
Tool Needed
You’ll need the right tools in order to make a perfect miter joint for your woodworking project and I ain’t talkin’ about a chainsaw or a band saw. A saw that is specifically made to make miters is what you need.
The most common type of saw to use is a miter saw – that’s where the name comes from, so you know it’s the perfect tool for the job. It’s a circular saw that slides along a track on a base and can make precision cuts. You can find miter saws at most home improvement stores and they usually come with different settings so you can get different angles.
You will also need to get some clamps to hold the boards in place while you make the cut. This will make sure that your boards are held tight together and don’t move while you are sawing.
Finally, you’d need some sandpaper to make sure that your miter joint looks smooth when it’s finished. Sandpaper comes in different grits so make sure you get the right type.
And don’t forget the safety glasses! Even if you’re making a miter joint, you don’t want sawdust flying in your eyes. No one wants that!
Now that you have the tools you need, you are ready to start making your perfect miter joint. Just make sure you measure twice and cut once. That way you don’t have to start all over again. Good luck!
Align the Board’s Edge

Ah, the miter joint. A fundamental step in all woodworking projects, the miter joint is the glue (well… actually the glue comes later!) that holds your projects together. But in order to get it right and make sure your boards fit perfectly, you first have to align the board’s edge.
When positioning the boards side by side, be sure to do it accurately with a square. No, not the ones you have in your pocket! I’m talking about a try square. A try square is an angle measuring tool used for marking and measuring, which makes it ideal forboard alignment.
Once you have the try square ready and you’ve aligned your boards, it’s time to check that everything looks right. Make sure both boards have matching edges, and there’s no tear-out or chips. If that looks good, proceed to the next step!
Now comes a crucial part: plus the blades. This involves setting up your saw blade to the right miter angle. The preferred angle is usually 45°, so adjust it accordingly. Once the blade is set, turn the saw on and check that the blade’s miter linesup consistent with your try square. If it’s all good, you’re ready to cut the miter joint!
Check the Joint
If you’ve ever tried to do a miter joint by just eyeballing it, you know how important it is to get it right the first time around. That’s why the first step before cutting the board is to check the joint for accuracy. It’s all about precision, folks!
First, take a look at the two boards you are going to be joining. Make sure they both have their edges at 90 degrees and that the miters are at 45 degrees. Take your time here and double-check everything. If you find yourself wavering, step away for a few minutes and come back to it.
Next, choose the boards you’re going to work with and lay them out next to each other. Check to make sure they are flush. If you’re using a miter-cutting saw, adjust the blade so it creates a cut that’s deep enough to join the boards but not too deep. It’s always a good idea to practice this on a scrap piece of wood before jumping in.
Finally, make sure the markings are in the right place and make sure everything lines up correctly. This may require some patience and re-measurement, but again, it’s worth the extra effort in the long run.
And there you have it! A few simple checks to ensure your miter joint is perfect. Don’t forget, as always, take your time. The more you put into it, the better your results will be. Now go forth and create some gorgeous furniture!
Plus the Blades
Doing complex woodworking projects can be intimidating, especially when it comes to miter joints. But don’t let that scare you; I’m revealing all my secrets to making perfect miter joints. Let’s begin with the blades.
The blades for a miter joint need to be precisely aligned for a neat finish. To get this right you’ll need a sliding t-square, mitre square, or mitre saw. Place your material on the saw table and adjust the saw fence and the angle of the saw blade to the desired angle of cut – usually 45 degrees. Now, height wise and depth wise, you’ll want the blade to exactly match the thickness of the material. To check that, use a ruler and set it up at the level of the blade.
Now that you’ve aligned the blade, lock it into position so it won’t move. This is important for your safety, and for precise joints when you make the cuts. When you turn the saw on, the blade needs to be clear of the wood – if it’s lowered too far, the blade won’t have time to speed up and cut smoothly. Make sure that all the guard adjustments are in place, and double check the depth setting before you power on the saw.
Once the blade is in place, it’s time to make the cuts. But don’t just jump right in–measure your work twice and cut once! That’s a good rule of thumb for any woodworking project. The precision of a miter joint will all come down to how accurately you cut the pieces. This is especially crucial if you’re working with cherry or walnut lumber, as these woods can be very hard and take longer to sand.
Don’t vamp, take your time and take precise measurements to ensure that your joint is perfect! You may even want to go as far as marking out the angles on a piece of scrap lumber and cutting it to double-check the accuracy of your cuts.
Now, don’t be daunted; if you follow these simple tips, you’ll be sure to make perfect miter joints every time. All it takes is a little time and lots of patience. It’s not magic, just the way of the master woodworker!
Cut the Miter Joint
Ah yes, the moment you’ve been waiting for – it’s time to cut the miter joint! This can be a bit daunting, especially if it’s your first time, so take deep breaths and have no fear– you’ve got this! You’re going to need the good, old-fashioned skill, precision, and determination to make the perfect miter joint.
First, you must prep the wood prior to cutting. Make sure to properly measure the wood to ensure your miter joint won’t be too loose or too tight. Once you’ve got your pieces marked accordingly, it’s time to make the initial cut. I don’t know about you, but I love this part!
Set the saw’s depth and angle adjustments just so. Put on your eye protection! Safety first! Now, slowly and evenly, feed the wood into the blade. Oh, the satisfying sound of the blade cutting through the wood. This is when my adrenaline starts to kick in and I get all fired up! Go slowly and stop right before you make it all the way through. Make sure you’ve done this part right, because the miter joint is only as good as the initial cut.
Now, it’s time to complete the miter joint. But wait – don’t get too excited just yet, or you might end up going too fast and make the final cut wrong. Take a few more deep breaths and line up the initial cut with the saw’s blade and make the final cut. Make sure to take your time because this is where precision counts.
Finally, pull the pieces apart and check the joint. Take a step back and admire your work – you’ve just made a perfect miter joint! If you’ve made a mistake though, don’t worry – it happens, and it’s ok! Take a break and start over, but make sure to be extra careful the next time. Pat yourself on the back and get ready for the next step – assembling the pieces and gluing them together.
Make an Initial Cut
Hey everyone! Are you ready to create the perfect miter joint? Well, then let’s get started! First things first – you’ll need to gather all the materials and tools needed. Now that you have that squared away, it’s time to cut the miter joint.
Making the initial cut is critical. You’ll need to make sure the board’s edge is aligned to make the perfect miter joint. So double check that the boards are lined up properly. If the joint isn’t aligned correctly, you may find yourself with uneven cuts and assemble a crooked joint.
Once you’ve checked the joint, adjust the blades accordingly. You’ll want the blades to be at an exact 45 degree angle so that you’re sure to get the best miter for your woodworking project.
Once the blades are set, you can start cutting. Take your time, and make sure the cut is precise. With the initial cut complete, you’re ready to make the final cut.
And that’s it for the initial cut. So let’s recap: you’ll need to gather your supplies and tools, make sure the joint is aligned, adjust the blades to a 45 degree angle, and then cut the board. Easy-peasy, right? Now that the initial cut is complete, let’s move on to the final cut, and you’ll be on your way to making a perfect miter joint!
Make the Final Cut
Are you feeling pretty confident about making that perfect miter joint for your woodworking project? Good! Now it’s time to make the final cut.
Start off by checking that both board edges are still aligned properly. This is important since any change in alignment while making the cut will affect the joint’s stability. If everything looks good, you’re ready to make the last cut.
Now, the key here is to start the saw before it hits the wood and make sure that the saw is held firmly. Take your time here—it’s better to go slow and steady than hurry up and end up with an off-centered cut. Make sure to follow the miter saw’s instructions when guiding the saw towards the wood. Listen carefully, hold it firmly, and voila! You’re done with the final cut; the only thing left is the joint assembly.
If at this point you find yourself thinking, “ What was I thinking?” don’t despair—just take a step back and remember that taking on a big woodworking project can be intimidating. Even if things don’t turn out perfectly the first time, as long as you remember to stay patient and to take your time, you’ll get it done soon enough. Just don’t forget to have a little fun along the way! Good luck!
Assemble the Pieces
As any woodworker knows, assembly is one of the most important steps in any woodworking project. Whether you’re making a coffee table, a picture frame, or a simple miter joint, you’ll need to know how to properly assemble the pieces to create your final product. So let’s get to it!
When you first begin to assemble your miter joint, make sure you take the time to get it right. Start by making sure the pieces fit together properly. Place them in the right positions to form a joint and make sure the angles are aligned correctly. If something isn’t quite right, take a step back and make sure no mistakes are being made.
Once you are satisfied with the fit, it is time to bring everything together. Take your clamps and position them properly. Clamps will help hold everything in place during the gluing process and make sure the joint is secure. With the clamps in place, give the joint one more check over to make sure the pieces fit snug together.
Now you are ready to begin glueing. You’ll need to choose the right glue for the job; you’ll want to make sure it can bond the type of wood you are using together. Don’t skimp on the glue either, make sure it is applied generously and evenly to all the surfaces.
Once you have applied the glue, it is time to secure the joint. The clamps will come in handy again, the job they are doing is to ensure a snug fit while the glue dries. Put the clamps in place and give it one more check over, to make sure everything is properly held in place.
And, last but not least, let the glue dry. It is incredibly important to let it dry completely before you attempt any other steps in your woodworking project. Once the glue is completely dry, use sandpaper or a sander to smooth out any rough edges.
And there you have it. With the proper materials, tools, and techniques you can easily create a perfect miter joint for your next woodworking project. Good luck, and have fun creating!
Make sure the Joint Fits

When it comes to ensuring a perfectly fitted miter joint, accuracy is key! Now that your miter joint has been cut, it’s time to test and make sure that your woodworking project is ready to be assembled. Before adding glue, you must make sure that your miter joint’s edges fit together perfectly with any gaps that could compromise your project.
For starters, you’ll want to align the pieces that you’re joining as closely as possible. Make sure that the pieces of wood you’re trying to join have their edges parallel and any marking tools, such as a pencil, are properly oriented. This is an important step as it will help you guarantee a perfect miter joint, no matter how tight the cuts are.
Now, use your free hand to hold the two pieces of wood that you’re trying to join together, place them in front of your eyes, and look for any gaps or misaligned parts. If you’re having issues determining if the joint fits due to your limited vision, take a ruler and check for any discrepancies. That said, if there’s any give or movement where the wood joined, then it’s likely that the joint isn’t fitted correctly and you’ll have to start again.
Once you’ve determined that the joint has been made correctly, it’s time to move on to the next step. As the old saying goes, “measure twice, cut once” and when it comes to creating a perfect miter joint, this couldn’t be truer! Pat yourself on the back if you successfully created a perfectly fitted joint and congrats! Ain’t that something? Now go have yourself a beer and celebrate your accomplishment!
Place Everything Together
I’m here to show you how to make the perfect miter joint for your woodworking project! A miter joint is one of the most important tools for putting two pieces of wood together.
This brings us to the fourth main step in the process: assembling the pieces. Once you’ve checked the fit of the joint and made sure everything lines up correctly, it’s time to actually put the pieces together.
First, place all the pieces of wood on your work surface. Line up your boards with the cut edges facing each other. Then, use your hands to press the edges firmly together. The joint should fit snugly, with no gaps.
If the joint is too tight, you may need to make some adjustments. Check the blades on your saw to make sure they are perfectly aligned. If the blades aren’t in the right position, the joint won’t fit together properly. Adjusting the blade positions can help the joint fit together more easily.
If the joint is too loose, you may need to make some extra cuts. You can use a chisel to trim away any excess wood from the edges. This will help the pieces fit together more snugly.
Now that your pieces are in place, it’s time to glue them together. This step is important because it helps ensure that your miter joint will stay in place and not move around. Read on to the next step to find out how to glue the boards together.
That’s how you place everything together for your miter joint! With a few easy adjustments, you can get the perfect fit for your project. Now, let’s move onto the next step and get that joint glued up and ready to go!
Glue the Board Edge
Ah, the most exciting part of woodworking… glueing time! Nothing quite like the smell of fresh glue, am I right?
Anyways, before you get to glueing, you’ll want to make sure you have the right kind for the job. Certain types of glue require a specific amount of time to dry, so check the labels of what you’re using to make sure you’ll have enough time to let it set.
Once you’ve picked the glue for the job, you’re ready for the fun bit. Take your boards, make sure the edges are in contact, and apply a generous amount of glue at the joint. Make sure that your applied glue gets into all of the little crevasses and gaps, otherwise you won’t get a good fit.
As you’re glueing, you’ll want to apply just enough so that some of it squeezes out to the sides, but not enough to get over the boards and make a mess. This can be tricky, but it’s all part of the process.
Once you’ve applied the glue, use a small brush or a paper towel to clean up the excess. You don’t want it to dry in clumps and bumps, so spreading it out evenly is key.
You’re almost ready to move on to the next step. Now, you’ll just need to let the glue dry completely before you proceed. Depending on the type of glue you use, this could range from a few minutes to a few hours. Don’t rush it, or you’ll regret it later!
Select the Type of Glue
Ah, what kind of glue should ya use for the perfect miter joint ya ask? That’s a great question, ’cause there are a few options that you can choose from! So, let’s go over them.
The first type of glue you can use is wood glue. Wood glue has been used for centuries by carpenters, furniture makers, and everyday hobbyists. It is strong, waterproof and easy to use, making it a popular choice among builders. Just make sure to apply the glue properly and allow it to dry completely before moving on to the next step!
The second type of glue you can use is epoxy. Epoxy is a more modern type of glue and is ideal for projects that require a very strong bond. The strength of the bond will depend on the type of epoxy you are using and how you mix it, but it is generally very reliable. Just make sure to read and follow the instructions on the epoxy package before starting this step!
The third type of glue you can use is polyurethane. Polyurethane can provide an even stronger bond than epoxy and is particularly good for projects when a waterproof and durable bond is needed. Like with epoxy, you need to read and follow the instructions on the package before applying it, and make sure to allow the glue to dry completely before moving onto the next step!
So, there ya have it! No matter what type of glue you choose, make sure to use it properly and allow it to dry completely before moving on to the next step in your project. Now, go get that miter joint perfect!
Apply the Glue

Oh man, the time has come to apply that glue! Alright, for maximum effectiveness, woodworkers need to choose the right type of glue for their project. For miter joints, there are a few types that work especially well, like wood glue, construction adhesive and hot glue.
Now I’m a fan of wood glue. I mean, it’s not just for woodworking! It can also fix wobbly tables and chairs and is a great adhesive all-around. The key here is to spread a thin and even layer of glue on both surfaces of the joint. This will ensure that the joint is secure and lasts a long time. Don’t forget to wipe away any excess glue after you’re done applying it.
Construction adhesive is also a great option. It’s applied in much the same way, but it has a stronger bond than typical wood glue, which makes it perfect for thicker and more complex projects. Hot glue is, as the name implies, a glue that actually melts into the joint. It works great for smaller items, but can result in a less secure bond over time.
No matter which type of glue you choose, there’s still one more step before securing the joint with clamps. Yeah, don’t forget to check for any gaps between the joint when you’re done! You don’t want any air pockets between your pieces, otherwise the glue won’t be able to do its job.
Alright, once everything looks good, it’s time to clamp the joint and let it dry. Now I’m gonna let you in on a secret: if you have a lot of clamps, it’s really easy to secure a miter joint! Just remember to tighten them evenly and you’ll be golden.
And boom! That’s it. Now you know how to apply the right glue to make a perfect miter joint for your woodworking project. Go forth and be the handyman you always dreamed of being.
Secure the Joint
Ahh, you’re almost there! Now you’re ready to secure the joint. Securing the joint is the most important step since that’s what will hold the two boards together. Let’s take a look at what you need to do.
First off, you need to get some clamps. Clamps are the only way to put pressure on the joint and hold it in place while the glue dries. Any type of basic clamp should do the trick – just make sure it reaches across the joint and can press both boards firmly together.
Once the clamps are in place, check the joint to make sure everything is aligned nicely. This step is important since you need to make sure the boards don’t shift out of place when you apply pressure with the clamps. If everything looks good, you’re ready to go!
Now that the clamps are all set, press them firmly down on the boards to apply pressure and hold them firmly in place. Be aware that if the boards don’t fit properly, the clamps might not do the trick. If that’s the case, you might need to readjust the joint and start over.
Finally, just double check the joint one more time to make sure it’s secure. If it looks good, then you’re ready to move on to the next step and let the glue dry!
Secure the Joint with Clamps
Now that you’ve processed the wood, aligned the edges of the boards, made the miter cut, and assembled the pieces, it’s time to glue the board edge and secure the joint. So grab those clamps…seriously, look for them and get to clampin’!
Alright, so picture this, you find your clamps and have them ready at the joint you’ve created. It’s time to spread the glue on the joint and set it with the clamps. I know, clamps can seem tricky. But don’t be scared, it’s actually quite simple.
All you need to do is place each clamp at opposite sides of your miter joint and slide it tight. Make sure that your miter joint is completely secured in between the clamps and isn’t allowed to move or shift. Then turn the screw and pull the clamps tight. Make sure the joint is still lined up right and that the clamps are positioned properly. You want to make sure that the clamps are snug, but not too tight; otherwise, you might squeeze out the glue and leave gaps in your joint.
Once your clamps are in place, you can add more if needed. Just repeat the process and make sure your joint is tightly secured in every direction. Now it’s time to let that joint do some setting up!
And that’s all you need to do to secure your miter joint with clamps! See how easy it was? See how I told ya “don’t be scared, it’s actually quite simple.” Alright now, on to the next step – letting your miter joint glue dry!
Check the Joint Again
Alright gang, now that we got everything glued together, it’s time to check the joint once more. You know how us woodworkers like things to be as precise as possible, so double-check that joint before we move on. I’m just gonna put my finger along the joint and see how it fits. If there’s any gaps or uneven edges I’ll adjust the clamps a wee bit and make the necessary adjustments.
Now it’s time to break out the protractor and double check the angle of the miter. We want a precise 45-degree angle, so grab that protractor and let’s make sure everything is just right. Now take your time and measure at each corner, and make sure that angle is exactly 45-degrees. If it’s just a little bit off, I’ll take a few swings of the saw and bring it back in line.
Once we’ve got that angle all squared away, let’s bring out the square and check the squareness of our joint. I like to set the square against the edge of my board, then press the other side of the square against the edge of the joint. If the joint is straight, there will be absolutely no gaps. And if the joint isn’t straight, something won’t line up. Make sure it’s all perfect, ’cause if it ain’t perfect, we gotta start all over.
So let’s check that joint one more time before we move on to the next step, just to make sure there’s no gaps and the angle is perfect. I’m like a mother hen with my woodworking projects, I like to be sure everything’s right before we move on. And if you’re ever feeling lost, just come back to the joint, because if the joint isn’t perfect, nothing else matters.”
Let the Glue Dry
Hey there, all you artisan woodworkers out there, have you ever wondered why the perfect miter joint has eluded you for so long? Well, have I got an idea for you! The last major step of the miter joint process is so easy, you’ll kind of regret you haven’t been doing it all along. Letting the glue dry! That’s right. All you need to do is let that glue dry and you’ll have yourself a brand new miter joint.
It’s seems so simple, but I’m sure some of you are saying, “Man, why should I let the glue dry? Can’t I just start using my project right away?”. Well, now hold on, my crafty friends, I’m gonna show you why you should wait.
When it comes to letting the glue dry, you want to make sure you’re doing it right, so that your project looks as professional as possible. You’ll need to start by selecting the right type of glue. Depending on the type of wood you’re using and the length of time you want the miter joint to last, you’ll want to pick the type of glue that best fits your needs.
Once you’ve got the right glue, go ahead and apply it to the edges of your boards. Make sure to spread it evenly and cover all the surfaces that will be joined together. This part is important. You don’t want any gaps in your joint, so put that glue on there good.
After the glue is applied, go ahead and secure the joint with clamps. This will ensure that the boards stay together and the adhesion is strong. Finally, let the glue dry completely. This will take some time, but it will make all the difference in the end.
Now that the glue has dried, you can go ahead and check the joint once again. Make sure that everything is aligned properly and that all the surfaces are snug fit together. If not, you’ll want to sand any extra glue or rough edges.
And there you have it! You’ve completed the final step in creating the perfect miter joint. Now you can go ahead and show off your masterful craftsmanship to your family and friends. Just remember one thing – always let the glue dry!
Let the Glue Dry Completely
Ha ha ha! Ok, check it out; everyone knows that when you glue wood together, it needs time to – yah know – do its thing. But funnily enough, this actually doesn’t mean that you can sit back and take it easy while the glue sets. No, no, no! It’s more like you’ve got a long list of don’ts that you have to keep in mind while the glue is drying.
First off, you don’t want to shock the glue or else it might not be secure enough for your project. So try to keep vibrations in the area to a minimum. Also, you don’t want to move the pieces around too much, since that might make the glue slide off the wood. But what’s that? I hear somebody asking: ‘What do I do when somebody turns on their stereo and the whole house starts rumbling’? Well yeah, it happens to the best of us. In that case, make sure you have something to muffle the vibrations, like a couple of couch cushions. Ha ha ha!
Heat is another factor when it comes to drying the glue. Too much heat might actually speed up the drying process, but it might make it less secure in the end. So keep the temperature in the room cool until the glue is completely dry.
My last tip when it comes to drying glue is to give it enough time. Don’t be tempted to rush this process, because this is the time when you have the highest chance of messing up your joint. Depending on the type of glue you used, curing can take up to 24 hours, so get yourself cozy and enjoy a 6 whole episodes of your favorite TV show while it’s drying. Yes, I know; it’s a hard job, but somebody’s gotta do it. Ha!
Anyway, you should now be all set with the glue-drying-process. Just remember to keep the area clear, hushed and cool while your miter joint is bonding. Now all you need to do is let the glue dry, and before you know it, you’ll be wielding your own masterpiece in no time!
Sand Any Rough Edges
Yikes, once the glue has fully dried and set, you can see there may still be some rough patches around the joint. If you don’t fix this, your project will be less than perfect. It’s time to get to sanding and smoothen this baby out. Here’s what you do:
Start by taking the sanding block or orbital sander and putting some fine-grit sandpaper on it. Next, start lightly sanding the edges of the mitered joint, avoiding the surrounding wood if you can. Make sure to keep the sanding block or sandpaper moving in circular motions and avoid holding it in one spot for too long. Keep sanding the joint until you can’t see any rough edges and it’s totally smooth.
When you’re finished sanding, use a damp cloth to get all the saw dust off the project. Once you’re done with that, you’ll have a perfect mitered joint that’ll make any woodworker proud! If you don’t feel satisfied with your results after sanding, don’t panic, just try sanding again with a finer grit.
And that’s it folks – you’ve now completed the perfect mitered joint! Now your woodworking project will look and feel professional. Congratulations on a job well done!