How To Make A Curved Cut With A Circular Saw

Cutting a straight line with a circular saw is one thing, but making a curved cut? That’s like trying to navigate a corn maze blindfolded. But fear not, fellow woodworkers – with a little know-how and the right technique, you can master the art of making curved cuts with a circular saw.
And who knows, maybe you’ll even impress your friends with your newfound sawing skills (okay, maybe we’re getting a little ahead of ourselves). So grab your safety gear and get ready to add a new skill to your woodworking repertoire – it’s time to make some curvy cuts with a circular saw!
The Basics
Welcome back to the ol’ “How to Make a Curved Cut with a Circular Saw” tutorial. Before we get into the intriicate steps of making the cut, we first need to discuss the basics.
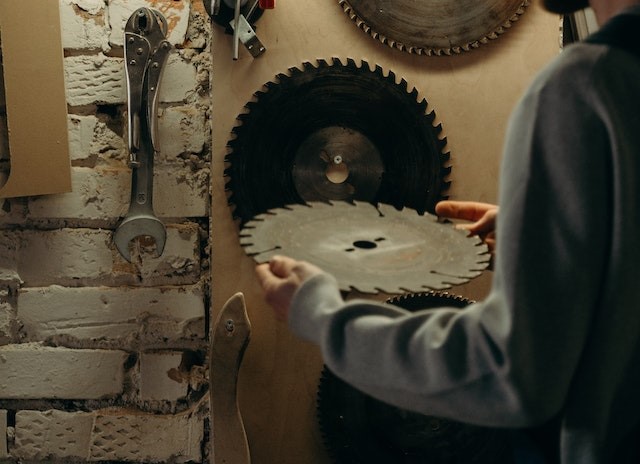
First, let’s talk about what exactly a circular saw is. A circular saw is a power-driven saw with a toothed blade used to make straight cuts of differing lengths in various materials. It’s usually the go-to tool for cutting hard materials like wood, metal, or plastic.
Now, safety first! Before heading into the realm of saws, make sure you have the right safety gear on like protective eyewear, hard hats, and other protective wear. Please also make sure you have disconnected the saw from its power source before doing any work. Good, now you know not to kickstart saws like you would a motorcycle.
In order to make your curved cut, here’s the materials you’ll need:
-Circular saw
-Circle cutting jig
-Measuring tape
-Pencil
-Clamps (depending on the thickness of material)
There you have it: the basics of making a curved cut with a circular saw. Now let’s move onto the more juicy parts of the tutorial and get started!
What is a Circular Saw?

Today, I’m here to talk to you about circular saws. Now, before we get into all the details about making curved cuts with one, let’s cover the basics–like, what exactly is a circular saw?
A circular saw is an electric saw that features a blade with teeth that rotate in a circle. That’s why it’s called a “circular” saw. It might sound complicated, but it’s actually pretty straightforward – just a blade spinning around in a full circle. The blade is usually oriented in a two-handed manner, where the larger handle is used to hold the saw and the smaller handle is used to control the direction of the blade.
Circular saws come in different types and sizes, depending on what type of job you’re trying to do. The basic type of saw is a sidewinder, which is a single-blade saw that is typically used for straight cuts. You can also get a multi-blade saw, which is usually heavy-duty and used for more intricate cuts like curves.
One of the best features of the circular saw is that it can make both straight cuts and curved cuts. That means if you want to make something a bit more interesting than a straight board, you can use a circular saw to make curved cuts with ease. This can really come in handy if you’re making furniture or pieces of art, or even if you just want to make a unique design for your home.
So, that’s the basics about circular saws. With the right saw and a few extra tools, you can make any kind of cut you can imagine. In the next section, we’ll talk about what materials you’ll need to get started and how to guarantee a safe work environment. So keep your eyes peeled!
Safety First!
Good evening everybody, instead of starting a stand up comedy routine, I’m here today to teach you all about a circular saw… Don’t worry, it won’t be incredibly boring. In fact, I’m here to make sure you don’t get hurt in the process of learning about this tool. So before we start let’s take a look at some of the safety measures you should take when working with a circular saw.
The first and most important piece of advice I can give you is to wear the proper safety gear. Safety glasses and gloves should be mandatory while using the saw. Hearing protection is also an excellent idea. Trying to correctly guess the decibel level of a spinning blade is something best left to the professionals.
Next up, be sure to firmly secure the workpiece before starting. Unsecured pieces of wood bouncing around on your workbench are both a safety and a cleanliness concern. It’s best to keep everything settled and organized so you don’t make a mess or get hurt.
Finally, take your time while using the saw and pay attention. Rushing through any cut could lead to an unleveled or misaligned end result. If a job is worth doing, it’s worth doing right. If you’re not sure about something, err on the side of caution and do a bit of more research before getting started.
So, rather then just telling you about circular saw safety, I’m telling you to treat safety like the top priority. Heck, I’m rocking out some safety gear now as I type this out. Lead by example, as they say.
Now that we got all the safety stuff out of the way, let’s move onto materials needed and steps needed to make a curved cut with a circular saw.
Materials Needed
Well, here’s the deal, if you’re gonna make a curved cut with a circular saw, you better be ready, cause you’re gonna need some materials. Now, this ain’t rocket science, but you still gotta make sure you got everything you need before you start.
What you’re gonna need is a circular saw, of course. This ain’t an antique shop and we ain’t lookin’ for no saw with a broken blade. You want one with a sharp, new blade that can zoom through your wood like it ain’t no thang.
You gonna need some wood too, whatever type you’re workin’ with. And whatever length you need to make your curved cut. Don’t be leakin’ no sawdust all over the place, though. That stuff ain’t comin’ out of my wallet to clean up.
And lastly, you’re gonna need what they call a jig. Now this little contraption that you’re gonna clip on the saw has got to be real sturdy. That jig’s gonna be the one doing all the hard work, if you know what I mean. So make sure you got a good one.
There you have it, all the materials you need to make a curved cut with a circular saw. Now go find yourself some wood and let’s start cutting!
Steps for Making a Curved Cut

D’ya ever want to make a curve with a circular saw? Betcha didn’t know that was possible, did ya? But it is! I’m gonna show you how – it’s real simple.
First, the basics: when you’re using a circular saw, you’ll need some safety gear like safety glasses, ear protection, and steel-toed boots. And if you really want to make sure you’re safe, you can even tape off the area where you’ll be working.
Right, so gather up your materials: you’ll need a circular saw, a ruler or straightedge, a pencil, and optionally a tape measure and/or protractor.
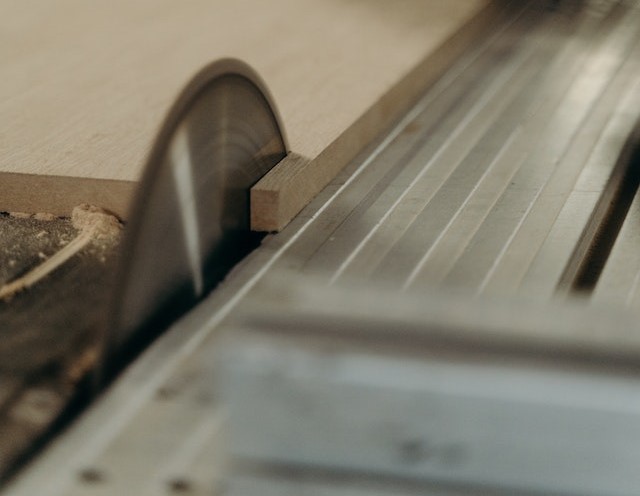
Now we can get started. You’ll want to set up the workpiece – make sure it is flat and even or your cuts won’t be accurate.
Once you’ve got that squared away, you’ll want to adjust the size of the circle you want to cut. Grab a pencil and ruler to mark the circle’s center point, radius, and circumference onto the workpiece. You can get these measurements either with a protractor, or by doing some quick math with a tape measure.
Now that you’ve got it all marked out, grab your circular saw. You’ll want to adjust the circular saw until it’s in the right direction.
And then comes the real fun – attaching a guide. With a guide in place, your saw will cut the circle more accurately than on its own. Plus, the guide will keep your hands a safe distance away from the blade. Attach it with a few screws and you’re ready to rock.
Now for the meat of the operation: cutting the circle. Make sure the saw is pointed in the right direction and set the saw blade to a depth that should be low enough to not be too aggressive, but high enough to cut through the material. Make your cuts slowly and steadily – you don’t want to mess up now.
When your cuts line up, you should have a nice curved cut! It’s a good idea to take a few more passes with the saw to sand away any residual material. And if you don’t get it right the first time, don’t worry – making curved cuts takes practice.
Now you can stand back and marvel at your masterpiece! See what cool shapes you can make with your new skill. Way to go – you made a curved cut with your circular saw. Have fun out there!
Getting Started
Ah, so you’re ready to git down to the business and git yer curve on! We’re ’bout to take our circular saw to the next level of swankiness and make it cut a wicked curve. Before we jump in, there are a few things we need to take care of first.
First things first, we gotta make sure our workpiece is set up properly and ready for the saw. Make sure it’s nice and secure, either held down on the workbench with clamps or put in a vice. Then it’s time to adjust the circle size. Depending on the size of your saw, you’ll have to adjust the size of the hole your saw needs toagit through. The biggest hole may be too big, and the smallest may be too small—you don’t want a tiny circle saw. Most circular saws will come with an adjustable ring for you to set the size.
Now that that’s all taken care of, we can start monkeying around with the saw. Get a feel of the saw, how it handles and how it cuts. Be sure to be extra-extra safety conscious when doing this, as the saw can be a bit unpredictable. Look around and search for any potential hazards, both physical and cyber-security related.
Alright, time to start cutting! Let’s get our saw pointing in the right direction. Find the right angle to place the saw and tighten the bolts. Then secure the guide, like a straight edge or a jig, to the workpiece. Make sure it’s held tight—we don’t want it moving while we’re cutting. Once that’s done, put on the safety gear and prepare for the ultimate challenge!
Setting Up the Workpiece
Ahoy mateys! I am here to show you how to set up the workpiece to make that curved cut with a circular saw like a real buccaneer.
Now, let’s face it, making a curved cut with a circular saw requires precision and care. That be why you already made sure to follow the basic tips before we started, like safety first and gathering all the materials you need to get the job done.
Not that you have all the materials, you can start setting up the workpiece. That be the wood or material you wanna make the curved cut on. It be a good idea to use some clamps to secure that workpiece so it be nice and stable. The more secure it is, the easier it will be to make the cut.
Once the workpiece is secure, you need to make sure it is aligned with the saw. Just as important, make sure the saw is aligned with the cutting line. Take your time setting up the workpiece and don’t be afraid to make any adjustments if necessary.
And that be it! You have now securely set up the workpiece, so you can move on to the next step and make sure you can get that curved saw in no time. Arrrgh matey! Now, let’s get to it.
Adjusting the Circle Size
Ahoy there sawyers! It’s time to adjust the circle size and with it, the size of our curve.
Using the proper lingo and materials to begin with is key here folks, so I’ll let you know what you’ll need. First, a clamp! Yes the clamp, that ole reliable friend of ours. Then, a straight edge and a pencil for markin’ the spot, which I’m sure you already have laying’ around.
Now, you can take your straight edge and place it across the edge of your workpiece that you want to follow with your curve. Measure down from the edge, the distance of the radius you want to cut, then mark the spot with your pencil. Take that clamp and clamp it down to the edge of the workpiece, and align it so the adjuster is located on the mark you made with the pencil.
And let me tell ya, ya won’t Dr. Spock it without some adjustment in the actual saw. Take your saw baseplate and tilt the baseplate adjuster so the flat side of the saw is perpendicular and flush against the adjuster. Then turn the adjuster towards the blade to increase the radius, while keeping the baseplate flush against the adjuster and perpendicular. Go ahead and keep adjusting and testing until you are happy with the circle size.
There you have it! Now it’s time to monkey around with your saw and get it all ready to cut that curve.
Monkeying Around with the Saw
Ah, monkeying around with the saw – now we’re getting serious. Before you start making your curved cut, you have to position and secure the saw so it’s ready to rip.
Start by setting up the workpiece on a flat, stable surface. This is essential for ensuring an accurate cut. A lightweight support board (like plywood) can be used if needed.
Once the workpiece is in place, grab your circular saw. Before you make any adjustments, take a few steps back and take a look. Is the blade guard properly positioned and the blade in good condition? Safety first!
Now it’s time to adjust the saw for the cut type you want. If you’re making a curved cut, you’ll need to adjust the saw’s depth so it reaches the depth you want. To do this, open the saw and adjust the depth adjustment control.
If you’re using an adjustable guide, or ‘jig’, then this is the time to attach it to the saw. Ensure it’s in the right position and make sure everything is tight and secure, as a loose jig can lead to serious deviations.
Finally, you’ll need to identify the radius of the curve that you’ll be cutting. This will help you set up the saw so you get the curved cut you’re after. If you’re cutting a freehand curve, then all you need to do is mark the start and end points of your cut on the workpiece.
Once everything’s set, it’s time to get monkeying and start making that curved cut!
Cutting the Curve
Aye! So, you’ve made it this far and you’ve worked up the courage to make a curved cut with a circular saw. Well, congratulations my friend, you’ve made it to the juiciest part of this how-to guide.
First of all, no, you shouldn’t get behind the circular saw and wave it around like an out of control helicopter. We may be getting ahead of ourselves, but let’s get into the nitty gritty of pointin’ it in the right direction. The goal here is to make sure that the circular saw blade is — you guessed it — following the line of the curve you’re trying to cut before you start working.
The way you do that is by securing a guide with some clamps or your bare hands if you’re brave enough. This guide should be the exact shape of the curve line you want to cut. Now, the way you secure the guide is by placing it against the circular saw so that it’s completely flush and won’t move around at all. Give that beast a few good taps against the saw blade so it’s locked in, and you’re good to start sawing.
Now, this is where the real work starts. Once your circular saw is all secured, it’s time to start cutting the curve. Do it slow and steady, and everything should be alright. Try to keep the blade parallel to the line and try to keep it in the same place throughout the whole cut. You made it this far, so why not finish the job and see what reward awaits?
Your reward should be a beautiful curved cut in whatever material you’re dealing with. If it isn’t, take a break and hit the reset button by doublechecking that you’ve done everything correctly. Once you’re satisfied with your work, give yourself a big pat on the back! You’ve done it! Cuttin’ curves with a circular saw isn’t nearly as intimidating as it might seem.
Pointing in the Right Direction
When it comes to pointing your circular saw in the right direction, it can be tempting to just give it a go and try to adjust as you go, but trust me: it’s better to get it right right away. A misdirected cut can take a lot of time to repair.
Most importantly, you’ll want to make sure the top of your saw is pointing away from the workpiece. Keeping the saw cord away from the workpiece will also help prevent any injuries while you’re working.
The key to getting the saw correctly aligned is to use the adjustable fence as a guide. To ensure a smooth, clean cut, adjust the guide as close to the edge of the cut as possible.
Once you’ve got the guide properly aligned and secured, it’s time to slow your roll and make sure you’ve got it right. Make sure your saw is exactly where you want it and don’t be afraid to move the guide around a bit if necessary.
To get a better idea of the direction the saw should be heading, you can mark a few small dots along the edge of the work piece using a pencil. The dots should line up with the blade, so it’s always a good idea to double-check your angles.
For those of you not so inclined to drawing dots, you can try holding a straightedge up against the blade. This will help you maintain the same angle and make sure you’re headed in the right direction.
And now that you know how easy it is to point your circular saw in the right direction, you’re almost ready to cut that all-important curve. Now you’re talking, my friend. All you got to do now is secure the guide and start sawing away.
Securing the Guide
Well, so now that you’ve set up the workpiece and adjusted your circle size, it’s time to start monkeying around with the old circular saw! Now, given that you’re trying to make a nice curved cut, you’ll need to make sure the saw is properly secured. Don’t worry, it doesn’t take a genius to get it done – just a few simple steps.
Once you’ve got your saw in place, you’ll want to make sure that it’s properly secured to the workpiece. You’ll want to use a few clamps or something similar to ensure that the saw won’t move when you’re making your cut. The last thing you want is for the saw to start wandering around and making a mess of your nice, curved cut.
Now, once the saw is secured, you’ll need to make sure that you have the right blade for the job. You’ll want to select a blade that’s going to be able to make a nice, clean cut along the line that you’ve determined. You’ll also want to make sure that the blade is securely connected to the saw – if it’s loose, it could fly off mid-cut and really cause some trouble.
om there, you’re ready to start cutting – just make sure to put on your protective gear and have a good grip on the saw. If you’re having difficulty connecting the blade, you can always go for a helical blade and attach it instead – just make sure that you’ve got a steady hand and that you’ve got the right tools for the job.
So now you’re all set to start monkeying around with the saw and make that nice, curved cut that you’ve been dreaming about. Just make sure to be careful, stay safe, and have fun! Good luck!
Putting in the Work
You know all about getting your circle and saw set up, and making sure everything is pointed in the right direction. Now, it’s time to get down to the hard part: actually cutting the curve. Don’t worry, I’m here to guide you through, Mr.Murphy style.
We can start by taking a few practice runs. You’ll want to get comfortable with how your saw feels when it is operating before you actually start cutting into your workpiece. Remember, circular saws can be tricky and you don’t want to make a mistake now.
Now, when it comes time to start cutting, take your time and go slowly. You can gradually add small amounts of pressure as you go, building up to a steady and consistent pressure that you can maintain as you make your cuts. Keep the saw steady and keep your eye on the path of your cut as you make your way around the curve.
You’ll also want to remember to back off from the work piece periodically to make sure you’re not making any mistakes. You can use a marker to keep track of where you’ve been and make sure you stay on the path you intend. Once you get to the end of your cut, the marker should line up with where the edge of the saw blade was when you started cutting.
Finally, don’t forget to keep the blade lubricated while you’re making the cuts. It’s a good idea to check the blade to make sure it’s still sharp before you begin and then add a few drops of saw oil to it at regular intervals as you cut. This will help keep the blade lubricated and make sure it is running as efficiently as possible throughout your cut.
Now, when you’re all finished, take an appreciative look at your work. You just made a curve in wood with a circular saw and you should be proud! I hope you found this brief guide helpful and that you can now make any curve you put your mind to.
Finishing Up
When you’ve almost finished your curved cut masterpiece, you’ll want to make sure you finish it up right. That’s why the final section of your how-to-curved-cut-with-a-circular-saw journey is all about finishing up!
Now first things first, it’s time to finish your cut. This can be a bit tricky, depending on the kind of curved cut you’re making, so it’s important to go slow and take your time. You might want to practice a few cuts on scrap wood first so you can get the hang of it. Once you feel comfortable, it’s time to finish up that masterpiece!
Now that you’ve got your cut finished, it’s time to try out some more ambitious curves. After all, what good is a curved cut if you can’t even attempt something a bit more challenging? You can use the same basic techniques, just scaled up to make bigger, more complex curves. And don’t forget to measure, measure, measure! It’s important to make sure all the pieces of the curve fit together perfectly.
Once you’ve mastered the art of the curved cut, you can start making some truly awesome projects! You’ll be able to create stunning furniture, toys, and decorations. Or you could even try your hand at creating some complex, multi-level shapes. The possibilities are truly endless!
So, what are you waiting for? Get out your circular saw, some scrap wood, and start practicing. Before you know it, you’ll be creating masterpieces with curved cuts of all kinds. Just don’t forget the safety gear! Good luck, and happy cutting!
Finishing Your Cut
It’s time to wrap up your gorgeous curved cut creations, my friends! First things first, take a few steps back to admire your beautiful work of art before you break out the sander. The saw is all powered down, the saw dust is all vacuumed up, and you are looking at your crafted masterpiece!
Now that you have laid eyes upon your artistic magnum opus, you can stop and finish it off. Depending on the material you are working with, you may need to do some sanding or filing to get the edge just right. It is important to keep the sawzall set at the same settings you used for the curved cut so that you don’t erase all your hard work.
When you have the edges just so, you can use a natural finish or a clear coat to complete your curved cut. If you are working with metal, you may need to heat the material to treat and protect it before you seal it up with a clear coat. Again, you’ll want to be extra careful with this part as you don’t want to reverse all the hard work you’ve put in up to now.
Finally, maybe you’ll want to go back and use a permanent marker or paint to highlight your curved cut masterpiece. You’ll want to make sure you are using a non-toxic and easily removable paint so you don’t ruin your work!
And there you have it! A perfect curved cut. Ready to show the world. Take a bow, my friends. You deserve it.
Trying Different Curves
Ladies and gentlemen, we have made it! After all the hard work of setting up the workpiece, adjusting the circle size, and monkeying around with the saw, we have successfully cut our curved cut with a circular saw. But why stop there? Now it’s time to try different curves and really show off your new set of skills.
First, let’s start with the basics. When trying different curves, you can either adjust the circle size of your circular saw blade, or you can make bigger cuts by increasing the size of the workpiece. Experimenting with different sizes will give you a better understanding of how the curved cut works. You can also adjust the angle of the saw and the depth of the cut to change the shape of the curve.
Next, let’s move on to cutting different shapes into the workpiece. The most common shapes are rounded corners, wave edges, and stepped edges. To cut these shapes, you will need to adjust the position of the saw and make multiple passes. However, the most important part is maintaining an accurate line while cutting. Make sure to take your time and use a guide to help keep your line straight.
Finally, you can use the circular saw to craft more intricate shapes. Small cuts can be used to create concentric circles or designs within the workpiece. You can also use the curved cut feature to cut curves in the middle of a piece or break up straight lines into flared edges.
Trying different curves with a circular saw is a great way to expand your skills and create unique shapes. With a little bit of patience, practice, and the right guide, your next curved cut will be anything but ordinary.