How to Create a Beautiful Wood Scroll Saw Design for Your Project

Well hello there friends – today I’m going to be showing you how to create a beautiful wood scroll saw design for your project! Now I’m no carpenter or engineer, but I do know my way around a scroll saw and if I can make a beautiful design, then so can you!
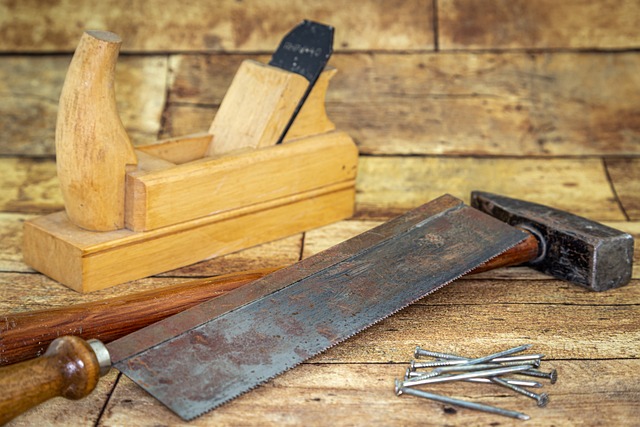
First off, you’ll need some basic tools and materials to get you started – a scroll saw, obviously, but also a few other pieces of equipment like a drill, level, and a few other basic tools. You’ll also need some wood pieces – I prefer using thick oak – and protective gloves to keep your hands safe.
Once you have all of your equipment ready to go, the next step is understanding the basics of using the scroll saw and what sort of things you can do with it. I mean, don’t be scared to experiment and try new things – you might be surprised at what you can create. But even if you don’t want to get too creative, there are plenty of simple patterns you can use to get comfortable with the scroll saw.
Once you’ve got that down, you can start your creative journey! Try to come up with some new ideas, play around with the shapes you can make with wood – don’t be afraid to use multiple pieces to make more complex designs. And of course, for truly beautiful wood scroll saw designs, don’t forget the finishing touches. Sanding down the edges, adding color and decorative elements to the wood, and making sure the final product looks just how you want it.
Now, before you actually start cutting your design out, you’ll need to prep your scroll saw. Secure the wood to the machine and make sure everything is level – that way when you start cutting, you won’t run into any problems. Finally, you can start cutting the pattern – a slow and steady hand is key here, and don’t be afraid to take your time.
Once the cutting is done, you’ll need to do some minor smoothing of the edges – this is where you can really make a big difference in the look and feel of the design. And once you’re satisfied, it’s time to varnish or stain the wood so it looks as beautiful in real life as it does in your head.
Finally, it’s time for the final presentation. If you want, you can add a frame or mount the design to a wall so everyone can appreciate it. And of course, don’t forget about cleaning and safety tips – never be afraid to ask if you’re unsure of something.
And that’s it – that’s how you create a truly beautiful wood scroll saw design for your project. So don’t be afraid – get out there and make something beautiful!
Tools and Materials Needed
Ladies and gentlemen, if you want to create a beautiful wood scroll saw design for your project, you’re going to need some items. Gather ‘round and let me tell you which tools and materials you’ll need to make it happen.
First, you’ll obviously need a scrollsaw. I’m not sure why they call it a scrollsaw because you’re not actually sawing scrolls, but hey, that’s what they call it! You’ll also need clamps, a drill, a sharpen tool. Make sure you use the right tool sharpener – otherwise you could end up with a wonky blade.
You’ll also need to make sure you have the right saw blades. You can get all kinds of sizes, with different kinds of tooth patterns, etc. Don’t try and get too fancy by reinventing the wheel. Get blades that are suitable for your project.
Wood is the most important material you’ll need. You can use a variety of different types of wood for this type of project, depending on the look you’re trying to achieve. Don’t skimp on quality. This is your special project and you want it to look amazing.
You’ll need something to draw your design onto the Wood. I like a good old-fashioned pencil and ruler but some people prefer to use a Sketch pen. Do your research and see what is suitable for your project.
Finally, make sure you have a good selection of finishing materials such as paint, varnish and wood stains. It depends on the look you’re going for, you’ll need to make sure you have the right supplies to get the job done right.
That’s all the tools and materials you need to make a beautiful wood scroll saw design. So grab your supplies and let’s get designing!
Understanding the Basics
Ahh! Understanding the basics. That part is real easy. There is really only one basic you need to understand to create your own amazing Scroll Sawing craft designs. THAT STUFF IS SHARP! And I’m not talking about as nice as a day at the spa man, I’m talking like next-level sharp. Whenever you are cutting, be very aware of the blade. If you make a mistake, don’t try to grab or grab hastily. Make sure to take breaks, stay focused and make sure that blade is in its safe spot.
Now, let’s talk options! Scroll Saw blades come in different sizes and shapes, so depending on what you are working on, you might have to switch up the correctly sized saw. It’s important to know the type of wood you are using and the accompanying blade size. A smaller blade will let you get into those tighter spaces, while a longer blade will go a long faster (and look way more cool).
Last but not least, it’s about the craftsmanship. You can be as precise or as loose as you want. It all depends on the design you’re looking for and if you’re trying to make something very intricate and detailed, you’ll have to be precise. Otherwise, you can try to leave a little more leeway with the design, just have fun!
So, that’s pretty much the basics of creating Scroll Saw Craft Designs. Now go get after it! Have fun and stay safe.
Practice with Simple Patterns
Here’s something that will make you lose some sleep: Making a beautiful scroll saw design. No worries fam, if you got the right tools and some simple know-how, you’ll be able to make something amazing! But before you can do the big designs, you first gotta practice with some simple patterns. So put on your creative cap (aka beanie) and let’s get to it.
First things first, you need to pick a subject. Let’s say you decide to do a cutout of a star – now you got to sketch it! It’s way easier if you use a pencil and paper to outline the shape, first. Then once you have a rough idea of how it should look, trace it onto your wood. Hint: If you want your cutout to be perfect, use a ruler to get the perfect lines.
After your basic shape is traced, it’s time to get it ready for the scroll saw. And that means you gotta prep the edges! A great way to do this is to use a trimming square and an angled saw blade. This way, you’ll be able to figure out exactly where to cut the design and it’ll make it easier to get yourself accustomed to the saw’s sawdust-producing capabilities.
Next, we’ve got to transfer your pattern to the saw blade. If you got a CNC machine, it’s easy peasy! But if you aren’t lucky enough to have one of those fancy machines, it’s probably best to just draw your pattern onto the wood with a marker. This will ensure a more precise cut that’s also aligned to your design.
Once everything’s ready, you can start cutting. Make sure you go slowly and be extra careful when making tight turns. You might have to make a few cuts before you get the angle or pattern perfect, so take your sweet time and be the boss of your own precision.
And now – drumroll please – your basic design is done! Now it’s time to move on to more complex patterns. But since you already know what you’re doing, it’s safe to say that you now have the basics down. Set your creative juices free and let your scroll saw dreams take over.
Get Creative
If you are looking for an additional challenge and want to really amp up your scroll saw project, then it’s time to get creative! You see, it’s not just about the smoothness of your cuts and the angles, it’s also about the design! Start by drawing out a design in pencil, paying attention to the details that you would like to include. Then, break it up into sections so that they will fit into your wood and make the elements more manageable to cut.
Scroll sawing is like creating a beautiful mosaic – each piece, no matter how big or small, has to contribute to the overall “picture”. Keep in mind that the more intricate details you include, the more difficult it can be to cut. To make things easier, you may want to break your scrollsaw picture into four sections, as this will make it easier to manage when you begin sawing.
When it comes to getting creative, there are so many exciting possibilities you can try. Feeling a bit whimsical? Take a look at the work of Larry Sexton for some inspirational ideas. Focused on art? Check out how Minnie Evans used scroll sawing to create artwork. Just looking for something more traditional? Look at this tutorial to master the art of scroll sawing fretwork.
No matter what sort of design you’re after, take your time and be patient. After all, dust takes time to settle! And remember, you can always come up with a unique design of your own, as long as you don’t forget the basic guidelines of scroll sawing. Have fun and experiment! You never know what sort of cool designs you will be able to come up with using your imagination, a few tools and some wood.
Finishing Touches

If you want to create a beautiful wood scroll saw design for your project, the finishing touches are just as important as the initial planning and cutting process. First of all, make sure you’re using the best saw for your project. If you’re not sure, consult a professional and also consider renting one from a local hardware store or online.
Now onto the fun part. Finishing touches can take your design from good to great and make it something you’re proud to show off. Here, you can get creative and add another layer of detail that will really make your design stand out. Depending on your project, you may want to use special tools such as a router, sandpaper, or even a hand drill, but be sure to practice safe woodworking techniques, even for small projects.
Next, it’s time to add some character and flair to your wood design with finishing touches. Depending on the type of wood, there are other options you can use such as carving, polishing, and mitered cuts. Carving is great for adding details like flourishes and patterns, while polishing can give your project a more finished look. Mitered cuts are great for beveling corners and giving your design depth.
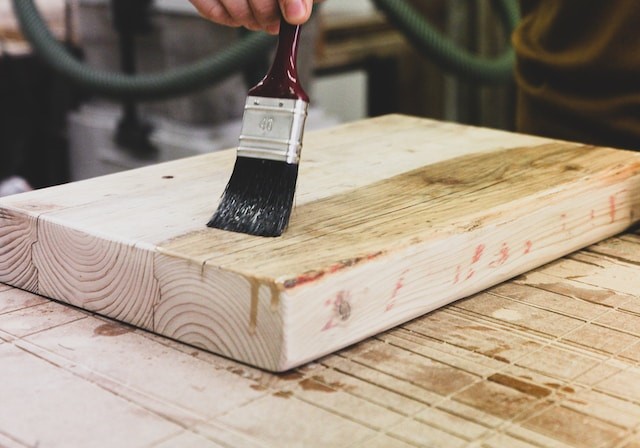
You also don’t have to stick to just wood. Adding color to your project is a great way to add visual interest and really make it stand out. If you go this route, make sure you use a quality wood-staining product and allow ample time for the color to dry before proceeding with the project.
Last but not least, take the time to varnish your project. This will help protect it from wear and tear and help it last longer. Varnishing can also give it a unique, glossy shine that will make your project stand out even more.
No matter your woodworking expertise, adding a few finishing touches to your wood scroll saw design can be a great way to add that extra bit of detail to your project. Incorporating the tips from this article and having a bit of patience and dedication will help you create a beautiful wood scroll saw design that you’ll be proud of for years to come.
Adding Color and Decorative Elements
Ah, the fun part of any project! Adding color and decorative elements! Sure, woodworking projects can look great with just the basic wood grains, but adding a splash of color can really bring it to life.
For starters, you’ll want to get some shimmery, metallic paints – silver and gold are always a nice touch. If you’re looking for something a little more unique, try some of the pearl paints or glowing lites in blues and greens. The possibilities are endless!
Once you’ve chosen your paints, gather up some of your special cutting tools. The dremel or rotary tool is perfect for drilling out any decorations you want to add – such as roses, stars, or other symbols – and cutting out intricate shapes. When it comes to adding color and decorative elements, the sky’s the limit. Try to think outside the box and make something that’s uniquely you.
And don’t forget the necessary elements like glue and masking tape. Applying tape can help you delineate your design and prevent paint from oozing over into areas you don’t want it to. Don’t forget to this important step!
Finally, if you’re looking for an added bit of flair, try adding some embellishments – like sequins, glitter, faux-jewels, even feathers! Again, the possibilities are endless when it comes to adding fancy bits and baubles to your projects.
Have fun with this part of creating your own beautiful wood scroll saw design – it’s really where you can let your creativity shine. And once you’re done, make sure you take a pause and admire your handiwork. You’ve created something amazing and unique, and you should be proud!
Prepping the Scroll Saw
Ah, the scroll saw – a truly remarkable invention that makes it possible to create intricate patterns and shapes out of wood. But if you want to create something really special, it’s important to prep your scroll saw properly.
First and foremost, ensure that the table is level and the blade is properly tensioned. This will help ensure the blade has enough tension, but not too much, so that it is able to cut smoothly and efficiently.
Next, make sure the saw is well-oiled, to keep the blades moving smoothly. With your oil and rag, wipe down the blade and its surrounding parts. You don’t want any excess sawdust to get in the way of your masterpiece, so give it a good clean!
If you want some help in setting your blade, there are many guides online that will help you to get the optimal blade settings. Be sure to check out a few before starting your project, so that you’re sure to get the best results.
Once your blade is set, it’s time to choose your material. Not all materials are the same and some may require extra sanding or finishing. Be sure to research what materials are best for scroll sawing beforehand. This will ensure that your project turns out exactly how you want it to.
Last, but not least: measure twice, cut once. Make sure you know exactly where and how you’re going to cut before getting started. This will help to ensure that your design doesn’t go off track and you don’t have to start again.
Though it may seem daunting at first, prepping your scroll saw correctly is essential to creating a beautiful wood scroll saw design. Follow these steps, and you’ll soon have the perfect project to show off to your friends and family. Good luck!
Cutting the Pattern

If you want to create a great wood scroll-saw design for your project, you’re gonna have to learn how to cut the pattern. Now, cutting a pattern isn’t too hard, but it can be tricky. You’ve got to pay attention to your blade, your wood, and the speed of the saw. So here we go!
First, you want to make sure that you’ve got the right blade for the project. Some saws use a single blade, others use two blades. Depending on the difficulty of your design, you’ll want to pick the right blade to get the job done.
Next, you’ll need to attach the blade to the saw. Most saws have a designated spot for the blade to go. It should be self-explanatory. Just make sure that the blade is secured.
Once the blade is in place, it’s time to test the saw. If you have a press-button saw, you can likely test it by turning on the switch. If it’s an old-school, manual saw, you can test the blade by taking a piece of scrap wood and testing it out. You want to make sure that the blade is not only cutting cleanly through the wood, but at the appropriate speed.
After you know your saw is working well, it’s time to cut the pattern. You want to make sure that you line up the wood correctly, before you put the saw against it. Make sure that your hand is steady and move the saw as slowly and steadily as possible. With a clean and steady hand, you should be able to execute the pattern correctly.
Finally, you’ll want to make sure that you clean up your workspace and safety equipment after finishing your cutting. Those blades are sharp and you don’t want to end up cutting yourself on accident. So, before you move onto the next step, make sure your workspace is picked up and you’re wearing proper safety gear.
And there you have it! With the right blade, a steady hand, and safety safety gear, you can cut your beautiful wood scroll-saw design with ease. Now, let’s move onto the next step in the process and finish off our project!
Smoothing the Edges
Well folks, here comes the fun part: smoothing the edges. Usually, this is done with a hand sander and sandpaper, but frankly, I like to just roll up my sleeves and use my bare hands. Now that’s not the most efficient way to do the job, but boy am I fast!
To get started, grab your sander and some sandpaper. While I recommend using the course-grit sandpaper (120-180) to work on really rough edges, for most projects around the house, a medium-grit sandpaper (220-320) will do the trick nicely. To really get a smooth finish, you’ll want to start with a rougher grit and then move to a finer grit. Keep in mind that you’ll need to apply consistent pressure and repeat the process with each sandpaper grit to get an even and smooth surface.
Now, if you’re feeling particularly ambitious, you can use a palm sander instead. This will give you a great, even finish, particularly around curved edges. If you’ve got a power drill at home, you can use the spade bit (also known as the paddle bit), but again, I prefer to stick with my hands. It’s sort of like an art form. You may want to practice on a few scrap pieces first before tackling your project to make sure that you get it right.
Remember, when sanding, it’s important to keep the sandpaper flat against the surface for an even finish. And don’t be scared to put some elbow grease into it. After all, it’s important that you get the edges nice and smooth so that the end product looks great.
Once you’re finished sanding, use a cloth to wipe off the dust. And then give yourself a pat on the back! You’ve officially completed sanding the edges of your wood scroll saw design. If you managed to do it in record time like me, you’re a champ!
Varnishing/Staining the Wood
Welcome to a new section of our guide: Varnishing/Staining the Wood! This is where it gets exciting – we get to add some serious color and pattern to our project.
I always like to start by varnishing the wood if I’m looking to keep a more natural wood grain look. This will give the wood a beautiful sheen and protect it against stains, spills, and other damage. I recommend using a clear, clear varnish. It gives the wood a great finish without detracting from its natural grain.
If you’re looking to go bolder, then you should pick up some wood stain and some fine-tipped brushes. There are a ton of different stains and finishes you can use here to create a unique, beautiful wood scroll saw project. Take your time – play around and test out different stains and shades, and find the perfect one for your next project.
Finally, you should always follow up with a polyurethane finish for your project. This will protect your project from the wear and tear of common use and give it a beautiful luster. Some polyurethane finishes can be glossy and some can have more of a matte finish, so decide what will work best for you.
Ultimately, your project is not finished until you have varnished or stained the wood. Make sure you take your time here and don’t rush it – you want a beautiful final product. Good luck, and get creating!
Final Presentation
Ha! Final Presentation, huh? We almost there! You’ve worked hard to get to this point, so let’s make sure it looks AH-MAZING when you show it off!
First things first: test your final project! Be sure that there are no mistakes or areas that need adjusting. Carefully look at all of your hard work – you want everything to be as perfect as possible.
Once you have your project ready to go, give it a little extra boost with your presentation. Get some pretty background fabric or a decorative box for your scroll saw design. If you are giving it as a gift, you may want to make a card to go along with it. That’s always a nice touch!
For any extra details, you can use a High Speed Rotary Tool to add tiny details to your project. You can also use different saw blades to make different cuts. It’s your project, so have some fun with it!
No project is complete without a nice finish. Check out your local hardware store for finishes and stains to give your creation the perfect touch. Or if you’re feeling a bit adventurous, you can use your own recipe of beeswax, lemon oil, and linseed oil. Just be sure to wear protective gear when using anything, like a mask or gloves.
Once you have your wood scroll saw design up and running, you can give a show and tell to your friends and family. Show them how you did everything, step-by-step. This is the perfect opportunity to explain everything you’ve learned and show off your impressive skill.
Visual aids are always a big plus for presentation. Take photos during the process and even after. This way you can remember exactly what you did and also show it off to others.
And now you have your wood scroll saw project presented! You worked hard and it shows. Enjoy you masterpiece!
Cleaning and Safety Tips
If y’all are tryin’ to create a beautiful scroll saw design, safety and cleanin’ should always be your top priority. You could have the best design ever but if you ain’t puttin’ effort into keepin’ your work space clean and safe, it ain’t gonna help you.
Now first off, you want to make sure your work space is free from any debris or sharp objects. Things like wood shavings and sawdust can be an annoyance when they get in your eyes, so be sure to keep ’em away.
Next, you want to make sure that any tools you be usin’ are well-maintained. Check your blade before you start cuttin’ to make sure it’s not dull, gettin’ any rust buildup, or missin’ any teeth. Also, wear protective eye and ear wear before you get startin’.
When you’re finished with your project, don’t just throw the tools away. Clean the saw blade with a cloth and apply oil to preserving it. This will make sure that your projects will come out lookin’ spiffy for years to come.
Finally, store your tools in a safe place. Keep them out of reach of children and make sure you be cleanin’ up your work area regularly. This will help you avoid any nasty accidents and keep things organized for your next project.
So now y’all know the drill. Safety and cleanin’ before, during, and after your project should be your top priority. Follow these tips and you’ll be makin’ beautiful scroll saw designs in no time.