How to dispose of wood stain
When it comes to disposing of wood stain, there are a few things you need to keep in mind. It’s important to read the manufacturer’s instructions carefully, as some stains can be disposed of in different ways. In general, however, most wood stains can be disposed of by pouring them down the drain with water. However, always check with your local municipality to make sure this is allowed, as some areas have restrictions on what can and cannot be poured down the drain. You may also want to contact a local hazardous waste disposal facility to see if they accept wood stain. If not, you can always throw it in the trash.
Be sure to thoroughly clean your stains before disposing of them, as some chemicals can be harmful to the environment. When in doubt, always err on the side of caution and throw away any wood stain that you’re not sure about. It’s better to be safe than sorry!
What is wood stain and why is it used
When you’re finished staining your wood, you’ll need to dispose of the used stain properly. Here are a few tips on how to do that.
Wood stain is a type of paint or dye that is used to color wood. It is typically made from a pigmented oil or a water-based dye, and it can be applied to both unfinished and finished wood. Stain is often used to give wood a more uniform appearance, to highlight the grain, or to darken the color of the wood.
There are two main types of wood stains: oil-based and water-based. Oil-based stains are more durable and longer lasting, but they can be difficult to remove if you ever want to change the color of your wood. Water-based stains are easier to work with and clean up, but they don’t last as long.
When you’re finished staining your wood, you’ll need to dispose of the used stain properly. Here are a few tips on how to do that:
– If you’re using an oil-based stain, you can clean up with mineral spirits or paint thinner. Be sure to do this in a well-ventilated area, as the fumes can be dangerous. Once the area is clean, you can throw away the rags or brushes in a sealed bag.
– If you’re using a water-based stain, you can clean up with soap and water. You can also use a garden hose to rinse off any excess stain. Once the area is clean, you can throw away the rags or brushes in a sealed bag.
– If you’re using a non-toxic, natural stain, you can clean up with soap and water. You can also use a garden hose to rinse off any excess stain. Once the area is clean, you can compost the rags or brushes.
Staining your wood can be a fun and easy way to change the look of your home. Just be sure to dispose of the used stain properly so that it doesn’t end up in landfill.
How to choose the right wood stain for your project
When it comes to staining wood, there are a lot of factors to consider. The type of wood you’re using, the color you want, and the finish you’re going for all play a part in what type of stain you should use. In this post, we’ll walk you through the different types of wood stains and help you choose the right one for your project.
Water-based wood stains: These stains are very easy to work with and clean up. They’re also great for staining large areas, like decks and fences. Water-based stains penetrate the wood deeply, so they’re good for highlighting the grain.
Oil-based wood stains: Oil-based stains have a more durable finish and are great for high-traffic areas. They can be more difficult to work with, however, and cleanup requires mineral spirits or paint thinner.
Gel stains: Gel stains are thicker than other types of stains, so they’re perfect for vertical surfaces like doors and cabinets. They’re also easy to apply and don’t require a lot of prep work.
Powdered stains: Powdered stains are just what they sound like – stains in powder form. They’re mixed with water to create a stain, and they can be used on both horizontal and vertical surfaces. Powdered stains penetrates deeply into the wood, so they’re great for highlighting the grain.
Staining Wood Tips
1. Test the stain on a small area of the wood first to make sure you like the color.
2. Apply the stain with a brush or rag, working in the direction of the grain.
3. Wipe off any excess stain with a clean rag.
4. Let the stain dry completely before applying a topcoat of paint or sealer.
Now that you know how to choose the right wood stain for your project, it’s time to get started! Grab a can of stain and some wood, and let us know how it goes in the comments below.
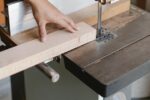
How to apply wood stain
Applying wood stain can be a daunting task. But with the right preparation and a few simple steps, you can achieve beautiful results that will last for years. In this post, we’ll walk you through the process step-by-step so you can stain your wood like a pro.
The first step is to sand the wood. This will create a smooth surface for the stain to adhere to. Be sure to use a fine-grit sandpaper so you don’t damage the wood.
Next, you’ll need to wipe down the wood with a damp cloth to remove any dust from sanding. Then, let the wood dry completely before proceeding to the next step.
Now it’s time to apply the stain. You can do this with a brush, rag, or sprayer. If you’re using a brush, be sure to work in the direction of the grain. Once you’ve applied the stain, let it sit for a few minutes before wiping off any excess with a clean cloth.
How to clean up wood stain
When it comes to staining wood, there are a few things you need to keep in mind. The most important is how to properly clean up any excess stain. If you don’t, the stain will dry and become difficult – if not impossible – to remove. In this post, we’ll walk you through the steps for cleaning up wood stain properly.
The first thing you need to do is blot the area with a clean, dry cloth. If the stain is still wet, you can use a paper towel. If it’s already dry, you’ll need to use a little bit of water to dampen the cloth. Once you’ve blotted the area, you should see most of the stain on the cloth.
Next, apply a small amount of dish soap to the affected area and work it in with your fingers. You don’t need to use a lot – just enough to create a lather. Then, rinse the area with clean water. The dish soap will help break down the stain and make it easier to remove.
If there is still some stain remaining, you can try using a mild abrasive like baking soda. Just make a paste with water and baking soda and apply it to the stain. Let it sit for a few minutes, then scrub it off with a brush or cloth.
Once you’ve removed as much of the stain as possible, you’ll need to address the underlying issue. If there is any damage to the wood, you’ll need to repair it before staining. Otherwise, the new stain will just soak into the damaged area and cause more problems.
If you’re not sure how to repair the damage, we recommend consulting a professional. They’ll be able to assess the situation and advise you on the best course of action. In most cases, though, a little sanding and refinishing will do the trick.
Once you’ve repaired the damage, you’re ready to stain the wood. Just follow the manufacturer’s instructions and apply the stain evenly. Be sure to wipe up any excess stain immediately – otherwise, you’ll have to start the whole process over again.
With these tips, you should be able to clean up wood stain like a pro. Just remember to take your time and be patient – rushing will only make the situation worse. If you need any help along the way, don’t hesitate to reach out to a professional. They’ll be able to guide you through the process and ensure that the job is done right.
What to do with leftover wood stain
When it comes to wood stain, there can be a lot of leftovers. What do you do with all that extra stain? Here are some tips on how to dispose of wood stain properly.
– First, check with your local regulations. There may be specific laws on how to dispose of wood stain in your area.
– If possible, reuse the wood stain. See if there are any projects around the house that could use a touch up.
– Once you have determined that you can’t reuse the wood stain, it’s time to properly dispose of it. The best way to do this is to take it to a hazardous waste facility.
– If there isn’t a hazardous waste facility near you, another option is to mix the wood stain with kitty litter or oil absorbent. This will make it easier to throw away.
– Finally, make sure you clean all of your equipment thoroughly after working with wood stain. This will prevent any accidents in the future.
Tips for disposing of wood stain safely and responsibly
When it comes to wood stain, there are a few things you need to know in order to dispose of it safely and responsibly. Here are some tips to help you out:
1. Make sure the stain is completely dry before disposing of it. Drying it outdoors in the sun is the best way to do this.
2. If possible, put the stain in a sealed container before disposal. This will help prevent any spills or leaks.
3. Avoid pouring the stain down the drain or into storm drains, as this can contaminate water supplies.
4. Contact your local municipality for information on how to properly dispose of wood stains and other hazardous materials.
5. Never pour wood stain into the environment, such as on the ground or in waterways.
6. If you must dispose of wood stain in a landfill, be sure to do so in a way that will not cause any leaks or spills.double bag it in plastic and then place it in the garbage.
How to dispose of wood stain
Wood stain can be a difficult thing to dispose of, especially if you don’t know how. In this article, we outlined the best way to get rid of wood stain so that it doesn’t cause any further damage. Hopefully this information was helpful and you are now able to dispose of your wood stain in an environmentally friendly way. Thanks for reading!