How To Make A Perfect Finger-Spline Joint For Your Woodworking Project
Woodworking is a craft that requires precision and skill, and there are many different techniques and joints to master. One such joint is the finger-spline joint, which combines the strength of a finger joint with the beauty of a spline joint.
This joint is commonly used in woodworking projects such as boxes, cabinets, and frames. In this article, we will show you step-by-step how to make a perfect finger-spline joint for your woodworking project. With a little practice, you’ll be able to create beautiful and durable joints for all your woodworking projects.
Safety
Hey, woodworking peeps! Before we jump right into this delicious DIY finger spline project, we gotta talk about safety. Because when it comes to woodworking, SAFETY FIRST!
Now, the first step to keeping yourself safe while working with wood? Wear a protective mask! Now, don’t be like Pops back in the day, thinking he could put a sock over his face and call it a day! Nope! You’ll need a real protective mask, so make sure to do your research and get one up to snuff with your project! Plus, it keeps your lungs safe from all the sawdust from your cutting, sanding, and planing.
Another biggie when it comes to safety for your woodwork project? You’ll wanna get yourself a pair of safety glasses. Don’t let your eyes bear the brunt of all the sawdust or even a flying splinter! You’ll regret it later down the line! Don’t be all “oh that won’t happen to me!” Only it will and it’s not worth it. Safety glasses are your friend.
On top of all that, you’ll also want to make sure you wear some protective clothes. Again, don’t be thinking a really big t-shirt will work! Again, our boy was wrong — back in the day, the bigger the clothing, the better the protection (at least in his mind). Nope, nope. What you’ll want to make sure you have are some gloves, long pants, and a shirt with long sleeves. This will help protect you from even the littlest splinter pain and a possible sawdust storm.
But when all said and done, safety is the most important step in any DIY woodworking project.
Wear a Mask
Let me tell you something, if you thought wearing a mask was only for cowards, think again. When you’re making a finger-spline joint for your woodworking project, a mask is essential for protection. I know that’s not the coolest fashion statement you’ve ever heard, but don’t worry about looking silly. Just pop on one of those masks and you’ll be good to go.
Just think of all the little sawdust particles you’re going to be dealing with. Those particles are small and they get everywhere. If you don’t have a mask on, you’re going to be breathing in sawdust and that’s not good for your lungs. It’s like a smoker sitting next to a big pile of cigarettes. That’s why a mask is so important.
Plus, a finger-spline joint is a delicate operation. You need to have total control of what you’re doing to make sure you don’t make any mistakes. That’s why a mask is even more important. It will make sure your vision is completely unobstructed and the only thing you’ll be focusing on is your joint.
And let me tell you something else. Having a mask on isn’t just about protecting yourself, it’s also about protecting others. A lot of sawdust will be floating around as you work away and if you’re not wearing a mask, some of it could get into someone else’s lungs. So wear a mask and be a responsible citizen.
Now all that’s left to do is get the appropriate protective mask and you’re ready to build the perfect finger-spline joint for your woodworking project. Just make sure to wear the mask at all times when you’re working and you’ll be good to go. Once you get the hang of it, you won’t even notice it’s there. You can thank me later.
Wear Safety Glasses

Hey, all you DIY fans, safety first, folks! Before you get to working on your woodworking project, you’ll need to make sure you have your safety gear ready.
We’re talking about more than just a mask, people. Who knew that eye protection was so important?! That’s why we’re covering the importance of wearing safety glasses.
No doubt you’re rolling your eyes, thinking you can get away with your regular pair of regular everyday glasses. Not so fast, my friend. Happen to know the safety glasses are designed to protect your eyes from any wood, metal, or plastic that might fly off during your woodworking escapade.
You don’t want one of those random pieces of wood flying up into your eyes and damaging your vision, right? That could hinder seriously hinder your work, not to mention your life for the weeks that follow.
So, you know what it’s all about now? Make sure to have the right eye protection. If you wanna get it done the best way possible, safety glasses are the way to go.
Just think of getting the high grade pair of safety glasses like you’re visiting the old rock and roll show to keep the dust from flying into your eyes.
Remember, safety glasses are a must. Otherwise you may have a really hard time seeing the pieces of your project that you’re trying to put together.
And, more than likely, you’ll be so busy trying to find your cleaning rag, you’ll forget the real mission at hand. And, you may be in accident waiting to happen.
So, listen up: getting the right safety glasses is essential. Not only will they take care of protecting your eyes, they look cool too. And we gotta stay fashionably safe, don’t we?
Your woodworking project will take on a whole new life when you use the right tools and safety equipment. So with that in mind, grab your high-grade safety glasses before you try to knock out any woodworking project.
And remember, the sooner you have them, the better. So, what are you waiting for? Get going and create that perfect finger-spline joint for your next project!
Wear Protective Clothing
When it comes to any kind of woodworking project, safety should be your number one priority. One of the best ways to keep yourself safe is by wearing protective clothing. Whether you’re using a saw, chisel, or some other type of tool, protective clothing is essential.
Let’s start with the basics. Make sure you’re wearing a long-sleeve shirt and pants that adequately cover your skin. It’s also important to wear non-skid shoes while you work to keep you steady on the wood and out of harm’s way.
Next, you’ll want to add a pair of safety glasses and a mask. The safety glasses will help keep your eyes safe from sawdust, wood chips, and potential particles that could fly up while you work. The mask is great to keep dust at bay and won’t interfere with your breathing.
If you’re cutting with a saw, it’s important to add a pair of work gloves. These gloves will give you a better grip on the tools and help protect your hands from any potential splinters. You should also wear protective hearing equipment if you’re using loud machinery for your project.
But the most important item in your safety wardrobe might be an apron. This item is great for keeping all the sawdust and debris from getting on your clothing. It will also help keep your tools from getting lost in the mess.
So next time you begin any kind of woodworking project, make sure you’re adequately protected by wearing protective clothing. It may seem like a bother, but all these items will keep you safe and comfortable while you put your woodworking skills to the test!
Preparation
Come one, come all! Preparation is the key to success when it comes to making a perfect finger-spline joint for you woodworking project. This is what will ensure that your project turns out exactly how you want it to!
First, make sure you have all the supplies you need. Stock up on the tools, wood pieces, and anything else you think your project will require. Measure out each of your supplies carefully. Nothing kills a project quicker than running out of materials or getting the wrong measurements in the middle of working.
After you have all your supplies, its time to measure out the wood pieces that you will be using in the project. This is important, as any mistake in the measurements will throw off the whole joint. Carefully measure each piece of wood and double check your measurements to make sure they match up perfectly.
Now you are ready to begin. Pretty easy, right? If you take your time and pay close attention to all the details, this project will be a piece of cake. So get out there and get crafting! Good luck, and have fun!
Gather All Supplies Needed
Okay, now that you’ve checked for safety, the next step on the journey to make the perfect finger-spline joint for your woodworking project is to gather all the supplies that you’ll need. Don’t worry – this isn’t as difficult as it sounds. Just like Auntie Gladys said – if you take it one step at a time, you’ll be fine!
Now you’ll need two pieces of wood. Get the right length and thickness for the project you’re doing – if you need to buy lumber, check out the hardware store and pick some up – don’t forget to double check your measurements! After you have two pieces of lumber, you’ll need a saw to cut the slots in the pieces. A hand saw will do, but if you want precision cuts, a table saw will do the trick.
You’ll also need some wood glue, a few clamps to hold the wood together, some sandpaper or a power sander, a wood finish to protect your wood, and a measuring tape. We recommend writing all of your measurements down, just to make sure that everything matches up correctly. Finally, once you have all of your supplies, make sure to physically organize everything before you start cutting.
Once you have all of your supplies, you can start measuring everything out and cutting the slots. Don’t worry – by now you should feel confident in your woodworking prowess. We’re almost to the finish line – don’t give up!
Measure Out Supplies Carefully

Let’s be serious for a second – if you don’t measure out your supplies carefully, then your finger-spline joint has no chance of working out perfectly. I mean, you want that joint to stay together so you don’t just have a bunch of wooden pieces lying around all willy nilly, right? So how do we measure properly you ask? Here’s how-
The first thing you want to do is measure the length and width of the saw blade you’ll be using to create the slots. You need to make sure it’s the exact size needed for a tight fit, or else things ain’t gonna work. Once you know the saw blade size, it’s time to measure the depth and breadth of the slots you’re gonna need to make. Since the slots will hold both pins and fingers, you need to make sure they are deep enough and wide enough to fit both pieces in! If they’re too shallow, then you won’t be able to get a tight fit.
It’s also important to measure the length and width of the pins and fingers correctly. If they are too short or too long, then they just won’t fit into the slots. Furthermore, the gaps between the pins and fingers need to be measured accurately so that you get the desired effect of the pieces locking together.
Once you are done measuring your supplies, it’s time to cut them to the appropriate sizes using saws or chisels. Depending on the design of your project, you may need to make the slots in the pins and fingers a little bit wider so that they can fit snugly into the slots in the pieces of wood. Trust me, this will ensure that your joint will be as strong and tight as possible!
So make sure to take your time when measuring out your supplies for your finger-spline joint. It’s important to do a good job and get everything right the first time, otherwise you will have to start all over again!
Measure Wood Piece Carefully
If you want to create the perfect finger-splined joint, then it all comes down to measuring your wood pieces carefully. And if you don’t, you’ll have Professor in the house, “Hey man, you better take some time to measure that wood piece carefully.”
No matter how careful you think you are, measuring the wood piece is an absolute must. You can’t just eyeball it and expect the result to look good. Even if you want to do it quickly, be sure to measure out the wood piece carefully. You can even measure out the wood piece with a ruler, if need be.
You can’t slack off when it comes to measuring the wood piece for your finger-splined joint. Take your time, grab a ruler, and make sure the piece is measured accurately. You can’t just rough guess it because if you do, your joint won’t fit correctly.
You need to make sure that your measurements are precise. That’s because if the joint isn’t fit correctly, it’ll create gaps and chips. And you don’t want that. No gaps and chips, please! This will not only be an eyesore, but it’ll also cause your project to take longer to complete.
Measure the wood piece only once and more than twice if needed. If you think your measurements are off, start measuring again. Just be sure to watch out. Professor might jump out and start scolding you if you measure wrong.
Another tip is to measure from each end of the wood piece so you can get a more precise measurement of the wood piece. That way, you’ll eliminate any gaps or chips and get a flawless joint in the end. So, measure the wood piece carefully and make sure it’s spot on.
Step 1
Ah, step one. After taking several precautionary steps such as wearing a mask, protective clothing, and safety glasses, you have arrived at the part of your woodworking project where the finger spline joint is to be crafted. It’s a tricky but fun process, and the finished joint will be quite a sight to behold!
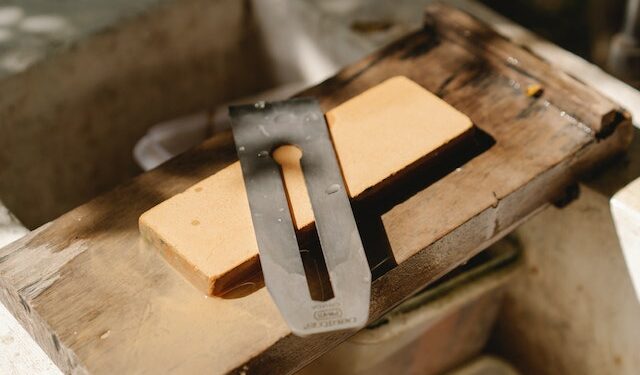
For the first step, you should take the longer piece of wood and cut a slot into it with a jigsaw or router. This will serve as the finger slot. After this, mark the point where the pin slot should cross over the finger slot. Then, cut the pin slot on the shorter piece of wood.
It’s extremely important to measure out these two pieces of wood accurately. Not doing so could cause the slots to not fit together properly, and that’s no fun. Measure the wood twice if you must! This will ensure that the joint will look perfect when it’s completed.
Once the two pieces are ready, it’s time for the fun part. With a jigsaw, router or some other type of saw, carefully cut the slots out that you marked off. Make sure to go to the appropriate depths. A perfect joint will not be flawless unless the cuts are accurate, so take your time. Measure the depth a few times and compare the cuts to make sure they are the same.
Once you have done this, all you have to do is make sure the slots match up perfectly. Remember, the slots need to not just be accurate in length and depth, but also in their positioning. Dropping them a millimeter off will result in a less-than-perfect finger-spline joint.
And there you have it – step one is done! Now, it’s time to take the next step on your journey to create a perfect finger-spline joint. Have fun and keep measuring!
Cut the Finger Slot on the Longer Piece of Wood
Hey, friends! So, you wanna learn how to make the perfect finger-spline joint for your woodworking project. Well, you’re in luck because I’m here to help you out. Before you get down to business, I must tell you—safety first! Put on a mask, safety glasses and protective clothing to make sure nothing goes wrong. Got it?
Alright, let’s get down to business. First of all, gather all the supplies you need—your wood pieces, a saw, and glue to hold everything together. Now measure everything out. Measure your wood pieces carefully—you don’t want one slot to be larger than the other, do you?
The next step is probably the most important—it’s time to cut the finger slot! Grab your saw and cut the finger slot on your longer piece of wood. Make sure it’s wide enough for the pin slot’s width.
And don’t forget! Measure out a point where the pin slot should cross, then go on and cut the pin slot on the shorter piece of wood. You’ll want to make sure you cut both slots to the appropriate depths, and that the slots match up perfectly. Otherwise, you won’t get the perfect joint.
Now, with the glue, assemble your joint and secure everything into place with a few clamps. Then carefully remove excess glue and sand any cuts if necessary. That’s it! Now you have a perfect joint. Don’t forget to apply a finish to protect it!
So that’s it! I hope this helps you with your woodworking project. Now go make something amazing!
Mark the Point Where the Pin’s Should Cross

Hey there woodworkers! This here is all about marking the point where the pin’s should cross for the finger-spline joint. It’s a key component, so pay attention!
First off, you need to ensure that your wood pieces are the correct size. Grab your ruler and measure ‘em up. No cheating here!
Now that we’ve got that all figured out, it’s time to mark the point where the pin’s should cross. To do this, grab your markers and measure 3/8 inch from each of the edges reducing the width of the slot by that amount. Then measure down the length of the longer piece of wood and mark a point on both sides where the pin’s should cross.
It may be a little tricky, so use a protractor to ensure the slots are square with the edge. Then use a square and a ruler to check that the slot is long enough by measuring the width.
Once you’ve marked the pin’s where they should cross, make sure you double check your work. Make sure you do this the right way, or else your whole joint could be off!
And that’s it, folks! Now you know how to mark the point where the pin’s should cross for the finger-spline joint. It may take a little practice, but in time you’ll have this perfected.
Cut the Pin Slot on the Shorter Piece of Wood
When cutting the pin slot in the shorter piece of wood, it feels almost as if we’re about to cut a hole for ourselves to jump into – but we aren’t! We’re making a finger-spline joint, so there’s no need to panic.
It may seem a bit daunting at first, especially if you don’t have a lot of woodworking experience. But don’t worry – this step is really quite simple.
First, grab a sharp wood chisel and a mallet. To make the cut, measure out the exact size of the pin slot you need. Then, slowly and carefully start chiseling away at the wood.
As tempting as it may be, resist the urge to take huge chunks out of the wood. Making small, controlled cuts with your chisel is the key to creating a beautiful, perfectly-fitted pin slot. You’ll have far better results if you take your time and go slow, rather than trying to rush through the process.
Once you’ve got your pin slot cut, set your chisel and mallet aside and take a look at your work. It should be a nice, neat line that fits the measurement you took earlier. If for whatever reason the cut isn’t exactly the size you need, you can make adjustments with a bit of sanding or, if necessary, go back and make a new cut.
This may seem like a long and tedious task, but I promise it’s worth it in the end. Taking your time to ensure your cuts are just right will pay off – your finger-spline joint will look even more fabulous!
Making a perfect finger-spline joint for your woodworking project may take a bit of patience and effort. By carefully cutting the pin slot on the shorter piece of wood, you’ll be well on your way to creating a beautiful joint you can be proud of!
Step 2
Ah, step number two in our quest for perfect finger-spline joints. Now comes the tricky part, making sure that all of our slots are just the right size, and are perfectly aligned.
First, make sure that both slots have been cut out to the proper depths. We don’t want one slot too deep, otherwise our joint will have a bit of a wobble. It needs to be just right. Once that’s done, make sure those slots are aligned properly. We want them to match up like peas in a pod. Lay one of the wood pieces over the other, and make sure your pin slot matches up with your finger slot.
Now, of course if it’s just a little bit off, you could try and saw a bit more off one of the pieces. But that wasn’t our plan when we started this project, was it? Of course not! We’re going for perfect, so if your slots don’t match up, carefully try and finesse the pieces of wood into alignment.
No matter the situation, make sure that both pieces of the joint fit together perfectly. It may take a few minutes of shifting and adjusting, but it will be worth it when we finish this project.
And that’s it for step two. We’ve done the tough part, cutting out the slots and matching them up properly. Now we can move on to gluing them together. But before we move on, make sure you double check that your slots are lined up nice and snugly – it’s better to be safe than sorry!
Cut Both Slots to the Appropriate Depths
Let’s face it, if you want to make the perfect finger joint, you need to get the slots cut to the very best of your ability. Sure, you can be a rebel and try and cut ‘em without worryin’ about the depth and whatnot, but that would be foolish. This step is essential to the project, and it must not be skipped. No, sir!
First up, take that electric saw and slice both pieces of wood till the slots have reached the desired depths. Do this carefully, for if you cut too deep, the joint will be too loose and the whole thing will be completely off balance. You must get it just right.
Now that you’ve got the electric saw outta the way, it’s time for the wooden chisel. This tool is required for cutting the ultra-fine slots in the wood. You must start slowly, chipping away at the wood until it reaches the desired depth. And remember, this must be done in a very precise manner – otherwise, you’ll mess up the entire joint.
And here’s a tip, when it comes to the chisel—make sure it’s kept below the surface of the wood at all times. This will ensure the cuts become really clean, and provide a much more stable joint in the long run.
Finally, once both slots have been cut to the right depth, take some sandpaper (a medium-grade sandpaper is ideal) and make sure you’ve gotten rid of any rough edges or splinters lingering around the slots. This will give the joint that professional finish.
As you can see, cutting both slots to the appropriate depths is key. However, if you remember to take your time, measure from time to time and double-check your results, your woodworking projects will look just as great as those of any professional woodworker.
Ensure the Slots Match Up Perfectly
Oh, man. Making sure the slots match up perfectly is where some novice woodworkers really mess up. You’d be surprised how easy it is to accidentally cut slots in the wrong place or to different depths, which could potentially be a disaster for your entire project. So, it’s important that you take your time when it comes to this step and ensure you get it right.
First things first, you should always double check that both slots are the correct widths and depths. If you cut either of those wrong, you won’t have a secure fit. To make sure they’re cut precisely, use a combination rule and caliper; they will help you to get measurements that are as accurate as possible. Secondly, be sure to take your time when assembling the joint. Take the time to make sure everything lines up and that the slot sizes are compatible with one another.
Once both pieces are in place, you should always snug them up in clamps to ensure everything is lined up and absolutely, positively secure. This step is extremely important as it can save your project from disastrous misalignment. If everything looks square and level, you can proceed to the next step.
But what if you have already secured the joint, only to find out that it’s not correctly lined up? If that happens, there’s no need to panic. Just take a few extra steps to make the necessary adjustments. Grind down the offending area until both pieces are square, or even enlarge the slot if need be.
At this point, you’re probably starting to think, “this is a lot of work,” and you’d be right. But I can assure you that if you take your time and make sure each step is done correctly, your joint will be beautiful, and it’ll be easier to make than you thought. So don’t skimp – Ensure the Slots Match Up Perfectly and you’ll be rewarded for your diligence.
Step 3
Ahh, folks, the exciting part of making any good finger-spline joint is most definitely Step 3! It’s here where we really start to take shape and our joint starts to come together as one. As with any woodworking project, safety is a must; please make sure you’re still wearing all the proper safety gear from Step 1.
First off, let’s get our pieces of wood nice and ready. Take the two pieces of wood and make sure the slots are lining up perfectly. Then, we get to start the fun part. Gather your woodworking glue, and apply it generously to both slots of the wood. Really get it in there so it holds the wood together tightly.
Next, it’s time to assemble the joint. Take the longer piece of wood and slide the shorter piece of wood in the slot. As you slide it in, make sure the pieces are properly aligned. From there, you’ll need some clamps to hold the woodtogether. After you’ve inserted the clamps, you’re almost ready to go!
Now, you need to make sure the glue has completely dried. With that, grab your tools and gently move the slotted piece back and forth. This will make sure the joint is securely connected, and removes any excess glue from the joint. After you’ve done that, it’s time to move on to Step 4 and finish off your finger-spline joint.
Glue Both Pieces of Wood
Now here’s the fun part – glueing both pieces of wood together! Now, ya gotta be careful here – since wood glue tends to expand when it’s drying, don’t use too much or it will ooze out everywhere!
Start by squeezing a small amount of wood glue into the pin slot. You’ll only need a small amount – really small – like a drop of a drop! Then, with a small brush, spread the glue around the slot.
Now get the other piece of wood and also insert a small dab of glue into the finger slot. Be sure to be generous here – don’t skimp on the glue, since you want a tight connection. When you’ve got the glue in both slots, it’s time to join the two pieces together.
Take the two pieces of wood and fit them together. Make sure that the slots line up perfectly – if the pin slot is slightly off, it’s gonna be really hard to secure the joint. When you’re happy with the fit, press the pieces together firmly.
Now, hold the pieces together tightly for a few moments to make sure that the glue sets. You don’t have to press too hard, but make sure that the pieces are being held firmly together. After a few moments, the glue should be dry enough to move on to the next step.
And that’s it! You’ve successfully glued both pieces of wood together, and you’re now ready to move on to the next step in creating a perfect finger-spline joint. Congratulations!
Assemble the Joint
Well, after you’ve done your cuts and prepared your joint, it’s time to put it together. Assembling the joint can be a tricky operation and requires patience and precision to get it right.
First, you’ll want to start by positioning the two pieces of wood together so that the slots fit perfectly – this is really important so make sure you’re careful and that everything lines up properly. Once you’re satisfied everything looks good, it’s time to get ready to glue.
Before you start, grab your clamps and set them up so that everything is ready for gluing. You don’t want to be scrambling around looking for something after you start, as it could be disastrous.
Now it’s time to start gluing – take your adhesive and make sure that you spread it evenly into the slots on both pieces of wood. Make sure you don’t miss any spots or you might find that your joint isn’t so perfect after all.
Once you’ve spread the adhesive, it’s time to put the two pieces of wood together. I like to use my clamps to hold it in place and make sure that the joint is tight. Now, leave it clamped for a few minutes and make sure you don’t move it or else you could find that your joint isn’t so perfect after all.
When you’re satisfied with the joint, you can move on to the next step. Congratulations! You’ve now assembled your perfect finger-spline joint. Now you can enjoy your woodworking project with the assurance that you have a perfectly engineered joint.
And there you have it! Now you know how to make a perfect finger-spline joint for your woodworking project. With a little bit of patience and precision, you’ll be able to create professional-looking joints every time. Good luck!
Secure with Clamps
Secure with Clamps. You feel like you have the worst case of dessert hands imaginable – your joints crack and move around like a box of jello. This is no time for moving and grooving though – you need to secure your joint with clamps!
Start by selecting two clamps of similar sizes and secure the joint in place. Make sure the pins and slots match up perfectly, then twist the clamp’s knobs tight. You want to make sure the joint can’t move around, otherwise you’ll be rebuilding the entire thing from scratch!
If you have the budget, you can use a third clamp to ensure that your joint doesn’t move around too much. Just make sure the knobs are tight – you don’t want any side-to-side wobbling. If you can, apply some pressure in the opposite direction of the joint when tightening. This will help create a snugger fit.
After the clamps are secure, take a step back and admire your work. You’ve just taken a plain piece of wood and created something beautiful. Now that you’ve mastered the finger-spline joint technique you can use it in all sorts of projects – from chairs to shelving units, the possibilities are almost endless.
Step 4
Now that you have all the pieces prepared, it’s time to put this joint together. Step 4 will ensure that it comes together smooth and perfectly.
Let’s start by removing any excess glue. That stuff can make a real mess, especially when it comes to woodworking projects. You don’t want any of that in the joint itself, so be sure to scrape away everything that doesn’t belong. Now you’re ready to go on to the next step.
Next, you want to sand the cuts if necessary. If you’re using a router, it’s essential to get it as smooth as possible so that when the joint eventually locks together it doesn’t leave any scratches or marks. Depending on how skilled you are with a router, this can be a quick job or a slow one. But either way, the extra coat of sanding will go a long way towards making the joint look its best.
Finally, you have the option of applying a finish if desired. This is a great way to protect delicate woodwork from damage and to make the joint look even nicer. It’s also a surefire way to hassle-proof your woodworking project. That way, even if you accidentally kick it or knock it, it will be okay. You can use a variety of different finishes depending on your preference.
And there you have it, you have officially completed the most perfect finger-spline joint in your woodworking project. Pat yourself on the back, you deserve it! Your work will likely be admired by many: your family, your friends, your colleagues, whatever it may be. You can be confident that the joint you’ve created will last and will look wonderful in whatever project it is used in.
Remove Excess Glue
Hey there woodworking enthusiasts,today we’re looking at the important fourth step in making that perfect finger-spline joint – removing any excess glue that may have oozed out while we assemled the joint!
The key here is to take your time and be precise! Any excess glue can ruin the look of the wood and let’s face it – no one wants to go back to the drawing board and start over! So, how do we actually remove the glue?
Well, the first tool we’ll need is a good chisel. Choose one that has a sharp blade so you can get close to the edges of the joint to remove any glue that’s come over the sides. Additionally, I recommend a pair of tweezers to help remove any stubborn bits of glue that the chisel can’t get to. Finally, a few pieces of sandpaper should also help with removing the rest of the glue, as well as smoothing down any rough patches you may have caused while using the scissors.
The important thing is to keep the surface as smooth as possible while using the chisel and tweezers. Too much pressure and you risk damaging the wood – take it slow and you’ll be sure to get those edges nice and clean.
Once you have removed all of the excess glue, you can move onto the next step – smoothing down the wood. Using the sandpaper, lightly brush over the joint to remove any rough patches and to give it a nice polished look. I always start with a medium grit and gradually work my way up to a finer one – it’s a great way to make sure your joint is ready for the rest of the project!
That’s it my friends, our fourth and final step for making a perfect finger-spline joint is complete. Now, I know there may be a tempting to burst with excitement and jump into the next step – but, trust me, it pays dividends to take your time and get this part right.
Sand Cuts if Necessary
Finally, we’ve reached the end of the road folks – time to sand those cuts! While it might seem like an extreme hassle to sand when the joint looks great and fit perfectly, there’s a good reason for it – if you don’t, the wood pieces can end up looking really wonky when you apply the finish.
So, take a second to take a break and get your sandpaper ready. And don’t just any old sandpaper – look for course-grit sandpaper that can deal with the wood quickly and easily. It should last you a decent number of hand sandings, so don’t skimp on quality here.
When you start sanding, remember to gently and lightly sand the wood finishes – be as gentle as an angel! First, use a circular motion to sand the cuts, then run the sandpaper alongside of the cuts, and then follow the grain of the wood all the way around.
Now, here’s the pro-tip of the day: go ahead and mark the seat of the joint with a pen or pencil and sand it by making small circular circles. That way, you won’t miss any nooks or crannies and will make sure that the joint is super seamless.
And don’t forget to check your work every now and again – no matter how perfect you think the fit is, there’s always a chance you missed a spot or two. Make sure everything looks good and even by looking for imperfections on the surface of the wood. If there’s still more to be done, break out the sandpaper and keep going.
Of course, once you’re done, it’s always a good idea to apply the finish as soon as you can – go ahead and thank us for that one later! And if you don’t like the final product, keep sanding – with enough practice, you can really make some truly incredible woodworking projects.
Apply Finish if Desired
If you’re anything like me, you like to finish your projects to perfection. So why not take a few extra minutes to make sure that your finger joint looks as good as it possibly can? The good news is that it doesn’t take much to finish off a finger joint – just a few coats of whatever finish you have lying around!
First, you’ll need to make sure your joint is completely dry. Any excess moisture will cause your finish to look lumpy and uneven. So grab some rubbing alcohol and a rag and make sure you get all of the excess glue off before you begin. Once you’ve made sure that everything is clean and dry, you can start on the finish!
My personal favorite is a water-based polyurethane. It’s easy to apply and it adds a beautiful shine to any project. Make sure you get the kind that is meant for use with woodworking projects – it will hold up better than regular polyurethane. Once you have the finish, you just need to apply a few thin coats – about 2 or 3 should be plenty. Make sure to let each coat dry completely before applying the next one.
If you’re looking for something a little bit different, you could always go for a wax-based finish. These are a great option if you’re looking for a natural look. The process of applying wax is pretty straightforward – just spread a thin layer over the entire joint and then buff it out with a soft cloth.
There are lots of other options too – anything from oil-based finishes to shellac-based ones. Whatever you decide to use, make sure you follow the instructions on the container and you should get a professional looking finish that will protect your joint from water damage and the elements.
So there you have it – the perfect finishing touches to your finger join project! Now you can stand back and admire the beauty of your work. Congratulations!