The Different Types Of Woodworking Hand Tools: Which Ones Do You Need?
Woodworking is a craft that requires precision, skill, and the right tools. While power tools can certainly make your work easier and faster, there’s something special about using hand tools to create something beautiful with your own two hands.
In this article – “The Different Types Of Woodworking Hand Tools: Which Ones Do You Need?”, we’ll take a look at the different types of hand tools that are essential for any woodworking project. From saws and planes to chisels and carving tools, we’ll explore the benefits of each tool and help you determine which ones you need for your own projects.
Whether you’re a beginner just starting out or a seasoned pro looking to expand your collection, this guide will give you the knowledge you need to choose the right tools for the job. So, let’s dive in and discover the world of woodworking hand tools!
Hammer
As any woodworker knows, one of the most important pieces of equipment in the shop is the hammer. From the hammer we can nail in pieces of material, bend things to the right shape, and pound out dents when something’s gone wrong
The good news is, there are several types of hammers on the market. Let’s take a look at a few of the most popular ones:
Claw Hammer
A claw hammer is probably the most commonly used type of hammer out there. It comes in handy for striking and removing nails, opening and closing parts, and driving finishing nails. It’s also great for making precise adjustments, thanks to the curved claw on one end. Just be careful not to pound your fingers!
Cross Pein Hammer
The cross pein hammer is another popular hammer, with a flat head and a pointed end. You can use it to drive nails or pins, as well as flatten or shape metal. If you need to get into tight spots or are working on a curved surface, the cross pein hammer is your friend.
Ball Pein Hammer
The Ball Pein Hammer is a really cool one – it looks like a cross between the Cross Pein hammer and a cooking pan! This tool is ideal for shaping or straightening metal pieces. It has two rounded heads and a flat peen – nice for when you want precision and a flat surface.
Mallet Hammer
Finally, the Mallet Hammer is for when you need a gentle touch. Rather than punching or pounding like other hammers, the mallet’s rubberized head delivers a softer, quieter blow that is gentler on the material. It’s ideal for chiseling, carving, and delicate tasks that require more finesse than a regular hammer.
So there you have it, the different types of hammers and how each is used. With these tools in your workshop, you’ll be equipped with the right hammer for the job, no matter what you’re working on!
Claw Hammer

Welcome, folks, to this great discussion of the different types of woodworking hand tools – and which ones you need! Before we dive into the different tools, it’s important to understand how they work and what they’re used for. Now, first up in our lineup is the humble but mighty claw hammer – the undisputed power tool of the woodworking world.
First off, let’s talk about why a claw hammer should be a key part of your arsenal. Well, if you want to pound nails into a project, then the claw hammer is your go-to. These bad boys pack a punch and can handle any project, big or small. With this mighty tool at your side, you’ll never have to worry about hitting the nail too hard (or too soft) – everything will come out just as you planned. And even better, these hammers usually have a magnetic nail holder to make your life easier.
Now it’s time to talk about the different types of claw hammers. Generally, you have two categories to choose from: the curved handle hammer and the straight handle hammer. Both of these have their own pros and cons and should be chosen based on your particular needs and preferences. The curved handle hammer is typically best for smaller projects, while the straight handle hammer is better for larger ones.
The other main type of claw hammer is the two-handed hammer. This bad boy can be a bit tougher to handle, but it’s great for larger projects and is especially effective in terms of accuracy and power delivery. All in all, this is a great tool and can really help speed up your work.
So there you have it, folks – the basics of the claw hammer. This is an essential tool for any woodworker, so make sure you have the right type for your projects. Now let’s move on to the next tool on our list. Until then, happy hammering!
Cross Pein Hammer
Welcome to the wonderful world of woodworking hand tools! Today we’re taking a look at the Cross Pein Hammer.
Now, if you’ve ever asked yourself, “What is a Cross Pein Hammer?” let me explain. A Cross Pein Hammer is a type of hammer with a rounded face that tapers towards a pear-shaped point at the opposite end. And, it’s the type of hammer you want to use whenever you need to drive nails and pins into wood.
Now, let’s talk about what makes this type of hammer so special. The rounded face of the Cross Pein Hammer is ideal for tapping fittings and other delicate parts into pre-drilled holes. While I’m a big fan of the Claw Hammer for driving nails, the Cross Pein Hammer will give you a much more secure performance with more delicate pieces.
But, here’s the kicker: the end of the Cross Pein Hammer isn’t just for pounding nails. It can also be used for removing nails! That’s right, the pear-shaped point makes it an ideal tool for prying nails out of their holes.
So, if you want to make sure you have the right weapon for pounding and prying, grab a Cross Pein Hammer. It won’t let you down when the job gets tough.
And there you have it: the Cross Pein Hammer is here to make sure your woodworking projects go as smoothly as possible. So make sure you have one on hand, and never get caught without the right tool for the job!
Ball Pein Hammer
Ah yeeuhhhh, the ball pein hammer! One of the lesser knoooown hammer types, join me as we take a look at this bad-boy!
Now, the ball pein hammer is a goood hammer to have in yer tool-box! Not as hefty as the regular claw-hammer, it is great fer light work—tap-tap-tapping away at metal, without making a HUGE noise like the regular hammers (which liiike to make a ruckus!)
The ball peinhammer fer sure have its uses! Made with two different heads and ususually between 10oz to 20oz in weight, it surely ain’t a toy! The head generally has two ends, one flat and one curved, to give you a few options when ya need to use it. The flat end can be used to flatten metal or adhesive hard surfaces, and the curved end can also be used to remove any metal burrs or chips from the job you’ve done.
It also works well if ya want to mark hard, tough surfaces. Just two or three light taps will do. The round side of the head also works wonders in rounding off metal corners which are difficult to reach with the normal hammer.
When using the ball pein hammer, be sure to use anti-vibration gloves, it’ll help protect ya hands against shock. Also, don’t forget to use safety glasses! Lots of metal particles fly when ya use a hammer, and they can be dangeroos. SO, be sure to use safety glasses and a face mask so ya can keep on pein-balling with no harm done.
So, there ya have it, the ball pein hammer. A good, lightweight and smaller hammer to have handy right next to yer matey the claw hammer. Ya can do wonders with this type of hammer, so don’t forget to add it to yer tool-box!
Mallet Hammer
Ahh, the mallet hammer. Another unsung hero among woodworking tools. Ahh, it’s not very well known, but boy is it useful. I can’t tell you the number of times I’ve dug an old mallet hammer out of my toolbox and given it a brand new lease of life.
A mallet hammer is basically a traditional wooden hammer used primarily in wood carving and other woodworking tasks. It’s an old school tool and the hammer head is commonly made of either maple, beech, or hornbeam. It’s got a very slim profile and a rounded face (no sharp edges here!), allowing it to more easily chisel into small crevices and tough to reach places.
The long components of the mallet hammer are what make it really useful for certain woodworking tasks. You can use it to tap pieces into place or to join two pieces together by hammering along the length of the piece. It also works great when sanding off excess glue or to help drive a chisel into place.
Most mallet hammers also come with a removable face, so you can use different faces for different jobs. The blunt edges on the face are the most commonly used, but if you need a drilling or ripping edge it’s easy to swap out the faces.
Speaking of edges, the edges of a mallet hammer are much softer than those of a traditional hammer. This is great for families with kids who are just starting out with woodworking, as the softer edges won’t leave as big of a mark as a traditional hammer.
If you’re looking for a classic woodworking tool that will serve you well for many years, then the mallet hammer is definitely the way to go.
Saw
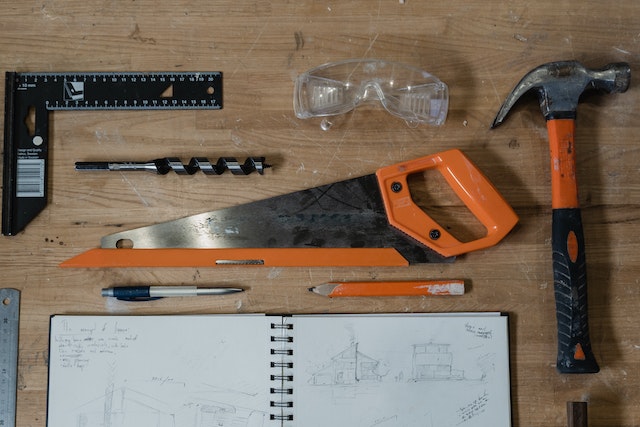
Welcome, boys and girls! In this section, we will be discussing the saws! So strap in as we explore the different types of saws!
First off is the hand saw, which is probably the most iconic saw in woodworking. It is a handheld saw with a blade that’s around 10 to 12 inches in length. Basically, it’s used for cutting straight lines in materials like wood, plastic, and metal.
Then comes the coping saw. Unlike the hand saw, the coping saw is designed to work on curves. It’s got a razor-sharp blade attached to a C-shaped frame. With its interchangeable blades, the coping saw can be used to make intricate designs in wood or any other kind of material.
The bow saw comes next in the list. This is a type of saw with a broad-toothed blade that is mounted between two thin bows. It’s a nice little number for more precise tasks. The bow saw can be used to make curved cuts in wood by positioning the blade in the right spot.
For tight corners, a keyhole saw comes in handy. It’s a small-toothed saw with a blade that’s usually less than 12 inches long. It’s an incredibly useful tool for making tight cuts that the hand saw can’t make.
So there you have it folks! Those are the different types of saws used in woodworking. So the next time you’re out building something, make sure you’ve got the right saws to get the job done right. I’m Eddie Murphy, and thanks for watching!
Hand Saw
Hello folks! You’ve stumbled across a good one – let’s talk about hand saws. If you’re a budding woodworker, it’s important to know about the different types of saws and which ones will work best for your needs.
Hand saws usually consist of a thin steel blade mounted in a handle of either wood or plastic. A hand saw can be used to make straight cuts, curved cuts, joints, and even create complex shapes. They’re great for cutting wood, plywood, and even wood-like materials such as PVC, laminates and acrylics.
When it comes to choosing the right saw for the job, there are a few different types of hand saws to consider.
A frame saw is a type of traditional hand saw which has a large handle and a sharp blade. It’s used for making straight cuts, and for cutting curves and intricate shapes. With its wide blade and big teeth, a frame saw can cut through large pieces of wood without being too difficult to work with.
Another popular hand saw is a coping saw. This type of saw has a fine, thin blade that can be used for intricate cutting and shaping. It’s great for making curved cuts and is often used in woodworking projects, such as making detailed wood carvings.
The last type of saw I’d like to tell you about is a bow saw. It’s a popular saw among woodworkers because it has a wide blade and it’s relatively easy to use. It’s great for making awkward cuts that normal saws may not be able to make accurately.
So, as you can see, there are a few different types of hand saws out there. They all have their own special uses, so make sure you choose the right one for the job.
Most importantly, remember to protect your eyes when using any of these saws by wearing appropriate safety goggles. And of course, always wear an apron or work overalls to protect your clothes from splintering or saw dust.
Anyway, there you have it – a quick overview of the different hand saws. So go out and get sawing!
Coping Saw
Welcome to the second subsection of the article, “The Different Types of Woodworking Hand Tools: Which Ones Do You Need?” This section is all about coping saws, which are the second type of saws that are discussed here.
So here’s the deal, folks! A coping saw is a small hand-held saw that is used for crafting intricate shapes in wood, metal and plastic. It consists of a thin blade, about six inches long and a sturdy frame to hold the blade, that has two handles attached to it. The blade can be moved up and down in the frame such that when it is pulled in one direction, it cuts the material in a curved shape.
Now this is where it gets really cool: the coping saw comes in different shapes and sizes. Some of them even have blades that can move both up and down and side to side. With some specific varieties, the blade can even be turned up to 180 degrees so that it can cut through both curved and straight materials.
If you are wondering what a coping saw is used for, here’s the answer! Basically, they can be used to form intricate or detailed shapes in materials, as well as remove materials from difficult to reach areas or in difficult shapes. In other words, if you want to create a curve in a piece of wood that is otherwise considered too hard for traditional saws, then the coping saw can come in pretty handy.
Furthermore, a coping saw can be used for making accurate curves and holes in materials such as wood, metal and plastic. Additionally, its small size makes it ideal for trimming and making thinner cuts where a regular hand saw isn’t capable of.
Now that’s all the basics. Next up we will explore the different types of coping saws and what roles they play in woodworking projects. So stay tuned for that. Till then, keep ‘em saws spinning!
Bow Saw
Ya heard about the ol’ bow saw? The thing looks like a two-pronged bow, can I get an amen? Well, you’ll need one of these to make those perfect straighter cuts. The bow saw has teeth on the blade which can cut through different types of wood. The blade is usually tensioned with a turn screw, hence why it looks like a bow.
Now, be sure to keep the blade properly tensioned or you’ll end up sawing your hand instead of the wood. Yo, check it with both hands, one to apply pressure and the other to guide the saw. Make sure you don’t cut too deep and take it nice and slow. This ain’t no chainsaw, mama bear.
Once you complete a cut, use the right file or sandpaper whichever one works, until you get the perfect edge. A bow saw is a must-have hand tool for making curves, circles, and even straight cuts. I’m telling ya, proper use of a bow saw can do it all. Also, you can use it to cut a wide variety of different materials.
It’s a great saw for a variety of woodworking applications, whether you’re building furniture, cutting lines, or making intricate joints. Plus, it’s the perfect finishing touch to any furniture projects.
Now, I’d recommend not skimping on the cost of a saw. Don’t buy one at the dollar store. Go for quality. Besides, who knows how long a dollar store product is gonna last. Just keep in mind, when using a bow saw there’s no need to apply too much force or rush it. Take your time, stay safe, and make some beautiful cuts. Thank y’all! Word up!
Keyhole Saw
Hey there, woodworking pals! How’re ya doing?
So let’s talk about the increasingly popular Keyhole Saw. Whether you’re a professional woodworker, a handyman looking to cut a few boards around the house, or just starting out your woodworking journey, keyhole saws are must-haves in your toolbox!
Y’all know why they call it a keyhole saw? Well, boy, let me tell you – ‘cause it cuts holes that look like locks! Seriously, it’s a gem of a tool. What this baby does is, it can cut circular holes with precision. That’s why you’ll find it in most woodworker’s toolbelt – it’s all about that accuracy, y’all.
Now, let me tell you some more cool features of the keyhole saw. Firstly, these tools come in a variety of sizes and shapes, from 5 to 12 inches in length, with round and triangular blades. Secondly, these saws are equipped with teeth that are specifically designed to cut in both directions, which can help you save time when working on circular holes and other intricate details.
And y’all wanna hear the best part? Just like other woodworking saws, the keyhole saw is relatively inexpensive – you can usually find one for under $25, so it won’t break your bank!
So, if you haven’t already, my advice to you is go out and get a keyhole saw – it’s a must-have in every woodworker’s toolbox! Trust me, you’ll be glad you did.
That’s it, my friends – and don’t forget to wear your safety goggles and aprons whenever you use any of your hand tools! Stay safe out there and have fun woodworking!
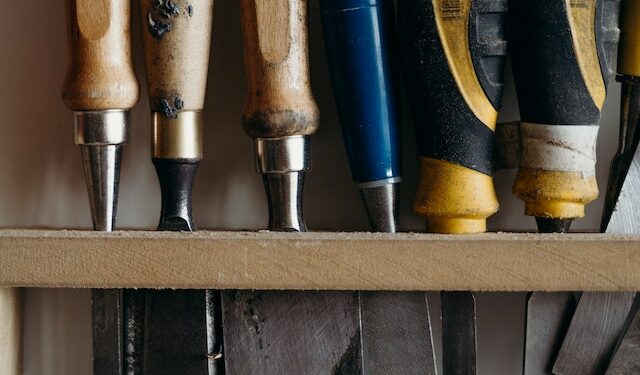
Chisels

So, we move onto the next type of tools – chisels. Now I don’t wanna talk too much about how to use these or what materials to watch out for – there are a few Youtube tutorials for that sort of thing. What I want to talk about is getting a good collection of chisels so that you can get started on those projects that require something a little more precise than a hammer.
Let’s start with the Bevel Edged Chisel. This little guy is your go-to for a lot of basic woodworking projects. But don’t be fooled by its size – it can do some serious work as well. Just make sure you use it correctly.
Next is the Firmer Chisel. This guy is your longer, more versatile cousin of the beveled chisel. It’s great for reaching into those hard to reach places, but watch the beveled edge – if you use it too much, it will start to wear down.
Last but not least is the Mortising Chisel. Now this guy is great for assembling joints and creating grooves in wood. Don’t get this one confused with the other two – it’s a bit thicker and heavier and is used for more specialized projects.
So there you have it. Now you know the different types of chisels and how each one is used. Before you start on that latest project, make sure you have the right tools for the job – chisels included!
Bevel Edged Chisel
Now you can have the legendary cutting tool that’s a staple of every woodworker’s toolbox. The bevel edged chisel is the most versatile of all chisels, and it’s the one you’ll use the most often when woodworking.
This chisel can be used for a variety of tasks from cutting grooves and dadoes in wood, to trimming and shaping edges, resulting in lovely smooth strips of wood. But it can also be used for lighter tasks around the workshop like removing small amounts of material for end rounding.
To use this chisel you’ll need a mallet, which will help you keep your cuts nice and neat. When using the chisel, make sure you keep the bevel facing away from the wood and always keep the chisel as close to perpendicular to the wood as possible. That’ll help ensure you won’t suffer from chips or tear outs as you’re working.
It’s important to maintain your bevel edged chisel, keeping it sharp and clean. You can use either a honing stone or a honing guide to keep the edge of your chisel sharp, as well as some polishing stones if you need to.
A bevel edged chisel is an indispensable tool and not just something I use to cut shapes out of wood. If you’re serious about woodworking, then this is an essential tool and you can’t do without it! So make sure you keep your bevel edged chisel maintained and in good shape, and you’ll be able to use it for many years to come.
Firmer Chisel
You can’t do any sensible woodwork without a firmer chisel. While they are big and bulky, they are essential when dealing with large pieces of wood. It is particularly important to use a firmer chisel when you’re working with thicker pieces— a claw hammer won’t do the trick.
Firmer chisels come in different hardness. Some are softer and better for tougher materials, others for cutting and finishing wood. You need to choose one that works for what you are doing. The steel should be tougher and not as brittle.
When it comes to fitting pieces of wood, a firmer chisel is the go-to tool. Back in the old days, carpenters and woodwork craftsmen had shaves and other specialized tools. But a firmer chisel can handle everything from fittings to cutting big blocks of wood, with some dexterity and finesse.
Firmer chisels come sharp right out of the box, and need to be kept that way. With regular use and maintenance, your firmer chisel will stay sharp. You’ll have to sharpen yours with a diamond or ceramic hone every now and again, but it’s worth it – your firmer chisel will last you a lifetime.
You can’t really do woodworking without a firmer chisel. Whether it’s cutting wood for fitting, or shaping wood for carving and beautifying, you will want to have a quality firmer chisel on hand. It’s a must-have for any woodworker’s toolbox, so make sure you don’t skimp on quality!
Mortising Chisel
They call these babies Mortising Chisels, the real troublemaker of the woodworking chisel family. It’s like the bad kid in school with its big beefy design twice the size of other chisels.
When you’re tackling deep, large mortises in stronger woods like oak and maple, forget it. This bad guy can do it all and more with fast, clean results. It’s got a strong steel banded tip that just oozes confidence.
Now for the tricky part. You’re gonna need a very special helper to keep this baddie from running wild. See, Mortising Chisels have an extra long neck and handle that extends into your woodworking bench or a special mortising machine (you might want to look into that). When you strike it, the neck helps reduce vibrations so your results don’t shake like Jell-O.
Mortising Chisels sure don’t make friends easily, but if you know how to use them the right way you’ll be reaping the rewards of a sharp, clean cut when you’re done. Just remember to play it safe, kids. These chisels demand respect and won’t take no for an answer.
They might not be the fanciest or most popular in the class, but when it comes to making precision cuts in tough woods, Mortising Chisels are the real MVPs—when used with caution, that is.
Other Hand Tools

Ahhhh, the other hand tools! We’ve got the hammers, the saws, the chisels…now, it’s time to get down to the nitty-gritty of the other tools.
For starters, you can’t succeed in woodworking without a plane. It’s just essential. How else are you supposed to make all those smooth, level surfaces? The plane is indispensable.
Speaking of indispensable, let’s not forget the trusty rasp. It’s perfect for smoothing out those rough edges, or for bringing some ridges back to life. A rasp can be a real lifesaver when it comes to woodworking projects.
A good file can also come in handy. Use it to clean up cuts or to make microscopic changes in the wood. And don’t forget that a wrench is a must-have tool in any woodworking arsenal.
Sometimes you’ve gotta use a screwdriver, too. Make sure it’s a sturdy, reliable one that won’t strip the screws you’re using.
And let’s not forget the sandpaper! There’s no way around it: you need sandpaper to achieve a smooth finish.
Safety first! That’s right, I’m talking about goggles and an apron. Woodworking can be dangerous, so you need to be well-prepared. Don’t play games with your safety. To make sure that risk of injury is minimized, make sure to use the proper safety clothing and equipment.
Well, there you have it. You know the different types of woodworking hand tools, and which ones you need for a successful project. Got all the tools? Great. Time to build something amazing!
Plane
Well, the plane has been a classic woodworking hand tool since the dawn of man. It is used to create smooth surfaces, adjust the the dimensions of large pieces of wood, and trim away any uneven pieces.
There are a few different types of planes, but the two basic types are hand planes and power planes. A hand plane usually comes with a handle, a blade and two arms at the end. It has a smooth, rounded blade and it’s only operated with one hand, making it both easy to use and more precise than a power plane.
Power planes, on the other hand, are the larger, industrial grade version of the hand plane. They are typically powered by electricity or by petrol or diesel fuel. They have a longer base with a larger motor and they come with different blades to cut different angles. They are much faster than the hand plane, but they’re also much harder to control.
No matter which type of plane you choose, it’s important to remember that safety should always come first! When using a plane, be sure to wear safety goggles and an apron to protect your face and hands.
But don’t worry, if you want to get started in woodworking and you don’t have a plane, there are lots of other tools you can use, like saws, chisels and files. So don’t let the lack of a plane stop you from starting, just get creative and you’ll find the right tool for the job!
Rasp
Ah rasps, who really knows much about them? To be honest I always think of woodworking as simply swinging a hammer and saw around, but I guess there’s more to it than that. So let’s talk about rasps for a minute so we can be smart when all our friends start talking about them.
A rasp is basically a dual-purpose tool. It looks like a saw but has a thick, rough blade instead of teeth. This makes it useful for both roughing out and refinishing wood surfaces. It’s quite versatile, allowing you to easily shape wood, remove material, and even pare hardwood quickly and cleanly. Essentially, a rasp is great at turning irregularly shaped or rough pieces of wood into smooth surfaces.
What’s also nice about rasps is that they come in many different shapes and sizes. There’s the typical flat rasp, round rasp, half-round rasp, and rat-tail rasp. If you’re looking for something more specific, like a pointed rasp, there’s a lot of options out there. Variety is the spice of life when it comes to rasps!
However, while they may look like saws, rasps are not really used to cut wood. Instead, they’re better suited to doing more detailed shaping and polishing. They’ll work on softer woods, and once you get a feel for how to use them properly, you’ll be able to create a variety of shapes and smooth surfaces with ease.
The key to using a rasp correctly is having the right one for the job at hand. You want to choose a rasp that’s the appropriate shape for the surface you’re working with. And you don’t want something that’s too aggressive and takes too much material away. That’s why it’s important to start with a softer rasp and work your way up to a harder one if you’re having trouble.
The bottom line is that if you want your wood projects to turn out nicely, you need a rasp. It might not be the most glamorous tool in the woodworker’s arsenal, but it certainly can’t be overlooked. So next time you head out to buy or borrow some woodworking hand tools, make sure you pick up a rasp or two!
File
Have you ever thought about all the different types of woodworking hand tools that are out there? Today, I’m going to talk about files, which is one of the most important tools for woodworking.
So, what is a file? Simply put, it is a metal shaping tool with a series of teeth on its blade. It comes in different sizes, shapes, and cuts. The type of file used to shape wood will depend on the job. For example, a smooth cut file can be used to clean up surfaces and edges, while a cross-cut file can be used to shape cavities.
Files are typically used in combination with other tools. For example, if you’re cutting a dovetail joint, you’ll likely use a chisel and rasp in combination with a file. A file can also be used to sharpen and shape other tools, such as saw blades and knives.
When considering a file, pay close attention to its size and type of cut. The size of the file will determine how deep into the wood it can cut, so make sure to choose a file that is appropriate for the task at hand. The cut determines how aggressively the file will work and can range from aggressive cuts to smooth cuts.
Finally, make sure to keep your file clean. This will ensure that it stays sharp and performs efficiently. Cleaning it is simple – just run it over a file card or cloth after use.
So, that’s it for files! As you can see, these handy tools are essential for any woodworker. With the right file, you can shape and clean your wood to perfection.
Wrench
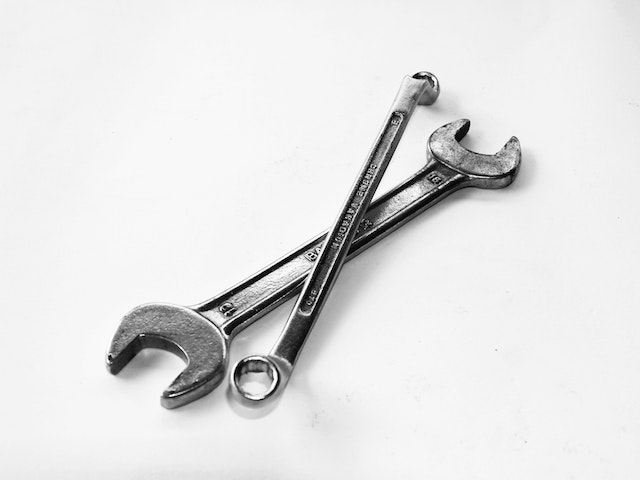
Well, wrenches are an important tool for woodworking, so let’s talk about them! Is that right? Wrenches? Yup! Wrenches are those handy little tools can be used to tighten and loosen nuts and bolts. They come in a wide variety of sizes and shapes, and they can be very useful in all sorts of jobs.
Now, the types of wrenches you need will depend on the project you are working on. The most common type of wrench is an adjustable wrench, also known as a crescent wrench. This type of wrench can be adjusted to fit a variety of sizes. It’s really convenient since you won’t need to buy a new wrench for every job.
Another type of wrench is a ratchet wrench. Ratchet wrenches can be used for those projects where you need more leverage. The ratchet allows you to loosen or tighten nuts without having to remove the wrench from the nut each time. This is great for tight spots where you don’t want to reposition the wrench.
You’ll also want to look into torque wrenches. This type of wrench has a preset torque rating so you know that it won’t overtighten or loosen the nuts or bolts. This ensures that any fastener is set at the right tension. Torque wrenches require you to invest a bit more but they are essential if you want to ensure that the job is done correctly.
Finally, don’t forget the socket set. Socket sets are great for working with nuts and bolts, and they come in a variety of sizes. The sockets can accommodate different sized nuts and bolts, so you won’t need multiple wrenches for each project. For example, if you have a project that requires a 1/4-inch nut, you can just pop one of the 1/4-inch sockets onto your socket wrench and you’re ready to go.
So, now you know a bit more about the different types of wrenches available. But which one to buy? Well, it really depends on your project. Some wrenches are better for certain jobs than others, so take a look at your project and decide which one you need.
Different tools for different jobs. That’s how woodworking works. And so, if you’re just brave enough to take on a woodworking project, don’t forget to buy the right tools, and don’t forget your trusty wrench! You’ll need it for all sorts of jobs, from tightening bolts to turning screws. So don’t be scared, because this is one tool you won’t regret having!
Screwdriver
Ahhh screwdrivers! You use them to drive screws into the wood pieces you’re working with. It’s such a simple tool with an exquisite ability: to fasten two pieces of wood together. Without them, you’d be up the creek without a paddle.
You’ll want to invest in a good collection of screwdrivers. Depending on the type of screws you’re dealing with, you’ll likely need both the straight and Phillips variety. Don’t worry though, the range of sizes make it easier. (If you’re still struggling to determine the type of screwdriver you may need, consider asking the good folks at the hardware store for advice!)
Now, I know what you’re probably asking: what are some of the different types of screwdrivers I should purchase for woodworking projects?
First up is the standard flat head screwdriver. This is probably the most popular of the screwdrivers and it features a flat end and a shaft of varying lengths.
There’s also the Phillips screwdriver, which is designed to be able to fit a range of screws.While it has a slightly rounded end, the curved edges make it easier to fit the screw properly.
Then, we’ve got slotted screwdrivers, which are used mostly to tighten and loosen a single screw at a time. Again, there’s a range of sizes you can purchase depending on the screws you’ll be using.
As with most other hand tools, a set of screwdrivers will usually offer more efficiency when it comes to woodworking. And, if you’re looking for flexibility, consider buying a screwdriver capable of multiple angles for short and long screws.
The bottom line: don’t leave home without them! Screwdrivers are an absolute must-have for your woodworking projects and you’ll require a range of sizes and types to get the job done. As always, you’ll get the most out of your tools if you invest in quality. Now, who’s ready to get driving?
Sandpaper
When it comes to woodworking, sandpaper is essential. In fact, without this hand tool, some projects simply could not get done. Without sandpaper, carving intricate designs into your wooden creations might be impossible – and the final product would look a lot less polished. So, if you’re a woodworker, you need to be sure to have plenty of sandpaper on hand.
Now, when it comes to sandpaper, there are a few different kinds with varying levels of grits. If you’re looking to take off paint or prep a wood surface, you’ll want to use a course grit sandpaper. If you’re looking to smooth surfaces, move to a medium grade sandpaper. If you want to get the job looking as close to perfection as possible, go for the fine grade sandpaper.
Sanding with sandpaper isn’t a hard process, but it’s important to use the correct technique. You want to make sure to sand in the direction of the grain, angling the sandpaper at about 45 degrees. If you need to remove thick layers or old finishes, you may want to try using a sanding tool that holds the sandpaper securely.
Now, when it comes to sandpaper, there are also times when you may need specialty papers. Sanding blocks, sponges, and pads are all great alternatives to traditional papers. For example, full-sized blocks and sponges are great for reaching tight spots, as are certain types of pads. As a woodworker, it’s important to know when it’s time to bust out the big guns and switch to the specialty sandpaper options.
While sandpaper may seem like a mundane item, it can truly make or break a woodworking project. That’s why it’s so important to make sure you have the right level of sandpaper on hand for any job. So, make sure you keep your sandpaper on lock, cause if you don’t, you’ll have a finished project that looks as rough as a sandstorm in the desert.
Goggles
Ah, goggles, the cool kid’s accessory when it comes to woodworking. Goggles are very important to have when working with wood since they protect your eyes from small particles which can sometimes fly off when your tools come into contact with the wood. If you’re looking to drastically reduce the amount of time it takes you to get your projects done, then goggles are a must-have.
Sure, you might feel a bit silly at first wearing goggles while you’re crafting a masterpiece, but I guarantee if you go more often, you’ll forget all about it. Plus, when you move on to using power tools (and really, you should) you’ll thank yourself for choosing to invest in safety goggles to protect your precious eyesight.
When picking out the right pair of goggles for woodworking, there are a few things to consider. Firstly, you want to make sure they are comfortable. You’ll want to make sure they don’t pinch your nose or the sides of your face too tightly, or obscure your view of the woodwork you’re working on.
You’ll also want to make sure you get a pair that won’t fog up when you start working with the heavier power tools. Lastly, you should make sure that the goggles offer both a good fit and optimal ventilation to ensure that you won’t be faced with fogging issues.
One of the great things about goggles is that they come in a variety of styles, colours, and sizes, so you can find a pair that suits the look and rests comfortably on your face. If you’re going for a more industrial look, then you can choose a pair of safety glasses with a metal frame and a grey lens. For a more modern look, you may choose plastic frames with coloured lenses and a mirrored finish.
No matter what type of goggles you choose, always make sure you’re getting safety glasses, not just sunglasses or fashion glasses, to protect your eyes from any debris that may fly off when woodworking.
So, if you’re looking to up your woodworking game, toss on a pair of goggles and get crafting! They not only protect you from harm, but they look pretty cool too. Who knew safety glasses could be so stylish? It’s a win-win situation!
Apron
If there’s one thing that’s hard to miss when a woodworker is hard at work, it’s the apron! Not only does a woodworker’s apron look stylish, it’s also incredibly practical. An apron is one of the most essential hand tools for woodworking and keeping you clean and safe.
First and foremost, the apron is designed to protect your clothing from sawdust, dirt, and other debris that might come from working with wood. It also shields you from splinters, chips, and other sharp objects that could otherwise cause injury. A good apron does this without getting in the way of you doing the work you need to do.
Another nice thing about an apron is that it provides more than just protection from sawdust and other debris. It can also act as a place to keep your tools. You can store measuring tapes, pencils, screwdrivers, and more in your apron’s pockets. That way, you know exactly where they are when you need them.
It is also important to choose an apron that fits you properly and is made with a durable fabric. The best aprons should be comfortable, lightweight, and breathable. Some are even made with waterproof material, which is great if you’re going to be working with water-based stains or varnishes.
Finally, you’ll want to consider the style of apron that’s best for you. There are lots of different styles of aprons that offer different levels of protection and functionality. Some are designed with extra pockets and straps for a more tailored look. Others offer more coverage for your back and chest. It really comes down to personal preference and which option you think will work best for your woodworking needs.
In short, the apron is an essential tool for woodworking, and it can do much more than just keep your clothing clean and safe. It can also provide a place to keep your tools at hand and protect you from getting splinters and other sharp objects. So don’t forget to grab an apron when you set out to do your woodworking projects!