How To Make A Perfect Cut With A Circular Saw

Circular saws are a powerful tool for woodworking projects, but they can also be dangerous if not used properly. One of the most important aspects of using a circular saw is making a clean and accurate cut.
In this article, we will provide woodworking safety tips and a step-by-step guide on how to make a perfect cut with a circular saw. Whether you are a beginner or an experienced woodworker, these tips will help you use your circular saw with confidence and precision.
Step by Step Guide on How to Make a Perfect Cut with a Circular Saw
Welcome to a guide on how to make the perfect cut with a circular saw. If you want to make straight cuts and curves with your circular saw and you’re a beginner and don’t know where to start then no worries, because I am here to help.
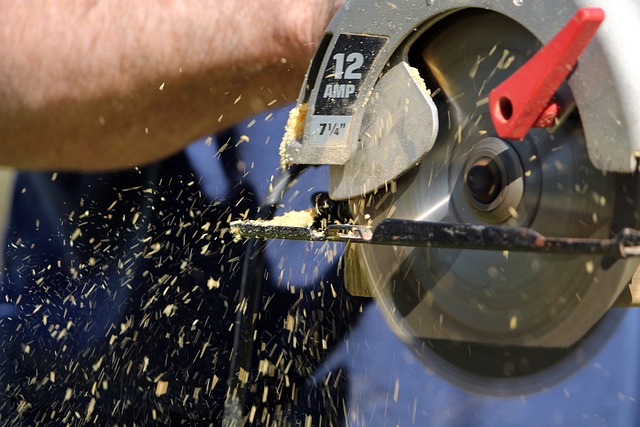
Let’s start with step one: getting the right circular saw. The first thing you should consider when picking a circular saw is the power or horsepower. More horsepower is better because you’ll be able to cut through harder materials like plywood, but make sure you also pick one that has a depth adjustment. You also want to look for one that has good safety features, like an anti-kickback, and one that has easy blade changes and adjustments.
Step two is choosing your blade. When you purchase your saw, it will come with a blade but you may want to buy a different one. The type of blade you choose depends on the material you’re cutting and the type of cut you want. For example, if you’re cutting plywood then you’ll want a blade specifically designed for plywood. There are also blades designed for ripping or crosscutting, and some blades have coatings to reduce friction and heat.
Step three: setting the depth and angle. Setting the depth and angle of your saw are important for making accurate cuts. You’ll need to adjust the depth to the thickness of the material you’re cutting and the angle if you want to make beveled cuts. Make sure to double check your settings before you start cutting.
Step four is safety tips. When using a circular saw, you need to be extra careful to avoid accidents. Make sure you wear protective eyewear and gloves at all times, and be sure to unplug your saw before you make any adjustments or change the blade.
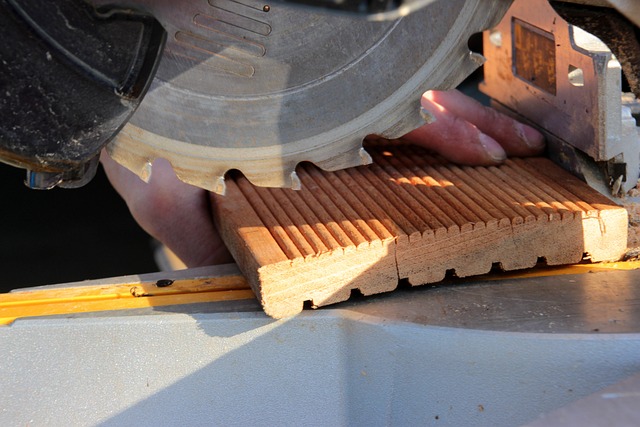
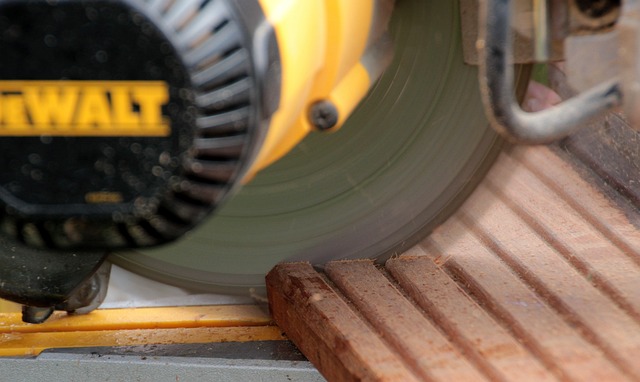
Step five is making a straight cut. Making a straight cut with a circular saw is fairly easy. First, you need to make sure you’re cutting along a straight line. Then, start the saw and hold it firmly against the material as you cut. Make sure you’re following the line gradually and don’t try to cut too quickly.
Step six is making a compound cut. A compound cut is when you need to make two different angles on the same cut. To do this, you need to adjust the depth twice and make sure you’re cutting at the correct angle. You also need to be very accurate in order to make a clean cut.
And the final step is turning in a corner. This is basically like making a compound cut, but instead of making two angles you’re just making one. To do this, make sure you’re marked out the corner accurately, and then make two passes with the saw. On the first pass you want to make sure you’re cutting at the right angle and on the second pass you want to make sure you’re cutting straight.
And that’s it! Now you know how to make a perfect cut with a circular saw. Keep these steps in mind and you’ll be an expert at using your saw in no time.
Getting the Right Circular Saw

Yoooo! Cutters, are you ready to make the perfect cut? Here is your one stop guide to shaving off those edges like a pro! Let’s kick things off with getting the right circular saw. Right!
So, the question is what saw is the right saw for the job? Well, isn’t that the million dollar question? There are many types of circular saws in today’s market, each with its benefits. It all depends on the type of cuts you will be making and the desired outcome.
If you are looking for a saw that can make beveled and mitered cuts, then you really want to get your hands on a sidewinder or a worm saw. A sidewinder uses a rotation that allows it to cut in the direction it is spinning. It also has a narrow profile and orients the blade to the right side of the body, making it a great saw for detailed and precision cuts. As for a worm saw, it features a more compact design and more flexibility when making mitered and beveled cuts.
But maybe you don’t want to shell out the big bucks for a sidewinder or worm saw. If you are looking for a more affordable saw, consider going with a basic circular saw. This type of saw uses a lower RPM motor, making it a great option for those who are on a low budget. It is capable of crosscutting, ripping, and making basic miter cuts, but it won’t be able to make more intricate beveled or mitered cuts.
No matter the type of saw you choose, always remember to pick one with a reliable and powerful motor that can handle the type of cuts you need it to make.
Choosing Your Blade
Shoot, choosing a blade is one of the most important decisions you’ll have to make when it comes to making a perfect cut with your circular saw. But don’t panic! This is a lot simpler than it sounds and it shouldn’t require too much thought.
First thing’s first: Make sure you’re always using the best and sharpest blade for the job. That’s right, the sharpness of the blade will make a world of difference in the quality and accuracy of your cut. If your saw is equipped with a jagged or dull blade – toss it! If the blade isn’t sharp enough it can cause the edge of your saw to tear the material instead of slicing it as it’s meant to.
Now, the type of blade you pick will also come into play. Let’s say you’re trying to make a perfect cut through an old cabinet in your kitchen – if this is the case, you’ll want to select a steel alloy blade. Steel alloy blades are durable and can go through tough material without any issues. On the other hand, if you were cutting plywood, you’d want to use a combination blade. These blades are great for intricate work, as they’ve got a lot of tiny teeth and a thin kerf, meaning you lose less material when you cut through the plywood. Pretty cool, right?
And of course, you’ll want to consider the thickness of the blade you’re using. Thicker blades are going to be more durable, and can withstand more strain from the power of the saw. But! If you’re trying to create a delicate cut, you may want to opt for a thinner blade, as it’ll get the job done faster and more accurately.
Finally, the trickiest part of the process. Try to remember that the size of the blade should match the size of your Circular Saw. wow, who knew size matters in the Circular Saw world? If the blade is too large it could be a dangerous situation. Likewise, a blade that’s too small won’t be of much use either.
In short, when you’re looking for a blade for your Circular Saw just remember to get the best and sharpest blade for the job. Go for the alloy blade for tough material, the combination blade for delicate projects, and the thickness should match the size of the saw. Got it? Great! Now let’s start cutting!
Setting the Depth and Angle
Well, now that you’ve got the right circular saw for your project, and you know what blades you should use for that task, it’s time to look at how to correctly set the depth and angle of cut of your circular saw.
First of all, let’s talk about the depth of the saw. This is one of the most important parts of sawing, as it determines how deep you can cut into the material. On a circular saw, this usually involves adjusting the fence, so that the blade comes out underneath the surface the right distance.
Now, while this seems simple enough, there’s actually a specific way that you should adjust the fence of the saw to get the best possible cut. To do this, you’ll want to make sure that the blade is around halfway between the surface of the item you’re cutting and the saw’s fence. This ensures that the blade is perfectly balanced, which will mean fewer mistakes and smoother, more flawless cuts.
Next, you’ll need to set the angle of the saw. This is important as you need to know what angle the blade will be cutting in, so that you can make sure it is as accurate as possible. This involves adjusting the bevel lever, which is usually located at the side of the circular saw. What you’ll need to do is twist the lever until the saw’s blade is set to the correct angle, then tighten the lock to make sure it’s secure.
That’s about all there is to setting the depth and angle of your circular saw! Just follow these steps next time you’re cutting something, and you’ll be sure to get a perfect cut every time. And remember, always be careful when using power tools like this, as they can be dangerous if used incorrectly. Now let’s go make some awesome saw cuts!
Safety Tips
Oh boy, we’ve come to my favorite part of the show, Step 4: the Safety Tips. Before we even think about starting a saw, we must remember basic safety. This includes wearing safety goggles, safety gloves, and ear plugs (if the saw is loud).
You should never try to start the saw until you have a firm grip on the handle, and be sure to have the blade completely stopped before re-positioning it. Never try to start the saw before the blade is in contact with the material.
If you must cut material that is longer than the saw’s capacity, use a jig so that both your hands are free and do not overreach with the saw. Never place the saw on top of any material you plan to cut.
If the saw begins to feel too unstable when cutting, make sure that you have a solid, flat surface to stand on. As a bonus safety tip, a pair of steel-toed boots are highly recommended.
Whenever you’re not using the saw, make sure you set it down carefully and don’t drop it or lay it down on its blade. Never point the blade towards you or anyone else when you’re putting the saw away.
Finally, if your saw is clogged with sawdust or wood chips, turn off the power and fix it when the blade has stopped spinning. Never try to clear out of material while the saw is running—that’s a good way to get seriously injured.
Now, of course, I’m sure you can all follow these simple rules, which is why Step 4 was the easiest and most fun of them all—safety first!
Making a Straight Cut
Ahh, so you’re a whiz at getting your circular saw set up, nothin’ on this good earth could possibly stop ya now– except maybe straight cutting with it. Making a straight cut with a circular saw can be a real challenge, especially if you have less than steady hands.
Yeah, having little jittery hands can be the kiss of death if you’re tryin’ to cut a straight line with a saw. That’s not to say it’s impossible, no sir no sir.
Listen, if you’ve got the right saw, the right blade, the right settings– and the steadiest hands on the block– you can use your circular saw to make a perfectly straight cut.
Let’s do a quick overview of how to make a straight cut with your circular saw.
First off, make sure you’ve got a clamped-down straight edge like a ruler or a square to act as a guide. You’ll need the edge to be securely clamped down to your material so it doesn’t move around as your saw glides through.
Next, get your saw ready. Check to make sure your saw’s blade guard is properly situated and tighten your blade if you need to. Place your saw on the material so the blade is aligned with the edge of your guide.
Once you’ve got that set up, steady your hands and take a deep breath before you engage the trigger of your saw. And don’t forget your safety equipment– always wear your goggles and gloves when making a cut.
Then, press the trigger and push forward ever so slowly. Make sure you keep the saw firmly against your guide until the end of the cut. And speaking of the end, don’t forget to cut until the end of your guide.
Making a perfectly straight cut with a circular saw will take some practice, practice, practice! But with that in mind, if you keep at it, you’ll soon be making perfectly straight cuts in no time!
Making a Compound Cut
Making a compound cut can be a bit tricky with a circular saw. But this doesn’t mean it is completely impossible to do – you just need to make sure that you’re taking the right precautions and following the right steps.
The first thing you need to do is to adjust your saw for the type of compound cut you’re looking to make. The most common types of compound cuts are miter, bevel, and compound miter. To set your saw for each of these, you’ll need to adjust the settings on the side of the saw. For a miter cut, you’ll need to set the saw at an angle, while for a bevel cut, you’ll need to choose a depth setting. For a compound miter cut, you’ll need to adjust both settings.
Once you’ve set your saw for the correct cut, you can begin to make your cut. When making a compound cut, it is important to remember to start small. It is much easier to adjust your settings and make a few small cuts rather than starting with a larger cut and trying to adjust the settings after.
For a compound miter cut, it is also important to take your time. You will need to make sure that each half of the cut is at the same angle, and that the saw is moving at the same speed for each portion of the cut. If you’re not seeing the results you wanted, adjust the settings and try again.
Finally, be sure to use your safety gear when making any cut with a circular saw. Wear eyewear, hearing protection, and gloves to keep your hands safe. A dust mask is also a good idea if you’re going to be making a lot of cuts.
By following these steps, you’ll be able to make a perfect compound cut with a circular saw. The key is to take your time and adjust your settings until you achieve the desired results. And most importantly, don’t forget to stay safe while operating your saw!
Turning In A Corner
Ahhhh the turn. We’ve all been there. You’ve been working diligently on your circular saw project and you get to the point where you need to turn a corner but you don’t know how. Fret not my friends, I’m here to help.
When it comes to turning a corner, the most important thing to keep in mind is that you want to keep the saw blade at a 45 degree angle. You’ll want to set your saw to its maximum depth, which is typically between 2-1/2 to 4 inches. Then, you’ll want to mark where you want the corner to be, usually at 9 o’clock and 3 o’clock. Now, the next step is to make sure that your saw blade is parallel with your line. Then, adjust your blade accordingly, and start cutting towards the turn.
Once you’ve made the first cut, you’ll want to turn the saw so that the nose of the saw is about 2-3 inches away from your line so that you don’t cut too deep into the wood. Then, make another cut in the same direction and it should create a nice curve. Keep in mind that it may take a few rounds of cutting to get the turn just right, so don’t be afraid to practice.
Once you’ve got the hang of it, the next time you make a turn with a circular saw, you’ll be a pro. Just try to cut slowly and keep your eyes on the line. With a bit of patience and practice, you should have no problem making perfect cuts with a circular saw.