How To Create A Beautiful Wood Turning For Your Project

Hey everyone, so if you’re looking to add a special piece of art to your project, you’re gonna need to know how to create a beautiful wood turning for your project. Well have no fear, I’m here to help and let you all in on the secret.
Let’s start by talking about gathering your materials. You’ll need a wooden board, some carving tools, a lathe and you’ll also want to make sure you have a dust mask, safety glasses and ear protectors.
When you’re all geared up, it’s time to choose your design. Think of something that you’ll be able to cut, sand and shape in the wooden board. This could be anything from a vase to a bowl, so be creative!
Once you know what you’re going to create, it’s time to start working with the lathe. Now, this is where we get serious. Make sure you’re cold and collected, because the lathe is no joke! Start by marking out the dimensions of your project, this will help you get a better grip and help you stay in control.
Now that you’ve got the basic shape down, it’s time to start doing the cutting and shaping. Not sure how to do this? No problem! Just remember to go slowly and keep your hand steady. Start with cutting out the material and then move on to shaping and smoothing it.
And when you feel like you’ve gotten the desired shape, it’s time to give it a finishing up. This is where you’ll need to do some sanding. Start with a course grit and work your way towards a finer one. Not only will this help get a smooth finish to your project, but it’ll also help get rid of any sharp edges and give it the desired shape.
Lastly, you’ll want to apply a finishing touch to your project. This is where you can really have some fun and add a coat of wax or oil for protection and for a shiny look.
And that’s it! Now if you follow all of these steps, you’re on your way to creating a beautiful wood turning for your project. So go ahead and get creating, I can’t wait to see what you’ve made!
Gather Materials
Before you start shaping, cutting, and sanding the wood for your project, it’s important to make sure you have all the tools and materials you’re going to need. Gather your materials! Just like MacGyver I need my tools close by in case something goes wrong, or I just get a great creative impulse and recognize I have too much time on my hands.
Whether you are creating a bowl, platter, candlestick, or something else, you’ll need to make sure your work area is set up correctly. Get your lathe ready, because you’ll need to make sure you have all the right parts and pieces. You’ll want to make sure you have the right size chisel bit, as well as a tool rest to guide your chisel. To ensure a safe and even cut, you’ll want to make sure you have wood clamps, too. And don’t forget the dust collection system. Safety first, even when you’re having fun.
Most of the materials you’ll need can be found at your local hardware store — you might even have the tools and materials you need in the garage or the shed. Make sure you have a fine toothed saw, a ruler, a high-grade sandpaper (preferably up to 360 grit or higher), float blade, and some sanding block. And don’t forget the blocks of your chosen hardwood – these are the materials you’re going to turn into something beautiful!
When it comes to the actual turning tools, you’ll want to make sure you have the right size for whatever you’re trying to create. You’ll want to pay attention to the measurements and make sure you have the right chisel bit. Look for a cutting edge set up– this will make your job a lot easier.
Making sure you have all of your materials before you start the project is the key to success. Once you’ve gathered your materials, you can move on to the next step: Choosing Your Design.
Choose Your Design
When you’re ready to begin working on your wood turning project, one of the first steps you’ll need to take is to choose your design. This may sound like a daunting task, but it can actually be quite simple if you know what you’re doing. Plus, by taking the time to plan ahead and pick a design, you’ll end up with a much better finished product that you can be proud of.
First of all, decide what type of wood you want to use. Different woods can create different visual effects, so it’s important to take this into consideration when selecting your wood turning design. For instance, a walnut wood turning would look much different than an oak turning.
You’ll also want to take a look at some existing designs for inspiration. If you’re looking for something classic, you could look up antique wooden turnings and see what type of measurements or techniques were used to create it. If you’d prefer something a bit more modern, you can browse through images online or visit a woodworking library to get a better sense of what looks good together.
Deciding on a design is also a great opportunity to show off your creative skills. Think about details like curves and sharp angles, or even consider engraving a pattern or image into the wood. Once you have an idea for the final look of your project, you can move on to the next step.
Finally, don’t forget to measure! Accurate measurements are key when it comes to wood turning, as an improper measurement can ruin the whole project. Make sure to account for shrinkage and other factors that can have an impact on the size of your design.
Choosing a design for your wood turning project doesn’t have to be intimidating – in fact, it can be an exciting first step! The key is to take your time, plan ahead, and make sure all your measurements are accurate so your project can look its best.
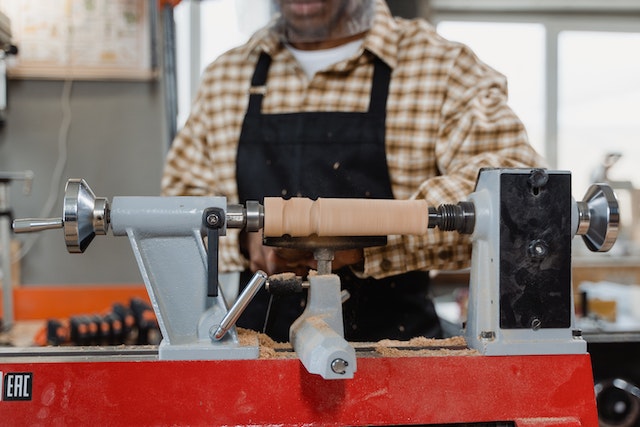
Start Working with the Lathe

Beginners to wood turning are sometimes intimidated when they look at a lathe and think, “How the heck am I supposed to work with this thing?” But worry not, it’s not as difficult as you might think!
Let’s start off by discussing what a lathe is. Basically, a lathe is an electrically operated machine that rotates pieces of wood on an axis, allowing the operator to shape and smooth the wood easily. A standard lathe has a variable speed motor, a power switch and a safety switch.
Now that we know what a lathe is, it’s time to begin working with it. The first thing you’ll want to do is ensure that the speeds are set correctly. This can be done most easily by switching to the “low” setting, which will ensure a safe speed for any novice wood turner. You should also make sure that the power switch is in “off” position, then plug in the power cord and flip the switch.
Now it’s time to choose a wood piece and attach it to the lathe. This is done with a set of jaws that clamp onto the wood, and the piece is spun so the operator can begin shaping it. However, before beginning any operation with the lathe, you must make sure that it is properly balanced to ensure a smooth finish and avoid any potential accidents.
To ensure proper balance, mark the exact center of the wood and ensure that the lathe is set so that it is the same distance from the axis of the wood. This can be done by placing a straight edge across the wood and comparing the distance from the edge to the end of the wood. Once you’re happy with the balance, you’re ready to start working with the lathe!
So, there you have it! Working with the lathe isn’t as hard as it may seem, and with a bit of practice, you’ll soon be turning out beautiful works of art. Now that you know the basics of working with the lathe, you’ll be well on your way to creating incredible projects!
Mark Out the Dimensions
Before you begin turning your workpiece, you’ll need to mark out the dimensions of your project on the wood. This will help you figure out the shape of your project and give you a rough sketch of what the finished product will look like.
First of all, grab a pencil and measure the thickness of the wood in increments of 1/4 inch or smaller. Once you’ve got a satisfactory measurement, draw a line across the wood to represent the thickness.
Next, use a ruler to measure and draw parallel lines along the length of the wood. The distance between each line should be the same as the thickness of the wood, just measured. The more lines you draw, the more detailed your project will become.
Finally, draw gaps between each marked line, leaving small spaces that will define the shape of the project.
Now that you’ve marked out the dimensions of the project, it’s time to start cutting.
First off, when cutting, always keep the blade lubricated. This will make the cutting smoother and give you a better finished product. Secondly, take your time and make sure you’re cutting at the right angle. You don’t want to end up with an uneven project. And lastly, make sure your tools are sharp and in good working order. This will help you get a clean and beautiful cut.
Now that your project is marked out and your tools are ready to go, you can now start turning those beautiful shapes into reality! Have fun- it’s time to get creative!
Turning the Outline of the Project

All right, let’s get down to the real work!
Once you’ve marked out the dimensions that you’ll need, it’s time to turn the outline of your project. Even though it might look intimidating, wood turning is actually quite simple – and it might even be kinda fun.
First, take your wood and hold it against your lathe. Make sure you keep it tight – this is key to make sure it stays in place. Then you’ll take your chisel and begin making the outline cuts. Be careful to keep the chisel flat and make sure you don’t press too hard. You can always go back and make more exact cuts later on.
Now it’s time to move on to the bigger cuts. You’ll need to use your lathe to turn larger pieces of wood. Again, move slow and make sure your chisel is pressing flat. Go around in a steady circle – this will create a nice, even cut. If you run into any issues, just slow down, take your time, and adjust the pressure to make sure it looks right.
The final step of turning the outline of your project is to sand everything down. This is a must if you want to make sure everything is smooth and even. Try to be as gentle as possible – you don’t want to sand too harshly and damage the outline.
So that’s it – you’re done with turning the outline of your project! Congrats for getting this far. Just remember to take your time and be patient – it’s all about getting the details right. Now go out there and make a beautiful wood turning for your project. Good luck!
Cutting out the Material with the Lathe
Now that you have the outline of the shape you need to start cutting out the material with the lathe. You’ll want to start by adjusting the speed and setting of the lathe to ensure you cut out the material evenly. You’ll want the blade to be at a 45 degree angle and the speed set to about 1000-2000 RPM.
Once you have the settings set, you can start cutting out the material. Make sure you have a steady, gentle hand as this is the part of the job where you really want to avoid mistakes. Don’t rush it, take your time – nice and slow.
Now this is where it gets really tricky and I have to confess, it’s not my favorite part of the job! You’ll have to start pushing the lathe against the material, putting the blade about quarter of an inch into the material and pushing it out. You’ll want to move the blade carefully, paying attention to the shape of the material. Even the most experienced wood turner makes mistakes here, so don’t beat yourself up if you run into any snags.
Now, one of the best ways to avoid mistakes is to be aware of how much force you are applying to the material. Check your settings and make sure the speed is still correct, and use gentle pressure when applying the blade. This is the time when it really pays to go slow, practice makes perfect and all that.
Once you have the shape of your project cut out it’s time to start cleaning up the edges. Gently use a chisel to remove any rough edges or debris. Don’t worry if you mess up – a little sanding should get it back to looking good as new!
Eventually, when you’re done, you’ll have a piece of wood that looks exactly like the shape you were aiming for, with clean edges and all. All you need to do now is sit back and admire your own handiwork – there is definitely no better feeling than that!
Shaping and Smoothing
And that’s the way I’m writing now! So here it is folks, the subsection on shaping and smoothing your woodturning project.
It’s time to take your project to the next level; let’s shape and smooth it. You’ll need your list of materials – the lathe, drill, chisels, and sandpaper are all essential for turning your project into a work of art.
First things first though – make sure your lathe is stable and securely fixed on a solid surface. With your materials ready to use, it’s time to begin. Start by using a drill bit to drill a hole deep into the turning. Make sure the bit is centered so the hole will be evenly spaced throughout.
Once you’ve drilled the hole, it’s time to get shaping. You’ll need to use a chisel to start cutting away the wood and give it the shape you want. Start cutting in the same direction as the grain of the wood; this will ensure that the cut is smooth and even. As you continue chiselling, begin turning the wood in the same direction as the grain, until you’ve reached the desired shape.
Once you’ve finished chiselling, grab some sandpaper, and begin sanding the surface to give it a smoother finish. Start with a course-grit paper and gradually move to a finer one until you achieve the perfect surface.
And voila! Now you’ve finished shaping and smoothing, and your project looks beautiful. All that’s left to do is to apply a finish, and you’ll have an amazing masterpiece. So what are you waiting for? Gather your materials, and let’s get started.
Finishing Up the Project
Finishing up the project is an exciting part of the woodworking process, and it’s also where a lot of the magic happens! Here you’ll be taking all the components you have created and assembling them into a beautiful piece of art.
Start by using a rasp to help define the curves and lines of the project. This will help you get a more accurate shape, and it will also smooth down any rough edges that may remain.
Organizing the components will also be important at this stage. Make sure all the pieces fit together before beginning assembly. This will save you from having to fit components together later if there’s misalignment.
Once the components are arranged properly, use wood glue to permanently attach them. Apply a thin layer of glue on each slot and then insert the components. Use wood clamps or rubber bands to hold the pieces together until the glue fully dries.
You can also give your project a professional look by adding decorative touches, like engraving the wood. If you want a more polished aesthetic, use sandpaper to smooth down the wood and remove any rough spots.
Finally, after making sure your project is structurally sound, you can give it final details like staining, painting, or applying any finish you deem necessary.
And that’s it! Now you have a beautiful woodturning that is ready to show off.
Finishing Touches
Haha, getting close to the end my friends! All there is left to do is give all our hard work the perfect finishing touches! Let’s chat about all the details of how to make sure your hard work shines!
First thing you gotta do is give your project a good sanding. Use some sandpaper and sand away any edges that might look a bit rough. We want the piece to look smooth, sleek and professional. Make sure to go over the entire piece to make sure you got it all covered.
Now that you have a nice, smooth surface, let’s make sure to give the piece a durable coating or finish. You have several options here. Pick something that works for you and with the type of wood you are using. We want the piece to look it’s best and protect it from the elements.
Now, here is the really cool part, you can choose what type of look you would like to give the piece. You can staining, waxing or polishing. Each will give a very different finish so decide what type of look you are going for and then pick your product. All you have to do is follow the directions on the back of the product. That’s it!
You did it! Now you have a beautiful wood turning perfect for any project. Hopefully by following these steps you were able to get the perfect finish and size you were looking for and enjoy the process along the way. If you just take your time and use some attention to detail you’ll be sure to love the end result.
Haha, there you have it! You have your finished woodwork and it looks great! Let me know how all of your projects turn out and I’ll be sure to spread the word. Now get out there and create something amazing!
Sanding the Workpiece

Once you’ve got your wood turning looking just the way you want it and taken some time to admire it, it’s time to get to sanding! After all, what good is a beautiful wood turning project if it isn’t smooth? Not much good at all, that’s for sure.
But don’t worry, this part is a breeze and won’t take more than a few minutes. Start off by getting some grit sandpaper and moving up through the grits until you get the smoothness you desire. Grits can range from 40 to 100 so make sure to use the ones that will work best for your project.
Once sandpaper is in hand, start off with a coarser grit and go for some aggressive sanding all around the project. Be sure to get into all the nooks and crannies, but you don’t want to dig too deep into the wood. Once you’re done, move on to the next grit and just keep repeating the process until you reach the desired smoothness.
As you sand, it may seem like all the hard work you put into turning your project is disappearing, but don’t worry! The wood will immediately start to shine again and your project will look even better than it did before.
Just be sure to keep an eye out for any dark spots and rings that may appear after the sanding, as these are typically spots where your turning tool has dug into the wood. You can either sand these spots out or use a bit of wood glue to level them out, although the latter option will typically require you to start the sanding process all over again.
You’ll soon find out that rewarding feeling of a smooth surface, and you’ll feel thankfulness for the time spent on this stage of your project. Finally, it’s time for the final touch: the finish!
Applying A Finish
Ah, the finishing touches of the project! You’ve worked so hard – now it’s time to apply a finish that’s going to protect the wood and make it look spectacular!
When it comes to applying a finish, you have a few options. You can choose either a varnish, a lacquer, or a wax. Each of these finishes will give your wood turning a different look and appeal.
Varnish is a great choice if you want an even, glossy finish. It not only provides a uniform look but also protects your wood from scratches and minor dirt or debris. Make sure to apply varnish in thin layers, allowing each layer to dry completely before applying the next one. That way, you’ll achieve the perfect finish without any bumps or ridges.
Lacquer is a great choice if you’re looking for a glossy, light finish. It has a strong smell, so make sure to apply in a well-ventilated area. As with varnish, apply in thin layers, drying between applications.
Wax is the best choice for a more natural look. It adds shine and protection without any intense colors or smells. Apply it in thin layers, and you should be good to go.
Once you’ve applied your chosen finish, give it a few days to fully cure and dry before you start using or displaying your wood turning!
Well, there you have it! You’re now ready to move on to the next step in your wood turning project: applying a finish! Remember to take it slow, practice good safety precautions, and don’t be afraid to experiment.