How To Cut A 45-Degree Angle With A Circular Saw
Welcome to this tutorial on how to cut a 45-degree angle with a circular saw for all you DIY-ers out there looking to take your projects up a notch. Live life on the edge with a 45-degree angle cut! No supplies? No problem! Grab your circular saw, measuring tape and a pencil, and don’t forget to put on some protective gear (safety first!).
Once you have the necessary supplies, measure the thickness of the board with a measuring tape. We don’t want the saw to be too big or too small or, you know, too dangerous. Try to be precise or you’ll have to start all over again if you mess up. Now, outline the 45-degree angle with a pencil, and it’s important to make sure you keep the angle accurate so that your board won’t look like a balloon animal when you’re done.
Now, make sure the board is secure and in a stable, level position, and then it’s time to bust out that saw! Carefully adjust the circular saw so that it’s at the exact 45-degree angle. Once you’ve checked and double checked that the saw is in the right position, it’s time to cut the board! (That is why you got the saw in the first place, right?)
Finally, inspect the board to make sure it’s cut at the exact 45-degree angle and you’re all done! Just look at you, all dangerous and professional and everything. Bravo!
Supplies
Ha! For cutting a 45-degree angle with a circular saw, the Supplies list is half the battle! It’s your key to success, you hear? Let’s take a moment to learn what Supplies you need.
First and foremost, the big gun! You need a Circular Saw, the main tool in this game. Its cutting power is enough to shear through any board like butter. That’s right, butter!
Take a gander at the Measuring Tape. This Supplies list wouldn’t be complete without it. You gotta get an accurate length and thickness with it – every time.
Ready to make your mark, huh? I hear ya! You’ll need a Pencil for that. Draw a nice, thick line, nice and visible. You’ll thank me for this later!
Can I get a Yeah or a What!, people? Don Protective Gear before you start cutting anywhere! Safety always comes first. I’m talking about a mask, goggles, a long sleeve shirt, long pants, and steel toe boots.
Now you got everything in place for a successful 45-degree angle cut using a circular saw. Go get ’em, champ! It’ll be a piece of cake!
Circular Saw
If you wanna cut a 45-degree angle like a pro, you’re gonna need the right tool; in this case, a circular saw. It’s really important to use the right saw for your project, otherwise you might end up regretting it!
Whether you’re an experienced handyman or a beginner just getting their feet wet with DIY projects, using a circular saw, even the most challenging cutting tasks can be accomplished with relative ease. This varies a bit depending on the type of board material you’re working with, but all in all, it’s a much more efficient and accurate way of tackling any job that involves making angled cuts.
When getting ready to use your circular saw, you’re gonna want to make sure it’s perfectly adjusted and all the components are in working order. Depending on the size and weight of it, you may want to think about clamping it down to a stable and level surface. When that’s done, you can make sure everything is tightened and ready to go.
Protective gear is a must when using a circular saw; this includes goggles, gloves and a face mask. In addition to that, you can invest in some accessories to make things more comfortable, like an anti-kickback device or a special strap to secure the saw in place. Investing in the right safety gear to protect both you and your saw is always a good idea!
The choices when it comes to circular saws are really vast, so do some research and pick the saw that will work best for your project. Keep in mind, the bigger and more powerful the saw, the larger the cuts you can make – but we don’t recommend going too large if it’s your first time. Now that you’ve got your saw, it’s time to move on to the next step.
Measuring Tape
Measuring Tape? More like Measure-Gone-Wrong-A-Pe! Hahaha. Seriously, folks. While you may be tempted to skip the measuring step, don’t. After all, if you don’t measure first, how will you ensure the board is cut at the right angle?
So grab that measuring tape. Be sure it has the metric measurements labeled somewhere. The imperial measurement system is so last century! You’ll want to measure the thickness of the board that you’re cutting at the 45-degree angle. You’ll want to make sure the cut is precise, so measure carefully. That’s no joke. You’ll want accuracy here.
Once you measure the board, you can mark it. You’ll want to make sure the cut is precise, so don’t eyeball it! Marking the board will help you achieve that precision. And precision is really important here, folks. Consider it: if you don’t get the board cut at the correct angle, you’ll have an uneven surface. Cutting won’t be so easy with those jagged edges.
To mark the cut, use a pencil. Pencils are much easier to read, and more precise, than a marker. So mark that board! We’re getting closer to the goal here. Soon, we’ll be making that angled cut with the circular saw.
Pencil
When it comes to cutting a 45-degree angle with a circular saw, the pencil just might be the most important supplies there is. Now, I know what you might be thinking – “a pencil? Is that really necessary?” The answer is – absolutely! If you don’t take the time to mark your cut with a pencil, you can be sure that the angle won’t look the same once you have made the cut!
Now, I’m not suggesting you can get away with using just any kind of pencil. In fact, I recommend you invest in a good quality pencil with a long-lasting lead. That way, you can make sure the marking will stay in place once you press the pencil against the wood. Also, a thinner lead is better for making accurate marks without breaking the wood.
In terms of how to actually mark the angle, let me start by saying that working with a protractor is your best bet. Once you have the protractor in place and your angle measurement set, you can easily transfer that to the wood by tracing around the protractor. This will ensure you get the exact angle every single time.
However, if you don’t have a protractor, that’s ok! Just use a ruler and get as accurate as you can with the measurements. Make sure your marks are close together, then connect them with a straight line for clarity.
In any case, don’t let the pencil fool you. While it may seem like a small part of the process, it truly is one of the most important! So take your time, be accurate, and make sure to double-check your marks before you start cutting. That way you are sure to end up with a clean and amazing 45-degree angle!
Protective Gear

If you ever watched an episode of “Home Improvement” you know that any DIY project requires protective gear. And making a 45-degree angle cut with a circular saw is no exception. The protective gear in question includes safety goggles, hearing protection, and a respirator because sawdust and shavings will most certainly fly your way.
Put on your safety goggles before you do anything else. You don’t want sawdust or shavings flying and getting in your eyes, especially when working with a circular saw. Trust me, I know from experience.
If you’re going to be sawing for a while, put on some ear protection. A lot of sawdust and shavings will be flying, so you don’t want to run the risk of ending up with permanent hearing loss. Nothing worse than hearing drums in your ears after cutting a piece of wood. Ain’t nobody got time for that!
Now that your eyes and ears are protected, you want to make sure that your lungs are protected as well. Sawdust and shavings will be everywhere and you don’t want it floating around in the air that you’ll be breathing. So, put on a respirator to make sure you don’t end up with a nasty case of sawdust-filled lungs.
Safety first is the name of the game when it comes to making a 45-degree angle cut with a circular saw. Protect yourself before you get started, otherwise you might end up paying the price. And you don’t want to end up like one of those characters from “Home Improvement”. So, don’t forget your protective gear!
Measure the Board Thickness
Hey there, you’ve decided to learn how to cut a forty-five degree angle with a circular saw. Congratulations, you’re about to embark on an adventure like none other! Before we get into the nitty gritty of how to do it, here are a few supplies you’ll need: a circular saw, measuring tape, pencil, and protective gear.
To start off, you’ll need to measure the thickness of your board. This is an important step, as it will help you set up your saw correctly in order to cut an accurate forty-five degree angle. Grab your trusty measuring tape and figure out the length of one side. Hint: it might be a good idea to write this down, so you don’t mix it up when you go to set up your saw.
Now, with your measurement in hand, you’re ready to move on to the next step: marking the angled cut with a pencil. This is a crucial step, since it’ll help you ensure that your board is cut correctly. Remember, accuracy is key! So, make sure you outline the angle correctly.
Alright, now that you’ve marked your board, it’s time to secure the board in a stable and level position. To do this, you’ll need to make sure the board is firmly clamped down. One wrong move and you could end up with an uneven cut, or worse, an injury. So, make sure it’s secure before continuing.
When your board is firmly in place, grab your circular saw and set it at a forty-five degree angle. This step might require a bit of trial and error, so be patient. Once you’ve got the setup correct, it’s time to make the cut. Just remember to be alert and take all necessary safety precautions as you do.
When you’re finished, admire your work and inspect the board to ensure it is cut correctly. Got it? Great! Congratulations, you’ve just completed your forty-five degree angle cut. You did it! Now all you have to do is enjoy the fruits of your labor.
Measure the thickness of the board with a measuring tape.
Alright, y’all, listen up. If y’all want to cut that 45-degree angle, you gonna need to measure the thickness of your board. Now a measuring tape is all it takes. Don’t be goin’ out and buyin’ a tape measure if you ain’t got one, ’cause a regular old steel tape measure works just fine.
Now your board needs to be securely placed in a stable, level position – like on a solid working surface. Or if you ain’t got no working surface, throw it on the ground, that’s fine. Just don’t let your board slip ’round and slide off the stable position you got it in.
Now place the measuring tape against the marked edge of the board, and make sure that the tab of the tape measure is pointing to the opposite direction. And gently bend it to get the measurement. Write it down if you have to, so you don’t forget the number. That’ll be vital for when you be making those adjustments to your circular saw and whatnot.
Once you got the measurements of your board, now y’all get to mark your angled cut. Now, that comes up next. You ready? Let’s keep it moving.
Mark the Angled Cut
Oh man, it’s time to get crafty and mark the angled cut! Grab yourself a pencil and let’s get to work.
First thing’s first, we gotta outline the 45 degree angle. Sounds like a lot of work, but it’s actually pretty straightforward. Just draw a line across the middle of the board and then draw another perpendicular line right where the two lines intersect. That’s your 45-degree angle line!
Now, if you want to get super fancy and ensure the accuracy of your angle, grab yourself a protractor and measure it. This is totally optional, but it doesn’t hurt to double check your work.
Okay, so now that the angle is marked, it’s time to get out the saw and start cutting! But first, make sure you double check that the angle you marked is actually 45-degrees. Do this by flipping the board over and looking at the angle from the other side. It should match up.
If it does, great! You’ve successfully marked your 45-degree angled cut. Now you know how to make accurate angled cuts with a saw. You don’t need a fancy miter saw or a table saw—just a regular ol’ circular saw and some measuring tape.
Now if you’ll excuse me, it’s time to break out the protective gear, adjust the saw, and start cutting along that 45-degree angle I just marked. No time to waste! On to the next step.
Outline the 45-degree angle with a pencil
Now that you’ve got all the right supplies and your board is nice and secure, it’s time to start outlining the 45-degree angle with a pencil. This can be a little tricky, but with the right techniques, it won’t be long before you have a perfect cut!
First thing’s first: set the length of the cut. It’s important to make sure the 45-degree angle doesn’t go beyond the edge of the board; if it does, you won’t have a perfect cut. Use a measuring tape to make sure the length of your angle marks the point where you’ll make your cut.
Second step: mark the angle. As a reminder, a 45-degree angle looks like a triangle. Take your pencil and draw the outline along the length you set out with the measuring tape. The right way to do this is to set the pencil in the corner of the board and draw a line at 45-degree angle along the length. You can use a protractor if you need a little extra help – just make sure you draw the line in the opposite direction.
Once you’ve done that, use your pencil to draw the second part of the angle. You want to make sure it is of equal size to the first line. Start at the end of the first line, and draw towards the other corner of the board. When both lines are complete, you should have a perfect 45-degree angle outlined on the board!
So there you have it. Outlining an angle with a pencil may seem intimidating, but with a little practice, it won’t be long before you have a perfect cut every time. Now that you’ve outlined the angle, all you have to do is adjust the saw, and you’re ready to cut the board!
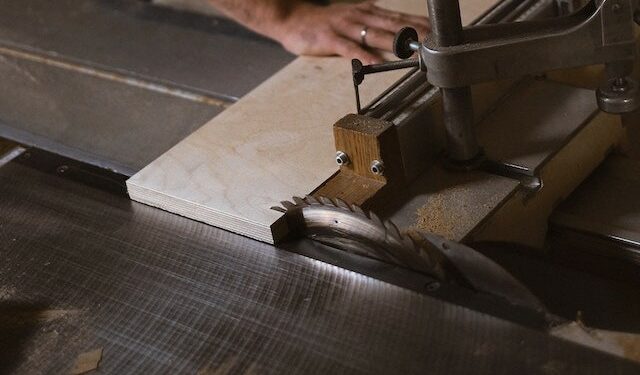
Secure the Board
When cutting angled boards, it’s important you secure the board in a stable and level position. Otherwise, you’ll end up with a wobbly, uneven cut. This can be disastrous if you’re working on something important like a birdhouse or if you’re trying to construct a piece of furniture. Fortunately, there are a handful of ways to ensure you get the perfect cut.
The simplest way to secure the board is to mount it to a workbench. This can be done either with screws or clamps, whichever you’re most comfortable with. However, if you don’t have access to a workbench, you can also secure the board using a vice. This will make sure the board is held firmly in place, allowing you to make your angled cut with ease.
Of course, if you don’t have a workbench or vice, there are still options. Track saws are a great alternative, as they allow you to secure the board directly to the saw. This means you can make your cut without having to worry about whether the board is secure. Plus, with a track saw, it’s much easier to make clean and precise cuts.
That being said, if you’re using a circular saw, it’s still important to secure the board to make sure it doesn’t move while you’re cutting. No matter which method you choose, just make sure the board is firmly in place before you start cutting. This will give you the best chance at achieving the perfect 45-degree angle.
Hopefully this advice has helped you secure the board and get the job done right. Just remember to take your time and be careful, and you’ll end up with a perfect cut — good luck!
Secure board in a stable and level position.
Okay, so you got your circular saw, measuring tape, pencil, and protective gear – so now it’s time to secure that board. This is kinda important, you don’t want to get your board flying around when you start slicing and dicing it.
Trust me, I’ve seen it happen. This isn’t something you want to mess with. You don’t want to be the one explaining to your boss why the board flew in the air and out the window.
We got an easy way to do this. Gently rest the board on a flat surface and make sure it’s not slippery or anything like that. We don’t want it sliding around.
If you need to, get some weights or clamps to make sure it’s really really secure. You don’t want to take any chances here.
So that’s it, make sure it’s stable and at a level position. Then we’re ready to rock and roll.
Now, the next step is adjusting the circular saw to the 45-degree angle. It’s a good idea to double-check the angle to make sure you’re set correctly.
Adjust the Circular Saw
This is where things get tricky. You don’t just want to jump right in and make the cut, you’ve got to make sure the circular saw is set at the right angle or you’ll regret it.
First off, make sure that the blade of your circular saw is set exactly at 45 degrees. You can do this by taking a look at the beveling scale on the saw. It should be labeled as “45 degrees”. Start by adjusting the saw’s table to the correct angle.
Once you’ve set the table, it’s time to test the saw’s cutting angle. To do this, you’ll need to set a level, or straightedge, on the tabletop and adjust the saw blade until it aligns with the level. You can do this by placing a level on the tabletop and adjusting the table around the saw blade to the correct angle. Now all you need to do is tighten the table in place, and you’re ready to make the cut.
Finally, it’s important to double-check the saw’s alignment. To do this, you’ll need to turn the blade all the way until it points directly up, and then bring it back down to the desired angle. Once you’ve done that, check to make sure it’s still alignment with the level. If everything looks good, you’re ready to cut that 45-degree angle.
And that’s all there is to it! Once you’ve set the saw and checked the alignment, you can make the cut with confidence. So don’t worry, I got you covered on all of your 45-degree cut needs. Now get out there and show them what you can do!
Set the circular saw at the 45-degree angle.
Now it’s time to get down to business and set the circular saw at a 45-degree angle. Now I know what you’re thinking – it ain’t gonna be easy, but don’t worry!
First, you’ll want to make sure that you have a circular saw with adjustable angles. Without that, you won’t be able to get the desired angle. Now that you know that your saw has this capability, it’s time to make the adjustment.
Start by lowering the saw’s base plate until it rests flush against the surface of the board. Next, you’ll want to slide the blade into the circular saw’s housing until it fits securely. Make sure that the cutting edge is facing downward.
Now comes the tricky part – adjusting the cutting angle of the saw. Depending on the saw that you have, this may involve loosening a lever, playing with a knob, or fiddling with a dust guard. Regardless of the mechanism involved, it’s best to start slowly and work your way up until the angle reads exactly 45 degrees.
Once the angle is set, you can tighten the lever or knob to lock in the new angle. Test the angle one last time before cutting, just to be safe. Congratulations! You’ve now successfully set a circular saw to the desired 45-degree angle.
Cut the Board Along the Angle
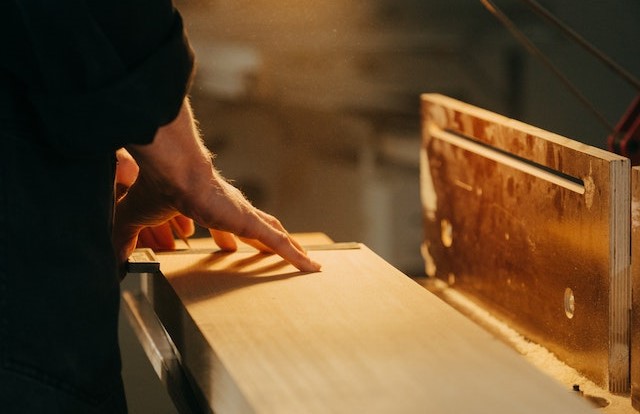
Once you’ve located the correct angle and orientation on your circular saw and made sure that your work surface is secure and level, it’s time to do this thing. Start your circular saw and give it a few seconds to reach full speed. It’s probably between the noise of the saw and the excitement of this moment, but my heart’s racing. You feel the same way? Just make sure you keep a steady and gentle pressure. You just need to keep steady and follow the pencil outline. You’ve got this.
For this part, make sure to use the special footplate that comes with the circular saw. Don’t skimp on safety when you’re using a circular saw, even when you’re cutting a 45-degree angle. Once the footplate is secured, you can bring the saw down to the wood. Keeping your fingers safely behind the saw and out of the way, cut along the pencil line. Keep the saw moving at a steady speed. And whatever you do, don’t take eyes off the board while you are cutting. You want to be sure to make the cut at the correct angle.
In moments your cut will be finished, and you will be an angle-cutting ninja. Once you’ve finished your cut, turn off the saw and make sure to inspect your work. Check that the cut has been made at the correct angle. If not, you can make any adjustments with a block plane. Congratulations! The board is cut flush and at the perfect angle. You just go ninja status with your circular saw.
Cut The Board Along The Angle With Circular Saw
Ah yes, the moment you’ve all been waiting for, it’s time to set this piece of wood free and see what kind of beautiful cuts we can make! Time to bust out that trusty circular saw and go to work – sounds like fun, right?
First, position the saw over the board and make sure it is lined up with the 45-degree angle you marked. If you don’t have the perfect angle, it’s ok, just do your best.Once you are satisfied, turn on the saw, and slowly start to cut the board.
As the saw does its magic, be sure to keep a close eye on the board and the saw. You want to make sure you’re going in a straight line and that you’re keeping that 45-degree angle. Don’t rush it! If you go too fast you risk splintering the wood.
Once you’ve successfully cut the board, feel free to take a step back and admire your finely crafted piece of wood for a moment or two. Then, pick up the saw and the board, take them away from the work area and examine the cut. You should see a clean 45-degree angle to perfection, so congratulations on a job well done!
Now you’ve got one wonderful 45-degree angle with a circular saw as your end result! Feel free to show off your work of art to anybody and everybody you know, as you’ve just proved that you can create masterpieces with a saw and some wood. So what are you waiting for? Go ahead and cut your way to fame and glory!
Inspect the Cut
So, you’ve completed the cut with your circular saw and that’s great! But you’re not quite done yet. Now it’s time to inspect the cut and make sure it’s at the correct angle you had marked.
This is the most important part, so don’t be lazy and just glance at it. Give it a good looking over and make sure everything is aligned the way it should be. It’s easy enough to just take a measuring tape and verify that all the edges are even and that your 45 degree angle is dead on.
If you want, you can also take a ruler and make sure all the lines are flat and even to the very edge. Or if you want to be extra sure, you can use a protractor to make sure everything is aligned properly.
Once you’ve verified that everything is in the correct angle, you can move on to the next step. A job well done! So pat yourself on the back, grab a celebratory cookie, and bask in the glory of your perfect 45 degree angle cut. You did it!
Inspect the board to ensure it is cut at the marked angle.
Inspecting your 45-degree angle cut with a circular saw is no joke! I mean, after all, this cut is going to be seen in your final project. Like, it better be right.
So, make sure to take your time and double-check your work here. First, you’ll need to make sure that the board is steady and secure before making the cut. That way, the board won’t shift while you are cutting it and throw off your intended angle.
Once you have made the cut, inspect it more carefully to make sure the angle is right. Grab a ruler and check if the angle is the same along the entire length. Check the angle and make sure it is in the ballpark of 45 degrees. You don’t want to be too off!
If you are too off, no worries. You can adjust the angle of the circular saw and recut the area. To get it exactly how you want it, you’ll probably have to do a few test cuts with the saw set at different angles until you get the perfect 45-degree angle.
It’s also important to remember to always wear the necessary safety gear when inspect the cuts. I mean, those sharp edges can be dangerous, even if you are just inspecting them. So, wear protective gloves and glasses, just in case.
There you have it! A perfect 45-degree angle cut with your circular saw. Now, go show off your creation and admire your handiwork!