How To Make A Perfect Mortise And Tenon Joint For Your Woodworking Project

Hey everybody! I’m here to teach you something new and exciting! Today we’re going to learn how to make the perfect mortise and tenon joint for your woodworking project.
Making the perfect mortise and tenon joint might seem like an intimidating task, but I promise it’s not that hard. In just seven simple steps, you’ll have a perfect mortise and tenon joint!
The first step is to prepare and cut the tenon. You want to make sure the tenon is just the right size, so it’ll fit into the mortise tightly. Before we cut the tenon, measure twice and cut once. When you cut the tenon, make sure to use a saw with very fine teeth.
The second step is to prepare and cut the mortise. This part is easier than cutting the tenon because you don’t have to worry about getting the sizing just right. However, you need to be very careful when drilling the hole to make sure it’s just the right depth.
Step three is when the fun begins! All you need to do is fit the mortise and tenon together. Once they fit perfectly, you can move on to the next step. Make sure that the joint is snug so it won’t come apart when you’re using it.
Step four is to glue the joint and set up the clamps. Once you’ve spread some glue on the joint, you can position the clamps strategically around it. You want to make sure the clamps are tight so the joint doesn’t come apart.
Step five is to test the fit. Now that the joint is firmly held together with the clamps, you can see how it looks and how it moves. If it passes the test, you can move on to the sixth step.
Step six is to finish and seal the joint. If you’re working with wood, you can use wood finish to make it look more attractive. If you’re working with metal, you can use metal polish to make it shine.
Finally, step seven is to enjoy the perfect mortise and tenon joint! Congratulations, you’ve just made a beautiful joint that will last you a lifetime.
So, there you have it! Now you know how to make a perfect mortise and tenon joint for your woodworking project. I hope you found this tutorial useful and are feeling confident about trying this out for yourself. Good luck!
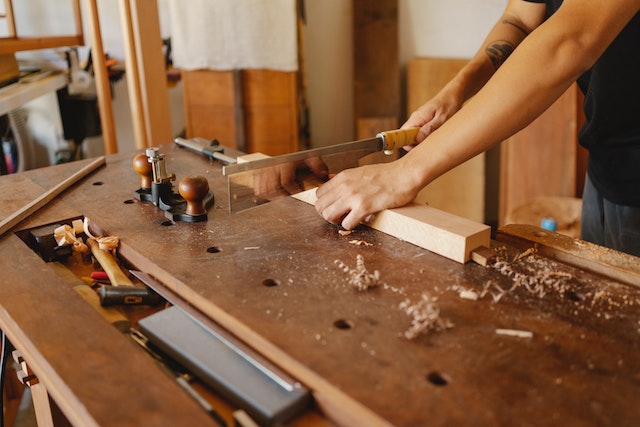
Prepare and Cut the Tenon
Ahoy there, Woodwork friends!
We’ve all taken on a project, stared down our lumber and wondered ‘Ok, how am I going to turn this into something special?’
I know I know, a Mortise and Tenon joint is the answer. Thus, step one of the journey is learning how to make a perfect mortise and tenon joint!
Let’s start with the tenon. The tenon is the tongue that fits into the mortise, and creates a beautiful joint.
When you prepare the tenon, the first step is to choose the wood you will use for it. The wood should be the same type as the rails and stiles that you are attaching the tenon to.
Your cut should be organized and the tenon should be in its own separate cuts. An easy way to do this is to use a miter saw so that all of the cuts are the same size and exact.
Once you have got your cut figured out, let’s talk about the size. The size of the tenon is usually determined by the thickness of the wood. So if you are using a 1″ thick board, you would use a 1″ thick tenon.
Once you have got your cut and size figured out, it’s time to put the tenon together. This requires using a mortise and tenon bit. Start by drilling a hole in one end of the tenon, making sure that the hole is the same size as the mortise bit. Then move the bit to the other end of the tenon and drill a second hole, creating a tenon.
You also have the option of cutting the tenon without drilling the holes. All you need to do is cut two pieces of wood the same size, stack them, and then use a tenon saw to create a tenon.
Now that you have got the tenon prepared, the next step is to cut the mortise. Keep in mind that the mortise should fit the tenon perfectly so that you don’t have any gaps. Good luck and have fun woodworking!
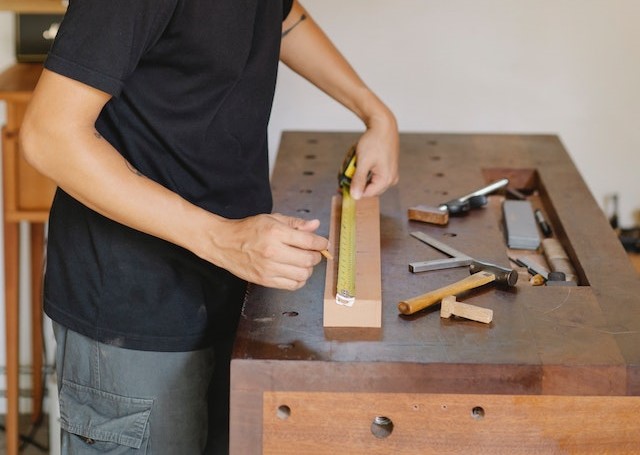
Prepare and Cut the Mortise
So, let’s move on to Step Two: preparing and cutting the Mortise. If you have gotten through Step One, then you have already completed the biggest challenge involved in achieving a perfect Mortise and Tenon joint! This is because cutting and preparing a Mortise is a lot simpler than cutting the Tenon. That being said, it still requires some precision, so you want to be sure to pace yourself and take your time.
Start by getting your drill bit and mortise template. You’ll need a sharp bit that can make clean, precise cuts. Make sure to double check the sizes and mark off exactly where you’re going to start drilling. You don’t want to go too deep or too shallow.
Now, take your chisel and get to work. Start at the center of your drill mark and make your way outward. Take your time here––you don’t want to rush and end up with a sloppy mortise. Move in short strokes, removing a small amount of the wood from each pass. Even the most experienced woodworkers can make mistakes here, so make sure to pay attention to detail. Don’t forget to sharpen your chisel often!
Once you have cut down to the depth you want your mortise to be, it’s time to clean up the edges. Use a sandpaper that is about one grade finer than the one you used for the Tenon. This will help ensure you have an even, precise joint.
Once you have sanded and finished the edges of the Mortise, it’s time to move on to Step Three: fitting the Mortise and Tenon together. Have patience and pay attention to detail with this one and you’ll end up with a perfect mortise and tenon joint in no time at all!
Fit the Mortise and Tenon Together
Ah alright, you made it to Step Three – fitting the mortise and tenon joint together! Now this is the most important step of all, as this is the one that will define the success of your woodworking project. So listen up, and pay close attention!
“Fitting the Mortise and Tenon together… it doesn’t get any more serious than this, does it?” Yes, it does! You must get this step right for your project to come together.
Start by counting out your pieces. Make sure there are two of everything – two tenons, two mortises, and two corresponding sides of the joint.
Now, before moving forward, use a square and make sure that your pieces line up correctly – flat ends meeting flat ends.
Once you’re confident that everything is okay, grab your hammer and line up your pieces. Line up the mortise with the flat end of the tenon and begin to carefully tap the two pieces together.
On to the next part! Grab a drill and make sure to pre-drill the pieces together. This part is essential, as it will ensure that the pieces stick together until you glue them up.
Now, depending on the type of wood you use, the fit of your joint could vary. If the pieces are too tight and won’t easily fit together, take out the drill bit and go up one size. But if the pieces are too loose, you’ll need to go down a size. The key is to find a size that’s just right, so keep testing until you get the right fit.
Once you get the right fit, it’s time to glue up your joint. It’s important to remember to wipe up any excess glue. Now, you’re almost done! Pat yourself on the back and take a break, you deserve it!
Congratulations! If you followed this step correctly, you should now have a perfectly fitted mortise and tenon joint. Now all you have to do is set up your clamps, test the fit, finish, and seal the joint. You are now ready to move on to Step Four – Glue the Joint and Set Up the Clamps!
Glue the Joint and Set Up the Clamps
Once you’ve fit your mortise and tenon joint together, it’s time to glue it up! I personally like to use yellow wood glue; it’s been around since the Phillies were hitting taters!
Before you proceed, be sure to lay out a cloth or a piece of scrap flooring over your work surface so you can prevent any unwanted mess. It also helps to prepare a level surface before you start.
Now comes the fun part! Grab your bottle of yellow wood glue and begin to brush it all over the joint. Don’t be stingy, you want to be sure to get adequate coverage so the joint can’t fail.
Once you’ve finished brushing the glue all over the joint, it’s time to clamp it up tight so it can dry. The best advice I can give to someone who doesn’t have any carpentry experience is to consult a professional carpenter for help in clamping the joint.
It’s important to use enough clamps to hold the joint tight together, but be careful not to over-clamp it. Too much clamping pressure can be detrimental to the joint, causing it to dry in an incorrect or uneven manner.
Once all the clamps are in place and the joint is secured, it’s time to wait! Set your timer for the recommended time (consult your glue container), and let your joint dry. Once your timer goes off, you’ll be ready to move on to the next step and make sure your joint is perfect.
Good luck! If you follow the steps correctly, you won’t have any trouble making a perfect mortise and tenon joint for your woodworking project. You’re on your way to having a perfectly-crafted joint ready for your next project.
Test the Fit

Have you ever come across one of those parlor tricks “Can you feel if this joint is tight?” and wonder what is the correct way of testing the fit of the mortise and tenon joint? Well, today my friends, is your lucky day
Let’s get started. Once you have completed your mortise and tenon joint, you will want to give it a rigorous test to ensure that it is as tight as possible. Start by removing the clamps that you had in place to secure the joint while you were gluing it. Then take a moment to admire your handy work, making sure that the join is aesthetically pleasing.
Now comes the fun part. Grasp each end in your hands and give it a few gentle pushes and pulls. Keep in mind that a perfect mortise and tenon joint should be fit for a lifetime and should not move much at all, so you should feel a considerable amount of resistance. If you do not feel any resistance or the joint is too loose, it is time to start all over again as you will not get a lifetime guarantee.
If everything seems to be going as planned, give the joint a few forceful pulls to really test the strength. While the joint should not break, it should still feel solid and stable. If it feels weak or flimsy, then return to one of the first few steps and review them, maybe you missed something.
If you twist or rotate the joint instead of simply pulling, then it is imperative that you check the end grain as well. After all, one of the benefits of a mortise and tenon joint is the ability to take torque and twist, so you need to make sure that the joint can handle it.
The last step is to measure the joint visually. There should be a gap on either side of the joint, free from any gaps or large voids. If the joint is tight, then that is great news and you are good to go.
Testing the fit of your mortise and tenon joint does not have to be boring or mundane. With just a couple of steps, you can ensure that your mortise and tenon joint is fit for a lifetime of use.
Finish and Seal the Joint
After nearly two hours of hard work, you’ve finally made it to the last step—finishing and sealing the joint. You can finally see the light at the end of the tunnel!
But hey, don’t get too hasty. This step is just as important as the others, or you won’t have the perfectly tied joints you’ve been dreaming of.
Start off by applying a finish to the tenon and the mortise. Now, you feel free to use whatever variety of finish you like, but if you want the best results, you’ll go with a light-colored wax. Just rub it on and let the wood absorb it. This will give your join a nice shine, plus it will make your wood even stronger.
Once you’re done with the finish, it’s time to seal the joint. And hey, if it isn’t something in your toolbox, we recommend getting some quality wood glue. This stuff can really make a joint sturdy as heck!
You can start off by squeezing a generous amount of glue into the mortise, but be careful no to make it too wet. Then, you can use a wooden dowel to spread it around and press the tenon into the mortise, until it pops in. That’s right, you’ve made it to the end!
Now, don’t take any chances, and give the joint some time to sit and dry before you move it. This step is especially important if you plan on moving the wood to a different room or even to a different house. If you don’t take your time, everything you worked for will go down the drain!
Congratulations, you’ve done it! After a few hours of work and proper sealing, you now have the perfectly tied joints that you’ve always wanted for your woodworking project. Go ahead and brag about it to your friends and family, and get ready to enjoy a unique piece of woodworking art.
Enjoy the Perfect Mortise and Tenon Joint!

Ya’ll done good! You just put together the perfect mortise and tenon joint. Now you can stand back and admire your masterpiece – a testament of your superior woodworking skills. Enjoy your moment of pride and glory for what you have achieved, for this is a moment that will be hard to replicate.
It’s hard to believe that you went from just a pile of wood to a beautiful finished product. Such a task requires skill, patience, and dedication. But it’s all worth it when you can say, “look what I made with my own two hands!”. Now you can finally move the project around, put it wherever you like, and be proud that you crafted something so beautiful.
Remember how you were able to fit the pieces together perfectly? That’s the key to any successful woodworking project – taking the time to get it right. It’s all about precision and detail, something that can be hard to master. But if you stuck with it, you knew you could eventually get it right.
Now that you’ve got everything put together, you can make sure to keep your masterpiece in top condition by regularly protecting it with the right sealants. That way, your hard work won’t be in vain. And in some cases, those joints will last for years to come, withstanding wear and tear from everyday use.
So, next time you head to the workshop, think back on that great moment when everything fit into place like a glove. Shooting for perfection is a great thing, and sometimes it pays off. Congrats to you for getting it done, and for making a stunning mortise and tenon joint for your special woodworking project. Enjoy your success and bask in the glory that comes with it!