How To Make A Perfect Blind Dovetail Joint For Your Woodworking Project
In woodworking, the dovetail joint is a classic technique that requires skill and precision. One of its variations is the blind dovetail joint, which adds complexity to the process.
But don’t worry, in this article, we will guide you step-by-step on “how to make a perfect blind dovetail joint for your woodworking project.” With this technique, you can create elegant and sturdy connections that will enhance the beauty and durability of your furniture.
Introduction of Dovetail Joint
Ahhhh, dovetails. As a seasoned woodworker, I know exactly what a dovetail joint is. But for any folks out there who aren’t as in-the-know I’m gonna go over it real quick.
First off, a dovetail joint is one of the most popular woodworking joints out there. It’s a sturdy, aesthetically pleasing joint that’s used in a variety of woodworking projects. The joint is made up of pins that extend from one piece of wood to dovetails that connect the other piece of wood. This joint is great for making furniture, cabinetry and even wooden drawers.
And it’s an exciting joint to try, because let’s be honest, there’s something kind of special about it. It’s a joint that’s been around for centuries and it looks magical when it’s done correctly. To make a correct dovetail joint, your cuts have to be perfect. You’ve got to be precise with your measurements and make sure that the joint you put together is sturdy enough to hold its own weight.
So here’s what you’ve got to do; you’ve got to prepare each part of the joint the right way, then assemble the pieces and finish it off with a few more touches. Whether you’re just a hobbyist or a professional woodworker, if you’re up for the challenge, you can make a perfect dovetail joint.
After this article, you’ll be able to get it right and make something that stands the test of time. Now let’s start woodworking!
Basics of a Dovetail Joint
A dovetail joint is one of the sturdiest and most impressive looking types of joinery in the woodworking world! If you have a woodworking project that requires the most reliable connection, you’ll need to learn how to make a perfect blind dovetail joint.
Dovetail joints look complex, but they can actually be relatively simple to create. Basically, a dovetail joint consists of two or more pins cut into mating pieces that fit securely together. Different woodworkers use different styles of dovetail joints. The “blind dovetail” joint is the most commonly used style, because it can be assembled without the need for any sort of visible gap or open joint.
To make a blind dovetail joint, you’ll need two identical pieces of wood that are the same thickness, along with a saw and chisel. One piece will have interlocking “pins” cut into it, and the other piece will have similarly shaped “tails” cut into it. When the pins and tails are fit together, the joint will be secure and invisible. This is what makes a blind dovetail joint so impressive looking: the joint is completely hidden from view.
Creating a blind dovetail joint does require some planning, as the pins and tails will have to be cut in such a way that they fit perfectly together. If your measurements are off, the joint won’t be secure and it can look quite uneven. However, with the right tools and a bit of practice, you’ll be able to make a perfect blind dovetail joint in no time! Keep reading to see our guide on how to do just that.
Preparing the Pieces of the Dovetail Joint
Sure, sure, it’s enough to make a woodworker weak in the knees! A dovetail joint is the perfect way to finish any woodworking project, giving it a real sense of quality and craftsmanship. But, before you can show off the beautiful joint and get the compliments, you gotta prepare the pieces of the joint.
Let me tell ya – it doesn’t have to be a difficult process if you follow some simple steps. First off, you need to mark your wood. This is where a carving knife and measure come into play. Use a square to mark out the angles for your dovetail joint. Make sure you mark things accurately. I’m sure you don’t want an uneven joint that looks like the inside of a dog’s ear.
Now, this part might scare some of you: You have to cut your wood. I feel ya, I really do, but fear not! A good saw is your friend here. Use a fret saw, coping saw, or even a jigsaw to make the cuts. Remember to take your time, especially with the tail pieces. Don’t be tempted to rush!
Feeling better? You can do it, my friends. You can make that perfect dovetail joint. It looks like you’re about ready for the assembly part, so let’s jump into that next!
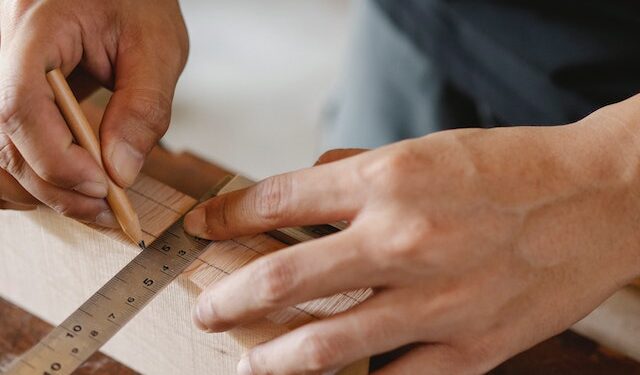
Mark Your Wood
Welcome to the second step of making the perfect blind dovetail join for your woodworking project: Marking Your Wood!
First, you need to make sure that the pieces you’ve cut fit to the dovetail pattern you want them to, so it’s important that you mark the wood properly and accurately in order to achieve a professional looking joint!
Now, while there are a few ways you can mark your wood, I think it best to use a pencil. Pencils are obviously a woodworking staple and even have their own distinctive woodworking smell. Some of you may be thinking to yourselves that you can use a pen or a marker, but the thing is the wood will reject that shit and the markings won’t stay very long. You may be tempted to try a Sharpie, and while they are very durable and long-lasting, they won’t work on the Dovetail Joint either.
So, if you want to ensure your markings last until the joint is complete and you want your dovetail joint to look like you payed a Master Carpenter for it, use a pencil for marking your wood!
Now, where do you begin marking? This is an important question, and the answer is simple. You start at the end. Yes, it’s just that simple. Make sure that the edges of your wood pieces meet at the right angle and mark the area, allowing yourself plenty of room for your sharp carving tools to do the job you need them to. You should also make sure to give yourself enough room so that you don’t take away parts of the wood that you may need for the joint to fit together properly.
If you’re feeling extra confident in your woodworking skills, try your hand at double marking your wood. This means, marking the same area from the other end as well, in order to make sure that the joint fits perfectly.
Now that you know the basics of marking your wood when creating a dovetail joint, it’s time to move on to the next step of your project and cut the wood according to your measurements! Good luck!
Cut Your Wood
If you’re starting to squirm in your seat at the the thought of how to cut those dovetails, ease those nerves and relax. If you learn one thing from this article, make it the following: wood is your friend, so don’t be scared of it.
First things first, you’ll need the right saw. For this project you’ll need a precision handsaw – just a standard jigsaw won’t cut it (Ha! Get it, cut it?). Most woodworkers opt for a coping saw or a dovetail saw. Pick one, any one.
Now, it’s time to make that first incision. Don’t worry if it’s not perfect. Perfection will come with practice. Mark the depth of your cut into each piece of wood with a pencil. You don’t want to go too deep. Hold the saw near the handle and lean in with gentle pressure – you don’t have to saw like you mean it. Let the saw do the work for you.
Now it’s time for the other side. Try to make the cuts at the same angle as the side you just made. For example, if you made a 80 degree cut on one side, try to make a 80 degree cut on the other side. You can always to use a sliding bevel or try to use a dovetail tracing gauge to get the angles right. You don’t have to be perfectly precise at this stage. Just get those two sides to fit together – that’s the goal.
Just remember, when it comes to cutting the wood for a dovetail joint, go easy on yourself. Take it slow and follow the marks you have made on the wood. Trust yourself, trust your saw, and follow the outlined steps you read here. If you do, you’ll have perfect cuts in no time at all.
Assembling the Dovetail Joint

Let’s get to assemblin’! If you’ve gone through the steps as I’ve outlined in the previous sections, you’ll have properly marked your wood, cut it to the right shapes, and you’ll have it all ready to go. You’ll want to start by performing a dry fit. This will ensure the pieces are all put together correctly. We’ll do the actual gluin’ after the dry fit. You’ll want to get yourself a clamp, or if you’re feelin’ adventurous, use yer hands. I find the clamp works best.
Start by placing the two pieces of wood together and make sure they line up as they ought to. If they’re close, use somethin’ like a chisel to take off the tiniest bit of wood here and there to make them fit nice and snug!
Now, before you start gluein’, you’ll want to make sure to use a thin coat of glue. Too much glue can make your joint gummy and soft. So, get that brush ready and just brush a thin coat of glue along those joint parts. Keep the brush strokes smooth and in one direction to make sure you get proper coverage.
Once the glue is applied, it’s time to get clampin’. Start by placing the pieces together that you put the glue on and make sure they line up as best you can. If you don’t have a lot of clamps, it can take a little time to get them all in the right place, so just take yer time and make sure it’s done right. Once everything is in place, give the clamps a good tight squeeze! Now it’s just time to wait for the glue to dry and then your joint will be ready for action.
And that be the basics of joint assemblin’! You should now have a perfect dovetail joint ready to go on yer next woodworkin’ project! Congrats and happy craftin’!
Dry Fit the Pieces
Hey, everyone! I’m gonna tell you how to get everything “jiggy” when it comes to your next woodworking project: the perfect blind dovetail joint.
So you’ve got your pieces of wood marked and cut, and it’s time to get everything dry-fitted before you go any further. No worries because I’m gonna show you how to get ‘er done right!
The trick to great dry fitting is to ensure that your pieces of wood are exactly even with each other. This means you’ll need to make sure that your pins and tails are the same length and height, and they should have the same angles when they meet in the middle. Once you get that squared away, you’ll want to make sure that there’s a perfect fit throughout. I recommend pinching the wood together to check the fit between the joint – and make sure to keep everything together in its place.
If you find that one part of your joint is too tight or too loose, you may need to tweak things to get a really snug fit. This means using an exceptionally sharp chisel to shave away the excess wood where necessary, but for the most part, once you’ve marked and cut everything initially, you should have no problem getting a great dry fit.
So that’s it for dry-fitting – easy, peasy! Just make sure to take your time and get everything just as snug as you want it before you move ahead with gluing. The next portion of this project is where the really fun stuff happens and where I can help show you how to make a beautiful dovetail joint your friends will be super impressed with! So stay tuned and keep up the good work.
Glue the Pieces Together
Alright, you’ve got your pieces all cut out and you’re ready to glue this thing together! Before we dive in, let me remind everyone to mind their fingers while they’re at it. I’ve seen some wild things in woodworking gone wrong and nobody wants to go to the hospital and explain they got stuck while assembling a Dovetail joint.
Now the first step in gluing the pieces together is to squeeze a generous amount of wood glue into the mating surfaces. Don’t skimp on the glue. You really want to drench them with glue as it makes for a stronger joint. Be sure and stay away from the visible parts of the joint as too much glue will gunk up the parts and be impossible to clean off. A good trick is to spread the glue with a cork. It creates a thin layer and is great for spreading glue into tight crevices.
Once you’re happy with the amount of glue you’ve spread, begin carefully fitting the pieces together. Make sure the joints are completely snug and evenly fit with each other. This is the time where you will really see whether or not your Dovetail joints have been properly cut. Things should fit together perfectly before you can now proceed to the next step.
Once everything fits together the way it should, press the pieces together with a mallet and some scrap wood along the top and bottom of the parts and clamp it up. Let it dry overnight and after you come back the next day, you can assure yourself that you have gotten a perfect Dovetail joint that’s as good as any professional woodworker.
Now observe your handy work and admire it for a few seconds and maybe even take a few pictures for your friends to honestly admire you for.
Great job! Now take a step back and smile at the joint because you have officially created a perfect Dovetail joint!
Finishing the Dovetail Joint
When you’ve got your Dovetail joint all prepped, it’s time to glue it together and get it ready for your woodworking project. That’s right, it’s time to finish the Dovetail joint! Let’s take a look at what you need to do to get it ready.
When you’re ready to assemble your Dovetail joint, it’s important that you dry fit the pieces first. This just means that you put the pieces together without any glue, to make sure everything lines up properly and that there are no gaps between the wood pieces. Once you’re confident everything is nice and tight, you can move to the next step.
Time to break out the glue and get to work! Start spreading the glue onto the Dovetail joint, being sure to get it into all the hard-to-reach places. Once the glue is evenly spread around the joint, you can go ahead and start putting the pieces together. Make sure you get them all squared up until you get everything nice and tight.
Once your Dovetail joint is all glued up, it’s time for a little aftercare. It’s important that when the glue is still in its wet state, you don’t disturb it too much. So, just let it sit and dry overnight until you’re confident the glue is dry and secure.
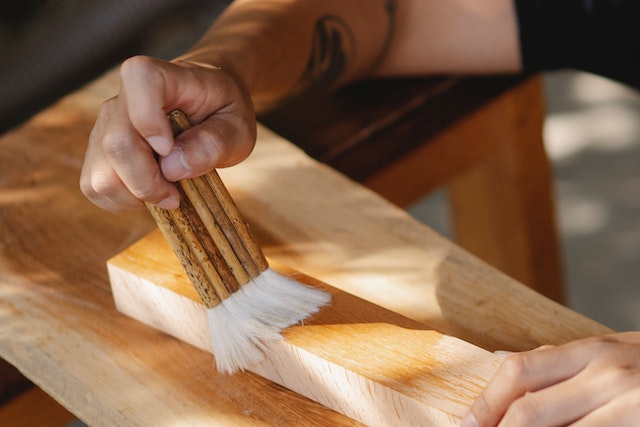
Finally, it’s time to add the finishing touches to your perfect Dovetail joint. Depending on the look you want it to have, you can use some sandpaper to smooth down the edges, apply some stain or paint to the joints, or take an orbital sander to them to give them a shinier finish. Whatever you decide on doing, just remember to take your time and do it right.
That’s how you make a perfect Dovetail joint for your woodworking project! With a bit of patience, time, and effort, you’ll have a stunning and long-lasting wood joint in no time. Now that’s what I call a perfect woodworking success story. Good luck!
After Gluing
Alright, after much sweat and pain you’ve made it to the next step in making your perfect dovetail joint… gluing all your pieces together! That’s right, after all the preparation and hard work, now it’s time to finally piece together your homemade masterpiece.
The best way to begin this part is to dry fit all the pieces, that way you know where they should go and how they should look together before the glue comes into play. Depending on the type of adhesive you’re using, you’ll need to familiarize yourself with how it works and how long it needs to rest before it becomes fully bonded.
Once you’ve gotten a good grip on how everything is supposed to fit and line up, it’s time to break out the glue! Apply a good amount of adhesive to each piece, ensuring that everything is sufficiently covered so you can get a nice tight fit when you put all the pieces of the puzzle together. Take your time and make sure that all the seams are completely and fully glued.
Once everything is glued, the last key step is to secure the joint. There are a number of creative ways to do this, the most popular being to use a clamp or clamping blocks. The idea is to put pressure and weight on the joint, forcing it to remain clamped together until the adhesive cures.
Once you get a tight grip on the joint, you should let it dry for an extended period of time, usually between 8 and 24 hours. Keep an eye on the joint to make sure that the adhesive is properly drying and hardening. When everything looks and feels good and set, you can be sure that the glue has done its job and the joints for your project are sealed! Good job!
So now you’ve made it through the painful part and have created a strong and durable dovetail joint for your project. Congratulations! Stay tuned for the wrap-up finishing touches next.
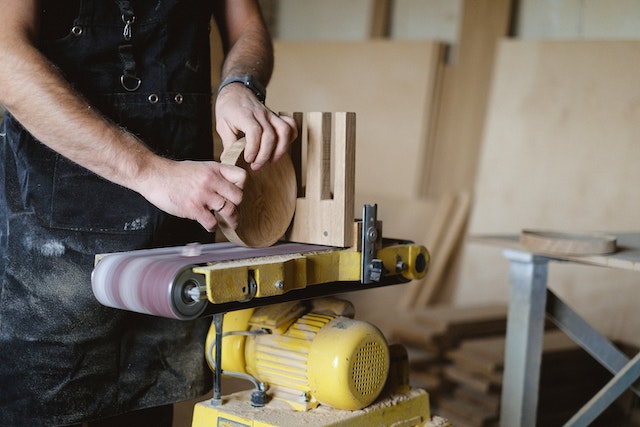
Finishing Touches
Finishing touches – the part of the process of making the perfect blind dovetail joint where you take your hard effort and make it shine. As I always said, if you don’t take the time to do it right, you’ll be doin’ it for twice as long.
First off, take your chisel and lightly scrape off any glue that’s seeped out from between the wood. Don’t go too crazy here, just get the extra glue off. Now, you’re ready to begin the shaping.
Start with a flat file, and work the edges down. Even on a blind dovetail joint, be sure to keep the edges clean and slightly rounded. When the flat file isn’t taking off the excess material, switch to a round file to shape the tail and pins.
Again, don’t go too deep. Feel the shape of the joint and its components as you file and make sure you’re only taking off a little bit at a time. Little micro-adjustments can really bring the joint together.
And then there’s sandpaper. A good rule of thumb when finishing any woodworking project is to start with a course, heavily-grit sandpaper, working your way up to finer, softer stuff. I recommend starting with 80 or 100-grit, and then taking it up to 120 and then 150 or higher.
When you get to the finishing sandpaper, I always suggest folding it in half and holding it in the crease so you can sand the curved parts of the joint more evenly.
When all that’s done, grab your favorite wood finish and get ready to show off your perfect blind dovetail joint. Depending on the finish you use, that can be a whole process in itself. So take your time with this step, because if you do it right, you can make it look like it came from a professional woodworking shop.
Take your time and make sure all of your edges are free of splinters, and your joint is smoothly finished.
And when you’re done, sit back and enjoy your hard work. Your perfect blind dovetail joint will be the pride of your workshop!