How To Make A Straight Cut With A Jigsaw

Ah, the classic question: How to make a straight cut with a jigsaw? Well, it’s really not all that hard, but you will need some tools and supplies to get it done. So let’s get started, shall we?
The materials you’ll need for a straight cut with a jigsaw are simple: a jigsaw, a saw blade and wood to cut. Now, about that wood, make sure you choose something that is sturdy and won’t break easily during the cut. That should go without saying.
Now that you’ve got the materials and the wood all set, it’s time to begin. The first step is to make a guideline with a marker or a pencil. Depending on the size of the cut, you should make the mark so that it is clear and easily visible to the jigsaw blade.
The next step is to place your jigsaw into the wood with the blade positioned along the cutting line that you just made. Make sure that your jigsaw is securely placed into the wood before you attempt to cut.
Step three is important, here’s where you turn on the jigsaw and press downward. Make sure to keep the blade flush against the surface of the wood at all times. This will ensure a straight cut.
Step four is where you begin to move the jigsaw slowly along your cutting line. Make sure to keep the blade correctly positioned on the wood and make sure to keep the jigsaw on the line the entire time.
Step five is when you begin the actual cutting. You may want to slow down a bit here so that you don’t make any mistakes. Once you’ve got the jigsaw doing its job, keep an eye out to make sure the wood isn’t kicking up any chips or splinters.
Step six is simply a matter of continuing to guide your jigsaw along the cutting line. As you get closer to the end, you may need to use some extra pressure to ensure that the blade finishes the cut cleanly and accurately.
Step seven is the moment of truth: the actual finishing of your straight cut. At this point, you can turn off the jigsaw and admire your work before moving onto the grand finale.
Step eight is the clean-up phase. Depending on your sawing practices, you may need to sand and finish the cut with some sandpaper. But, before you start that, make sure there are no leftover splinters or any other unplanned imperfections.
And there you have it! Eight easy steps on how to make a straight cut with a jigsaw. Now, go on and show off your new skills! Who knows, maybe one day I’ll be asking you for a demonstration!
Materials Needed
Ladies and gentlemen, it’s time to get ready for the ultimate lesson on how to make a straight cut with a jigsaw. But before you make the cut, you must gather all the materials that you will need for the job.
First and foremost, you’ll need a jigsaw! A jigsaw is a handy little tool that allows you to make angled or straight cuts in a variety of materials. You can get one at a local hardware store fairly easily and they’re not terribly expensive.
Next, you’ll need a straight edge. This can be a ruler, a yard stick, or something similar to ensure you have a straight line to make your cutting along. Then, you’ll need a sharp blade for your jigsaw. The type of blade you need depends on the type of material you’ll be cutting. Make sure to place your blade correctly as this will help make sure your cuts are straight.
Safe jigsaw cutting is all about clamping (or holding down) the material that you’ll be cutting. This helps ensure a safe and straight cut, so make sure you have some C-clamps on hand to secure the wood.
Last but not least, you will need a dust mask and some safety glasses to protect your eyes, ears and lungs when using your jigsaw. It’s important to protect yourself while using power tools and if you’re cutting a material that’s likely to produce fine dust, such as wood, it’s very important to have a dust mask.
That’s it! Now you have all the materials you need to make a straight cut with a jigsaw. Time to get cutting!
Step 1
Hey hey there edge-slicers, if you’re trying to learn how to make a straight cut with a jigsaw, you’ve come to the right place. I’m sure you’ve heard about the jigsaw and all its amazing functions. But now, I’m gonna give you a step-by-step guide to make sure you get the perfect straight cut every time. Our first step is all about getting the materials you need. Here we go!
First thing’s first, you’re gonna need to find the materials necessary for this jigsawing journey. List goes as follows:
– Jigsaw
– Wood
– Safety equipment (e.g. safety glasses, gloves, even a face mask, who knows!)
– Protective work surface
– Pencil
Now, all you’ve gotta do is gather these items together and you’re ready to start your very own jigsaw creation. Safety first, though, make sure you’re in a comfortable and safe space with all the protective stuff I mentioned before.
Alright, now once you have your materials and are ready in your rockin’ workspace, it’s time to make a mark on the wood. To do this, grab your pencil and draw an accurate line along the wood where you want the cut to be made. The important thing here is to get an accurate drawing of the line, so let that shoulder rotate, y’all. That’s all for step one.
Now it’s time to move on to the next step and get that jigsaw out if you haven’t already done so. With any jigsawing journey there are certain methods you should use and certain precautions you should take, and I’m here to guide you through them! So buckle up and get ready for step two, it’s gonna be adventurous!
Step 2
Ahh, step 2, the important bit! That’s where we’ll learn how to pick the correct blade for the job. When it comes to cutting with a jigsaw the type of blade that you use is very important. The type of jigsaw blade you use for straight cutting is fairly easy to determine.
Basically, the shallower the blade’s teeth, the straighter the cut will be. If you can get your hands on a blade with straight teeth then that’ll work better than a regular jigsaw blade which has curved teeth.
Now, when you’re picking out a replacement jigsaw blade there are a couple of considerations that you’ll have to take into account. The first is the type of wood that you’ll be cutting. If the wood is thick or hard then you’ll want to get a blade that is specially designed for that type of wood.
The second consideration is the length of the blade. The longer the blade the straighter the cut. A long blade can help to give you a smooth cut without having to make any corrections or adjustments later on.
Finally, the last thing you’ll want to consider is whether or not the blade is flexible enough to move around corners or tight angles. If you need to make some intricate designs then you may want to get a blade that is a little bit more flexible.
All these things need to be considered when selecting the correct blade for the job. Now, get out there and get to cutting!
Step 3

The key to getting a straight cut is to mark the outline accurately. Hey guys, donever worry, it’s simple! Grab your pencil or pen, whichever one you have and make a straight line where you want the cut to be made. So, grab the wood you’re going to be using and hold the pencil against it so you can draw the line. If you need to, you can use a ruler or a straight edge to make sure the line is straight.
Now that the line is drawn, you’ll need to measure the wood to make sure the length of the line is the same as the jigsaw blade. Use a tape measure and make a small mark on each end of the line. This is vital because if you don’t match the length of the line to the length of the saw blade, then you’ll end up with an angled cut that’s not straight.
Once that’s done, it’s time to lift the jigsaw out of the box! I know it looks scary, but you got this. Go ahead and give it a try. If you’re not sure what to do with the jigsaw, no worries. I’ll break it down for you in the next step.
So, there you have it! You’re now ready to move on to the next step and you can already feel the excitement of making that perfect, straight cut with your jigsaw. Who knows, you may even be able to impress your friends by showing off your new skills. See you in the next step, guys!
Step 4
Ok, friends, listen up. We’ve made it this far – congrats! It’s time to take our jigsaw and place it on the wood we marked earlier. Put that blade on the cutting line so you can make your straight cut.
Of course, before you do that, make sure the resources are ready. Is the saw plugged in? Is the blade of the jigsaw sharp enough? Check if the pins are correctly aligned in the saw blade bracket, and also double-check the saw blade’s compatibility with the measured wood material.
Once you’re sure everything is in place, proceed to place the jigsaw onto the wood. Make sure that the blade is facing the correct direction – you don’t want your cut to go the wrong way, do you? It’s also important that it is firmly pressed on the wood and properly aligned with the cuts you plan on making – because, believe it or not, you can actually get misaligned cuts due to slight imperfections in the saw itself.
Finally, make sure the jigsaw is set to the desired cutting speed. Depending on the wood density, you may need a higher or lower cutting speed. In general, the softer the wood, the faster the jigsaw should be set. Conversely, if the wood is hard and thick, you’ll want the saw to be set at a slower speed.
Once the blade speed is set, it’s time to turn it on! Keep a steady hand, and follow the line that you marked earlier. You may need to use a scrap piece of wood near the starts or ends of a long cut to ensure a smooth, accurate transition.
And that’s it! There you have it: all the steps needed to make a straight cut with a jigsaw. Alright, folks, let’s get to it – there no time for stallin’, let’s get those straight cuts made!
Step 5
So you’ve gotten to the half way point and you’re feeling like a jigsaw guru! Step 5 is no different from the rest and you’ll be feeling like even more of a jigsaw bad-a$$ by the time you finish it.
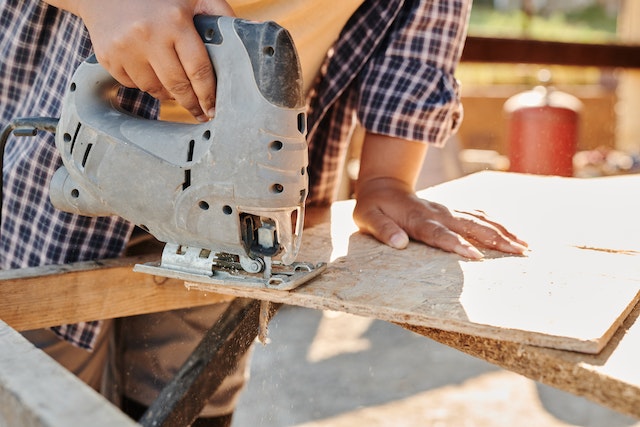
First, take hold of the jigsaw firmly with both hands. Make sure the sides of the saw base are making contact with the wood. As long as you hold firm pressure against the wood, your straight cut will remain smooth and even.
Then, turn your wrist to the left and then to the right. This will help ensure that the saw blade is evenly guiding itself through the material. Once you feel the blade starting to slow down, you can let go of the pressure and ease your cut. Now, quickly repeat this turn and press routine until you reach the end of the cut. It’s important to maintain a consistent pressure throughout your entire cut in order to ensure a smooth finish.
When you feel the blade beginning to slow down at the end of the cut, you know you’re almost there. Now, it’s time to finish off the cut. Move the jigsaw very slowly in a clockwise motion at the end of the cut. This will help to ensure that you get a nice straight line with no jagged edges.
And that’s it! Step 5 complete! Wasn’t so difficult, was it? You already know how to master the mysterious wonders of jigsaw puzzles. Now it’s just a matter of practice and patience. Give this new jigsaw skill a try and you’ll be impressing your family and friends in no time.
Step 6
So you made it to Step 6 – nice work! You’re on the home stretch now. At this point, your hand should be resting on the jigsaw, and your other arm should be resting on the wood to stabilize it. You’ll be using the jigsaw’s trigger to start the cut, and then quickly lifting the arm-rest to guide the blade. This part takes some practice!
Once you get the jigsaw going, it’s time to sink your teeth into the wood. I mean, not literally of course – that would really hurt! Just lower the blade into the wood and begin moving the jigsaw in a forward motion, following the cutting line. When you reach the other end, gently pull the trigger to shut off the jigsaw.
Go ahead and turn the jigsaw off, and move it away from the workpiece. What do you have? A clean straight cut, that was made with the elegance of a master craftsman? Well, not quite. If the cut is a little bit wonky, don’t worry, that’s normal. You made it to Step 6, congratulations! This is where you take a break, and if you’re feeling adventurous, you can find out how to smooth out any flaws in the next step.
Step 7
After completing the above steps, now it’s time for the fun part! Well, total fun! Push the jigsaw and let it cut the wood in a swift and straight motion. Now here comes the surprise – you will notice a loud sound of triumph of success! But it isn’t just that! You should actually feel the entire cutting experience, yes, the smooth and true performance of the jigsaw. This is the most exciting part. You won’t find a better way to make a true, accurate and sharp cut. Moreover, the satisfaction of having finished cauterizing the piece of wood with precision is something that can’t be adequately explained in words.
You will have a good time as the jigsaw does its job. But, don’t forget, safety precautions are paramount in such wood-cutting projects. Use the right settings and keep focused during the entire procedure. Also, make sure the blade doesn’t wander away the cutting line. Now, you’ve experienced the magical moment of making a straight cut with the help of a jigsaw!
And for the grand finish, there is one last thing that needs to be said: congratulations, my friend! You’ve successfully conquered the kingdom of cutting wood with a jigsaw. Whoaaa! You are like a modern-day Edward Scissorhands! Look at my chop chop chop! Now, go out and make more straight cuts to impress your friends and complete your home project with a sense of accomplishment. Who else is this heroic?!!!
Remember, the look on your buddies’ faces will be a pleasant reward for your efforts. Until then – happy wood-cutting!
Step 8

Ok, now you’re almost finished! Step 8 is all about the safety. First things first, make sure the power switch is still in the off position and unplug the jigsaw. Gently place the jigsaw aside, so it won’t be in your way.
Now your jigsaw cutting is complete, it’s really important to follow some safety steps! Make sure to properly clean up the area, so no small pieces of wood are left around the cutting area. Next, inspect the jigsaw blade, making sure it’s not too hot to the touch. Place the blade guard in its rightful place, so no one can improperly use the tool.
And don’t forget to put away the jigsaw! Make sure to store it in a dry place, that’s out of the reach of children and any pets. Make sure to also always keep sharp objects out of reach.
Last, but definitely not least, always make sure to wear eye protection and hearing protection when using a jigsaw. Safety should always come first!
There you have it! You now know how to make a straight cut with a jigsaw! Congratulations, you are now an expert jigsaw user! Go get those cuts done!