How to char wood
Charring wood is a process of burning the surface layer of the wood to create a protective barrier. This can be done for either aesthetic or functional purposes. In this article, we will explore how to char wood using a propane torch.
First, gather your materials. You will need a propane torch, wood chips or shavings, and a metal container. Place the wood chips or shavings in the metal container. Then, light the propane torch and direct the flame towards the wood. Be sure to move the torch around so that all of the wood is evenly charred.
Once you have achieved the desired level of charring, allow the wood to cool completely before handling. The charring process will create a protective barrier on the surface of the wood that will help to prevent moisture damage. Keep in mind that this barrier is not impenetrable, so the wood will still need to be protected from excessive moisture.
Charring wood is a simple process that can have a big impact on the look and durability of your projects. Give it a try the next time you are looking for a unique finish!
What is charring and why do it
Charring wood is a process of burning the surface layer of the wood to create a protective barrier. The char layer protects the underlying wood from further burning, and also from water and insects. charred wood has a very different appearance than unburned wood, and it is also much more resistant to decay.
There are two ways to char wood: using a propane torch or building a small fire.
If you are using a propane torch, start by lighting the torch and adjusting the flame so that it is about six inches long. Hold the torch parallel to the surface of the wood and move it back and forth across the surface, being careful not to stay in one spot for too long. As you move the torch, you will see the charring begin to happen. Continue until you have evenly charred the entire surface of the piece of wood.
If you are building a small fire, start by gathering some small twigs and sticks. Create a teepee-like structure with the sticks, making sure that there is plenty of airflow. Place the piece of wood on top of the teepee and light the fire. Allow the wood to char for about 20 minutes, or until you have achieved the desired level of charring.
Once you have finished charring the wood, allow it to cool completely before handling. Store the charred wood in a dry, protected area until you are ready to use it.
Charring wood is a great way to add both function and beauty to your home.
How to char wood with a blowtorch
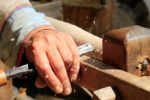
When most people think about woodworking, the first thing that comes to mind is probably using a saw to cut lumber into different shapes and sizes. But there are actually many other ways to work with wood, including charring it. Charring wood is a great way to give it a new look or create unique textures, and it’s surprisingly easy to do. All you need is a blowtorch.
Here’s how to char wood with a blowtorch:
1. Start by using the blowtorch to evenly scorch the surface of the wood.
2. Continue heating the wood until it starts to blacken and char.
3. Once you’re happy with the amount of charring, use a brush to remove any loose pieces of charcoal.
4. That’s it! You’ve now successfully charred wood using a blowtorch.
How to char wood with an open flame
When most people think of woodworking, they think of cutting and shaping the wood with various tools to create a desired product. But what if you want to add a charred, or burnt, look to your project? In this post, we’ll show you how to char wood with an open flame.
You’ll need:
-A piece of wood
-An open flame (a lighter or a torch will work)
-A metal container (optional)
Here’s how to do it:
1. Start by heating up the area you want to char. Move the flame back and forth over the wood until it’s evenly heated.
2. Once the wood is heated, bring the flame closer and hold it in one spot until the wood starts to blacken and char.
3. Continue moving the flame around the wood until you’ve achieved the desired look.
4. If you’re using a metal container, place the wood inside and allow it to smolder until it’s extinguished.
And that’s it! With a little practice, you’ll be able to char wood like a pro. Just remember to use caution when working with an open flame.
How to char wood with a smoker
There are many ways to char wood, but one of the easiest (and most fun) is with a smoker. Smokers use indirect heat to slowly cook the meat or wood, which produces a smoky flavor that is perfect for charcoal grilling. In this tutorial, we will show you how to set up your smoker and how to char wood using it.
First, you will need to gather your supplies. You will need a smoker, wood chunks or chips, and charcoal. If you are using a gas grill, you will also need a smoke box.
Next, you will need to set up your smoker. If you are using a charcoal grill, simply light the coals and let them burn until they are covered in white ash. This usually takes about 30 minutes. If you are using a gas grill, light the burner and place the smoke box on top of the grate.
Now it’s time to add the wood. Soak the wood chunks or chips in water for at least 30 minutes before adding them to the smoker. This will help to produce more smoke. Add the wood to the smoker and close the lid.
Let the smoker do its job and char the wood. This usually takes about 1-2 hours. Once the wood is charred, you can use it for grilling or smoking meat. Just be sure to soak it in water for at least 30 minutes before using it.
Charring wood is a great way to add flavor to your food. With a little practice, you’ll be a pro in no time!
Tips for getting the perfect char on your wood
If you’re looking to add a touch of rustic charm to your home, chars wood is a great way to do it. Chars wood is simply wood that has been burned, and it can give any space an instant update. Here are a few tips for getting the perfect char on your wood:
1. Start by sanding the wood. This will help the charred finish adhere better and also give you a smooth surface to work with.
2. Choose the right type of wood. Hardwoods like oak and maple char well, but softer woods like pine can be more difficult to work with.
3. Use a blow torch or other heat source to evenly char the wood. Slowly move the flame over the surface of the wood until you’re happy with the results.
4. Allow the wood to cool completely before moving on to the next step.
5. Apply a sealant to the wood if you want to protect it from further weathering. This is optional, but it can help prolong the life of your char wood.
With these tips in mind, you’ll be able to create beautiful chars wood pieces for your home that will last for years to come.
The benefits of charring your wood
When most people think of woodworking, they think of the final product: a piece of furniture, a door, or some other object made from wood. But what about the process of getting to that finished product? In order to create something beautiful and functional from wood, you first need to know how to work with it—and that starts with learning how to char wood.
Charring wood is a process of burning the surface of the wood in order to create a protective layer. This layer helps to seal the wood and protect it from rot, pests, and weathering. It also gives the wood a unique appearance that can be used for decorative purposes.
If you’re interested in learning how to char wood, there are a few things you need to know. First, you’ll need to choose the right type of wood. Softwoods like pine and cedar are good choices for beginners because they’re easy to work with. Hardwoods like oak and maple will take longer to char but will eventually produce a deeper, more even color.
Once you’ve selected your wood, you’ll need to gather some supplies. You’ll need a heat source (a blowtorch or handheld propane torch will work), gloves, safety glasses, and a fireproof surface on which to work.
Before you start charring, it’s important to understand the process. Charring wood is essentially controlled burning—you’re carefully igniting the wood and allowing the flames to consume the surface of the wood. As the flames lick at the wood, they’ll create a blackened layer of carbon. This layer is what gives charred wood its unique appearance and protective qualities.
When you’re ready to start charring, begin by igniting your torch and adjust the flame so that it’s about two inches long. Hold the torch about six inches away from the wood and slowly move it back and forth across the surface. As you char, you’ll notice the wood beginning to change color—this is normal! Continue moving the torch until the entire surface of the wood is evenly blackened.
Once the wood is evenly charred, allow it to cool completely. Once it’s cooled, you can use a wire brush to remove any loose carbon from the surface. Your wood is now ready to be used for any number of projects!
Charring wood is a great way to add unique style and protection to your projects. With a little practice, you’ll be able to create beautiful, one-of-a-kind pieces that will last for years to come.
How to char wood
When it comes to charring wood, there are a few things you need to keep in mind. First, make sure the wood is dry and free of any paint or finishes. Second, use a charcoal grill or fireplace with good ventilation – this will help avoid any potential fires. And finally, be patient! It may take a while for the wood to fully char. Follow these tips and you’ll be able to create beautiful pieces of charred wood in no time!